Here in germany (hence the lower/upper quotes) we call it Eisessig, but I think I don’t need that stuff. And from my studies of chemistry some 20 years ago I recall that pH-electrodes are at least sensitive to dry out, so maybe @mountbaldybrewing just had bad luck with his sensor.
2 Likes
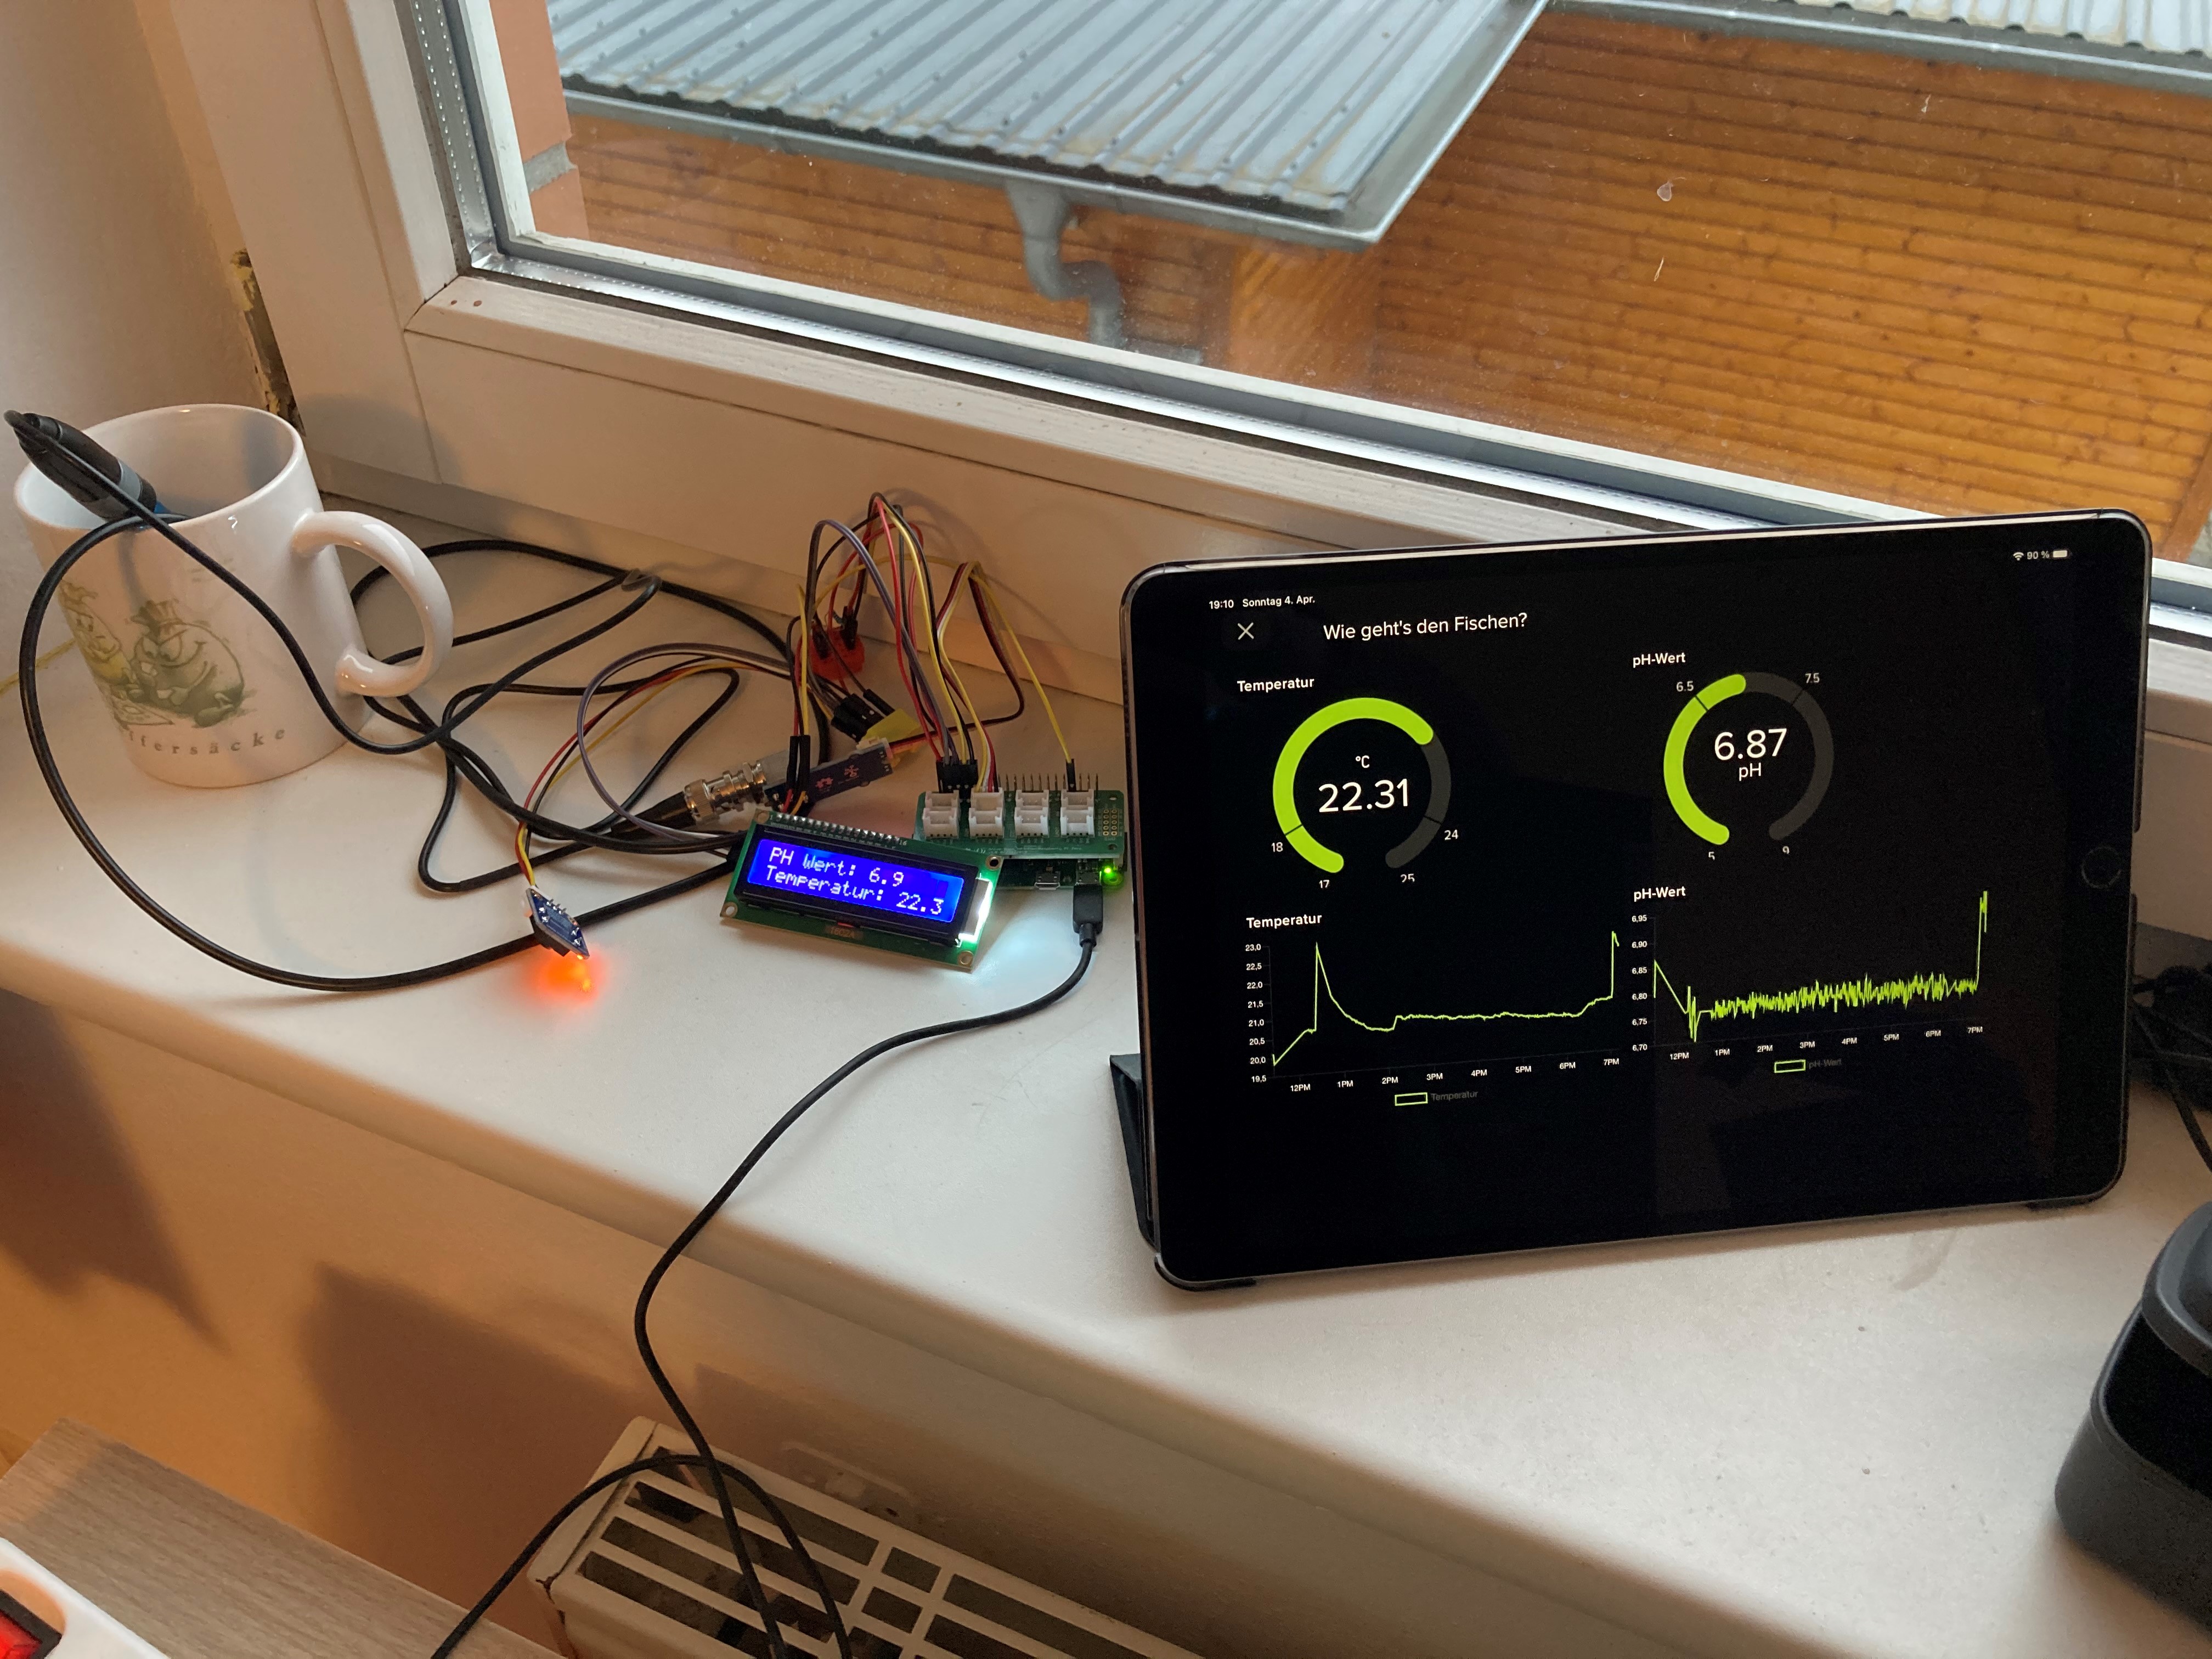
OK, thought I´d give you an update on my project, @jimrh + @aemee. I’ve got my prototype up and running on a pi zero/w. What does it do?
- collects data from a temperature and a pH sensor every 10 seconds
- displays gathered values on a small LCD screen
- LCD screen can be switched on/off with a small button
- pushes gathered values to an adafruit.io stream
- data can be viewed on a dashboard
Considering that i haven´t done anything with GPIO / Python / Cloud data storage / Sensors and Soldering until some weeks ago I think this is quite OK.
Next steps:
- check if the pH-electrode can be calibrated a bit better
- build a housing for all that stuff
- deploy into live aquarium, right now the AquaPi measures values in a cup on my windowsill
2 Likes
I think it’s absolutely FANTASTIC! A phenomenal job!
Pictures maybe? 
That being true, is there a way to re-moisten them and make them work again? What happens if you need to store them?
Back in (U.S.) high school, (think early to middle '70’s), as a senior project I wanted to investigate the relationship between electromotive potential and PH. Unfortunately, getting a platinum reference electrode - or a tank of hydrogen gas - wasn’t trivial for a high-school student. I also wanted to investigate the relationship between extreme cold and “standard” semiconductor components like transistors and such. Cryogenic fluids like liquid nitrogen were also difficult to come by.
Sigh.
At least my teachers were sufficiently impressed with both the ideas presented and the test protocol I proposed for the investigation that I totally aced, (got top marks), for the project.
Just out of curiosity,
Does the instructions say anything about the PH of the shipping solution?
If not, then I would suggest, (though I don’t know for a fact), that the shipping solution is just to keep the sensor moist with the correct chemicals and it may not be meant as a “standard” or “reference” solution.
Perhaps @DocDrum can elaborate?
Pictures maybe?
Your wish is my command:
As I mentioned: It´s a prototype, but it works fine. I think I will replace the display and the switch for it with components with a grove-connector. This reduces wiring and after all I already spent the money for the hat, so why not use it?
As for the pH-electrode, this is what i found in seeeds wiki:
The pH electrode is the most sensitive component of your pH instrument. And the pH electrode cannot be allowed to dry out or freeze. The proper maintenance will provide years of reliable measurement. So the pH electrode care and maintenance is no less important than calibration. Please remember: when it’s not in use, you should wash and keep it in the 3mol Kcl container. The 3mol KCL need you to prepare.
So my guess would be that the shipping solution is 3mol KCL, which should be fairly neutral (fits with my mesurements, at least).
That being true, is there a way to re-moisten them and make them work again? What happens if you need to store them?
My days as a student of chemistry are long gone and electrochemistry never was my favourite subject. As far as I remember the electrodes we used were stored in a buffer solution. It should be possible to “water” a dried electrode and make it work again, but I don’t know what would be the best way to do this. I also wonder how long my electrode will work if it is permanent use within an aquarium. With lots of organic substances in the water my guess would be that I should plan for maintenance and cleaning of the electrode …
4 Likes
HOLY SMOKES!
That is a TOTALLY righteous setup!
If you’re going to re-package it, how about a Pi with the 7" touch-screen and an Element-14 case.
Do you have a repo where you store code? I’m sure there are more than a few people who want to see how you did it - especially that totally cool-beanies dashboard.
Maybe you should send in an article about it to MagPi magazine? I’d read it in a heartbeat!
Oh, I don‘t deserve much kudos for the dashboard. Adafruit does the work here, all I do is post my values and do a little bit configuration and layout. I‘ll stick with a LCD display for showing the values, a Touchscreen sounds nice but would really be over the top for now.
Unfortunately I don‘t have a repo for code, I‘ll post it here after some refactoring and integrating the grove LCD and Button.
1 Like
What kind of LCD display is it? Does it run off of the Pi’s display port?
Just a small 16x2 LCD Display as seen in the picture above. The current one is connected to the I2C-Ports on the GPIO, the new one will come with a grove connector, so that I can plug it into the hat and also runs via I2C. I will have to use the seeed-Libraries to print values on the display I think, but I have those installed anyway for the pH-electrode.
1 Like
I’d still send to MagPi, and maybe even to Adafruit, they love this stuff.
Don’t knock yourself or your contributions. Builders don’t necessarily cut the wood or make the bricks, but they still build the house!
Which screen? I’m looking for an i2c display for my 'bot.
Total props and respect for you!
P.S.
If you’re going to spend any time with this stuff experimenting, you will need to get yourself a GitHub repo. It’s almost like the name-badge at a conference. . .
Not to mention it’s cheap insurance against the dreaded “type, type, type, OH SH**T!!!” moments. 
1 Like
Agree. At the very least consider posting an Instructable.
/K
1 Like
@DocDrum great work - can you elaborate on what code you used? I’m not asking you to share all your work with the world, just the part which does the calculation of the PH and voltage. I used the out of the box code from seeedstudio which comes with their adjustment values built in and havent had time to play with it yet:
#define SensorPin A0 //pH meter Analog output to Arduino Analog Input 0
#define Offset 0.00 //deviation compensate
#define LED 13
#define samplingInterval 20
#define printInterval 800
#define ArrayLenth 40 //times of collection
int pHArray[ArrayLenth]; //Store the average value of the sensor feedback
int pHArrayIndex=0;
void setup(void)
{
pinMode(LED,OUTPUT);
Serial.begin(9600);
Serial.println(“pH meter experiment!”); //Test the serial monitor
}
void loop(void)
{
static unsigned long samplingTime = millis();
static unsigned long printTime = millis();
static float pHValue,voltage;
if(millis()-samplingTime > samplingInterval)
{
pHArray[pHArrayIndex++]=analogRead(SensorPin);
if(pHArrayIndex==ArrayLenth)pHArrayIndex=0;
voltage = avergearray(pHArray, ArrayLenth)5.0/1024;
pHValue = 3.5voltage+Offset;
samplingTime=millis();
}
if(millis() - printTime > printInterval) //Every 800 milliseconds, print a numerical, convert the state of the LED indicator
{
Serial.print(“Voltage:”);
Serial.print(voltage,2);
Serial.print(" pH value: ");
Serial.println(pHValue,2);
digitalWrite(LED,digitalRead(LED)^1);
printTime=millis();
}
}
double avergearray(int arr, int number){
int i;
int max,min;
double avg;
long amount=0;
if(number<=0){
serial.println(“Error number for the array to averaging!”);
return 0;
}
if(number<5){ //less than 5, calculated directly statistics
for(i=0;i<number;i++){
amount+=arr[i];
}
avg = amount/number;
return avg;
}else{
if(arr[0]<arr[1]){
min = arr[0];max=arr[1];
}
else{
min=arr[1];max=arr[0];
}
for(i=2;i<number;i++){
if(arr[i]<min){
amount+=min; //arr<min
min=arr[i];
}else {
if(arr[i]>max){
amount+=max; //arr>max
max=arr[i];
}else{
amount+=arr[i]; //min<=arr<=max
}
}//if
}//for
avg = (double)amount/(number-2);
}//if
return avg;
2 Likes
Actually I found working pyton code right in this thread (Grove - PH Sensor Kit (E-201C-Blue) Raspberry pi Zero - #16 by cyclicalobsessive). I more or less used the GrovePH-Class, this is my current code for reading the pH-Value
import math
import sys
import time
from grove.adc import ADC

# CONSTANTS
Vref = 4.95   # volts
Vcal_mv = 646  # milli-volts (using raw value 535 * 4.95/4096 * 1000)
#Vcal_mv = 2588  # milli-volts (using raw value 535 * 4.95/1023 * 1000)  note 10-bit A2D
mv_per_ph = 59.6
ph_per_mv = 1.0 / mv_per_ph


class GrovePH:

    def __init__(self, channel):
        self.channel = channel
        self.adc = ADC()


    @property
    def PH(self):
        value = self.adc.read(self.channel)
        if value != 0:
            voltage_mv = value * Vref / 4096.0 * 1000
            #voltage_mv = value * Vref / 1023.0 * 1000
            PHValue = 7 - ((voltage_mv - Vcal_mv) * ph_per_mv)
            return PHValue
        else:
            return 0


def main():

    #if len(sys.argv) < 2:
    #    print(‘Usage: {} adc_channel’.format(sys.argv[0]))
    #    sys.exit(1)

    #sensor = GrovePH(int(sys.argv[1]))
    sensor = GrovePH(0)

    print('Detecting PH...')

    while True:
        try:
            print('PH Value: {:2.1f}'.format(sensor.PH))
            time.sleep(1)
        except KeyboardInterrupt:
            print("\nExiting...")
            sys.exit(0)

if __name__ == '__main__':
    main()
Right now I don’t do any fancy averaging of values, simply read the value once in 10 seconds and use it. I will try to do some calibration and fiddling with the constants used in the calculation of the pH, but since I still get a very good reading of 7 for my tap water here this is not on the top of the to-do-list.
1 Like
This screen is what I ordered:
You can get cheaper ones without a grove connector, but I wanted to simplify the connection of the screen. Should arrive tomorrow, then I will do some redesign of the hard- and software on the weekend if I find time for it. If erverything is up and running and I still find more time then maybe I will post the project somewhere.
1 Like
thanks - whats your h/w setup and how is it connected? Are you using arduino in there? I was going to use pi–>arduino–>pi sensor but was going to get the arduino code working first then sort out the interfacing to the pi
1 Like
I was curious about the large tablet-like screen shown in your first picture. That looks awesome and if it uses i2c, that would be totally wizard for my 'bot.
I don´t use arduino. My Hardware setup for pH-Measurement is
- Raspberry pi zero/w
- Grove Base Hat
- seeed PH Sensor Kit (E-201C-Blue)
Using this setup it was nearly plug-and-play for the pH-Measurement.
For Temperature Measurement I use a DS18B20 Temperature Sensor, connected via 1-Wire to GPIO. LCD Display and Button are connected to I2C and GPIO, but will be replaced with grove-components and will be connected to the Base Hat in the next Version.
1 Like
I was curious about the large tablet-like screen shown in your first picture. That looks awesome and if it uses i2c, that would be totally wizard for my 'bot.
The large screen is my iPad showing the dashboard , sorry to have to disappoint you there.
1 Like
Ups, I just noticed that some of my posts are now hidden because I have a tendency to post links to the components I used. This seems to look like advertising for the forum community here. Sorry, I wasn´t aware of the guidelines and will stop including links from now on.
1 Like