@DocDrum That is the same board I have. As @jimrh explained, Grove is simply a style of connector wired in a certain pinout. The Grove board just makes it simple to plug things in to the pi and provide Digital/Analog/I2C/PWM/UART connections easily. Yes these are all already built into the pi. It just provides an easy way to connect things.
I am successfully using the TDS and temp sensors provided by SEEED. Their pH probe never gave me accurate readings. I believe it was a problem specific to the probe. I have used their probe on multiple manufacturers boards now and have had similar results. I believe my issue stemmed from the fact that the probe was shipped to me in the middle of Winter and likely experienced sub zero temperatures. I also believe the probe dried out (which will cause faulty readings). To exasperate things, the probe also never would “calibrate” properly as the voltage readings were never stable. If I get time, I’ll test my new probe on the arduino and test my therory.
That said, I DID get the AnyLeaf sensor and probe to work this morning on a raspberry pi zero. The developer is currently fixing the code for the arduino for the AnyLeaf sensor. For more information on AnyLeaf sensors, check this link out. AnyLeaf sensors
I believe the code we had posted in this thread was working. I believe my issue with the faulty unstable readings was more of a function of a faulty sensor. Do give this a go. I think you may be able to get things working.
My project is at the tail end of things and I have now spent more time and money on to try and save a buck. I should have purchased either the Atlas or AnyLeaf sensor from the begining. Lesson learned, you get what you pay for.
I do wish you all the best of luck in your efforts. I do still have a “working” version of the code. I can repost it here ifyou would like it.
When I connected things up I just plugged the hat into the GPIO pins on the pi. It has been up and running the sensors I mentioned for the past few months with zero issues.
Thanks a lot, I would be grateful for a repost of the code. I‘ll try to calibrate the probe, but without standardized buffer solutions this will be tricky. First go will be distilled water which should give a pH of 7. I won’t spend that much money on this project, since it’s more of educational use to me. The aquarium I would like to monitor is a simple beginners fish tank, nothing exotic so no lives depend on an accurate pH there.
Well, well, well …
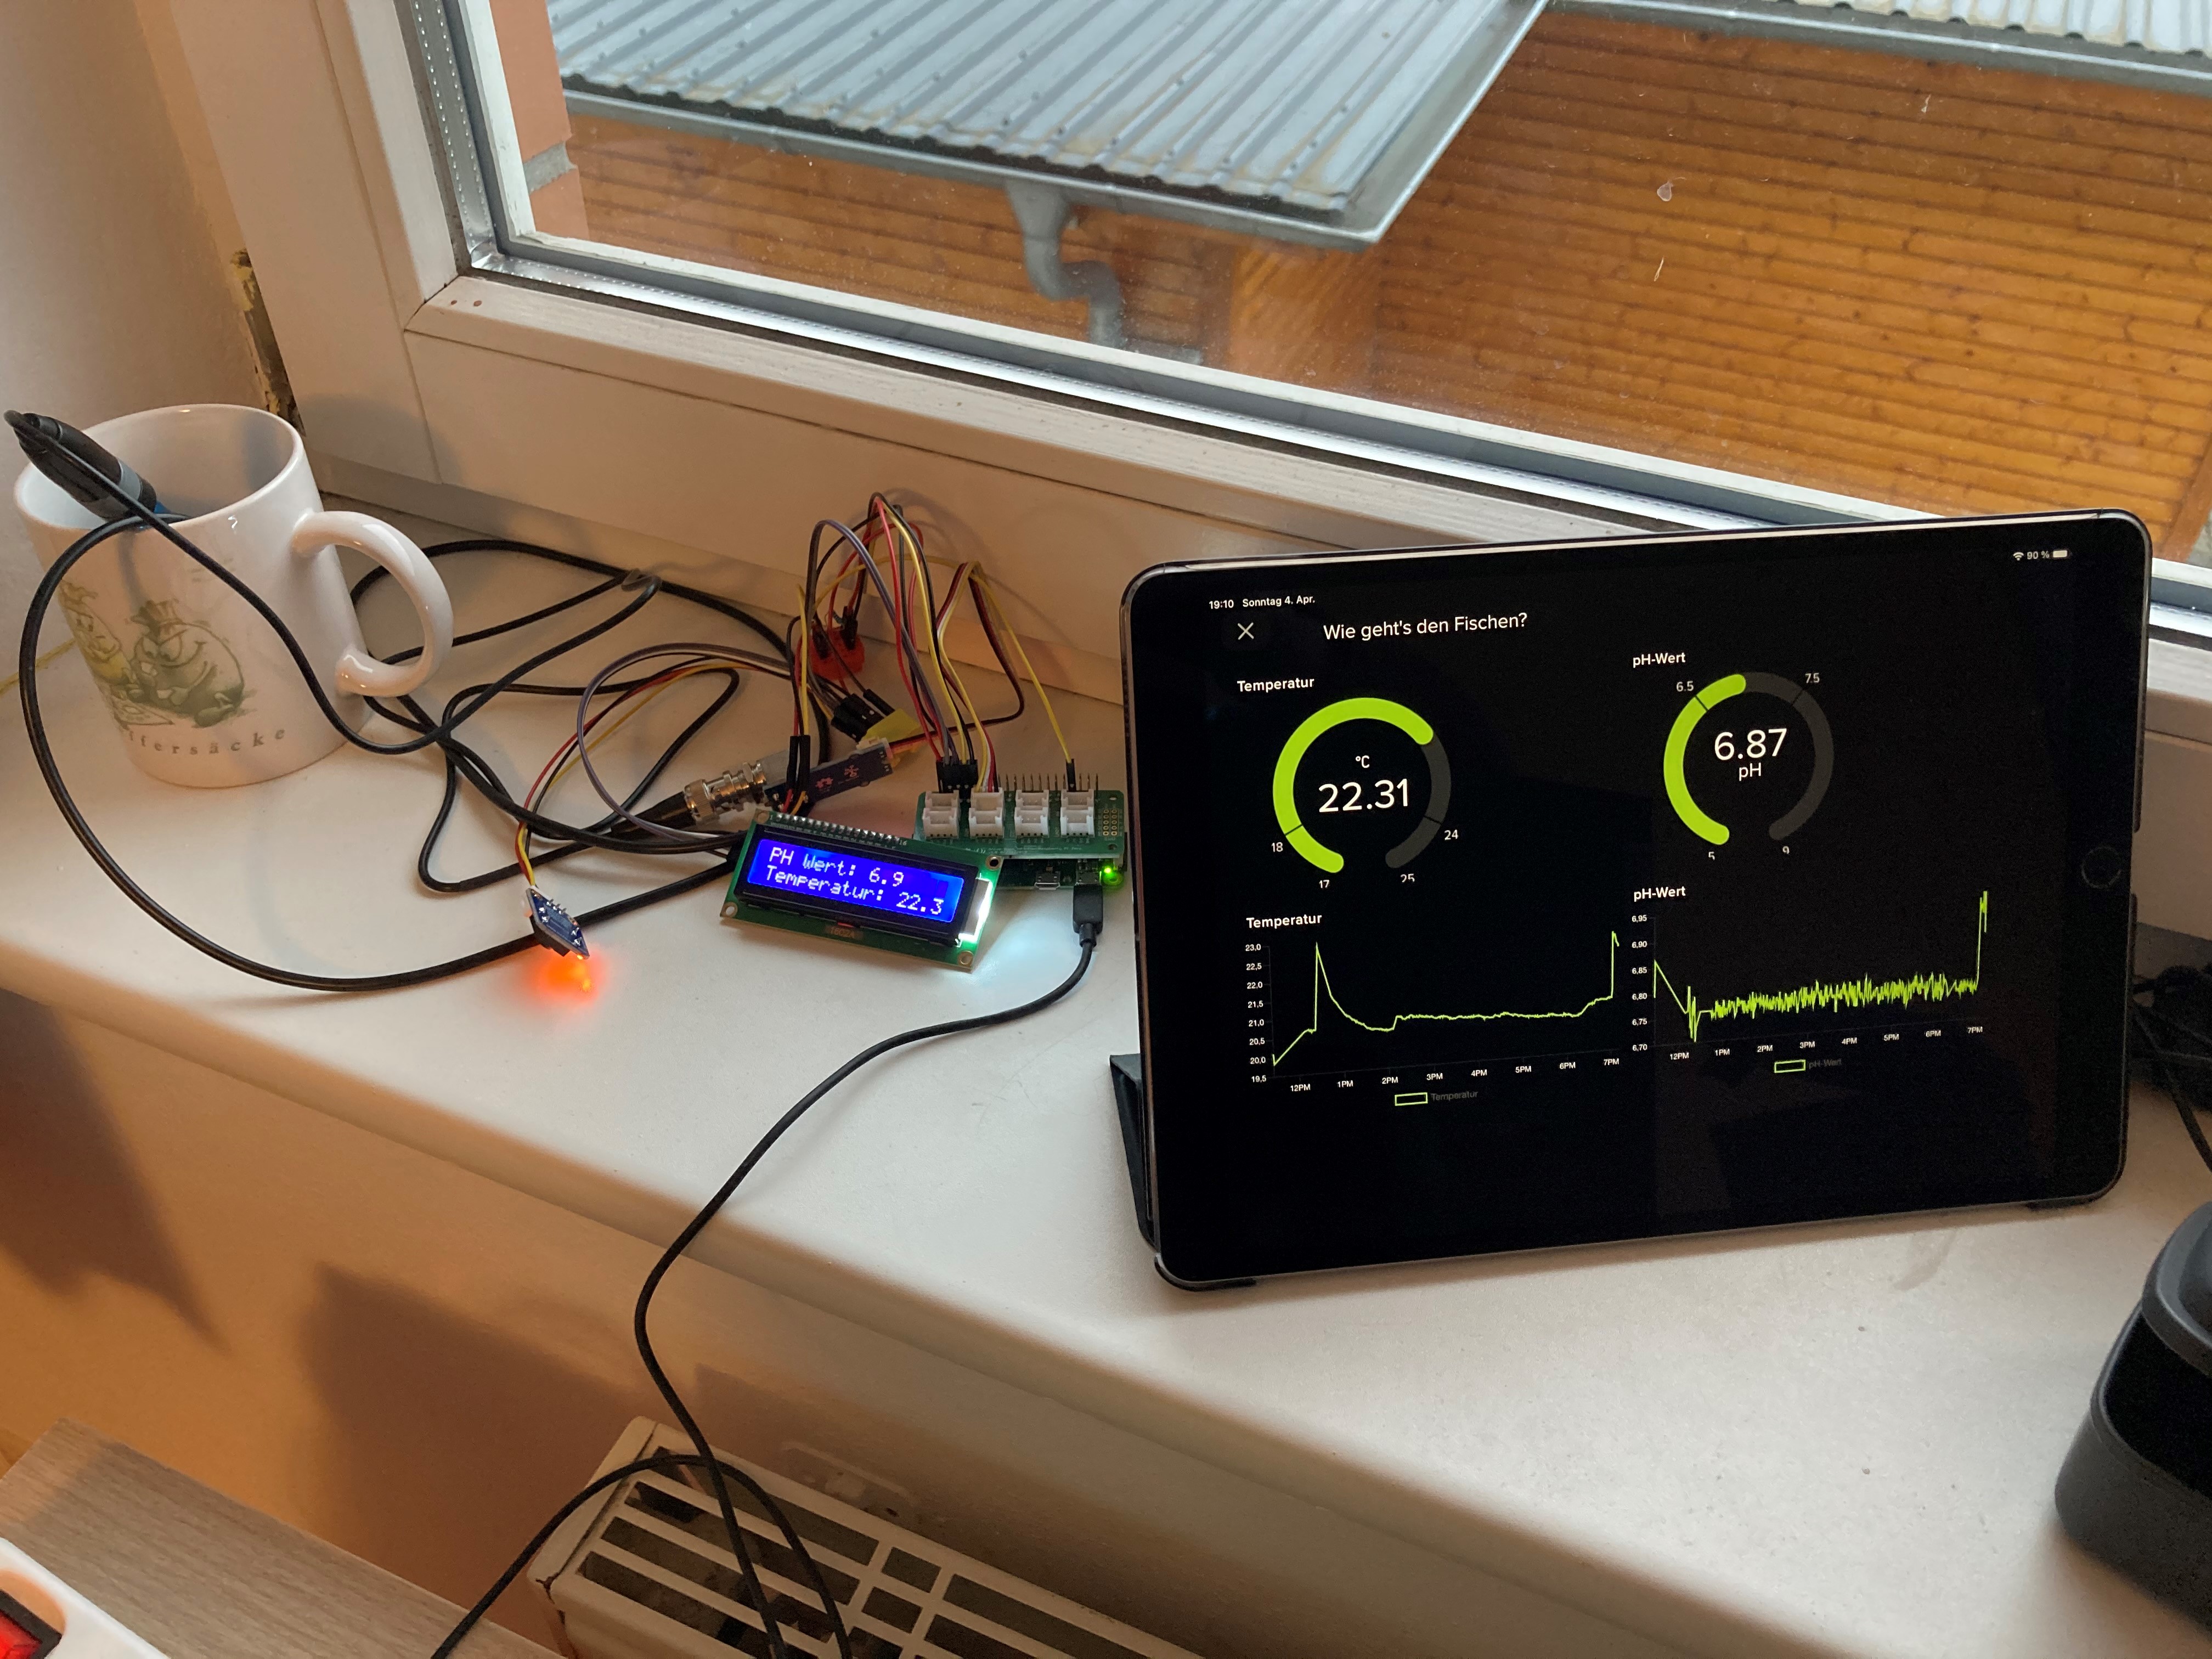
Plugged everything together, took @cyclicalobsessive code from way above here and this is what I get from the buffer solution the electrode ships with:
Not to bad, I would say. Plus: number of fried Raspberry-Pis: zero
Now where was that vinegar to do some testing of acidic solutions …
OK, edit:
Tap Water (don’t have deonized or distilled water here) gives a straight 7.0
Adding a dash of vinegar: pH drops to 5.4
Washing Powder in Water: pH goes up to 7.8
The chemist in me is happy, I will get distilled water after the easter holidays or try to get my hands on some buffer solutions for finer calibration.
Next steps: try to integrate this sensor into reef-pi (https://reef-pi.github.io/) or code something to record the values and show some nice dashboard.
The supply voltage tells you what the logic levels are. In this case you can use it on either a 3.3v system, (like the Pi), or a 5v system (like the Arduino).
So long as the “supply voltage” is the same, you’re golden.
I really do have to take a moment and endorse what @mountbaldybrewing said about “getting what you pay for”. If you’re doing this “just for the Sh*ts and Grins” of it - then please experiment and let us know what happens. However - if you really want to accomplish something and not just be jerking yourself around, you may want to go with a proven “solution” ( Bad pun, given the context.)
I, myself, tend to go “all lobster” stubborn on a project, invest major time and money, only to find out that had I spent a few extra dollars at the inception of the project, it would have taken 30 minutes instead of three months.
Far be it from me to tell you what to do or how to do it, but - since you are at the project inception stage - you may want to take a step back, a few deep breaths, and think carefully about project goals before going down what may be a rabbit hole.
Of course, I’m the pot calling the kettle black here with that one - I do the same thing all the time!
Maybe this has nothing to do with it at all, or maybe it does, but (unfortunately) the Raspberry Pi Foundation isn’t exactly a Gold Medal Winner when it comes to compliance to established spec’s.
Viz.:
The “hardware” i2c interface on the Raspberry Pi has been plagued with The Infamous Raspberry Pi Clock-Stretching Bug as noted above and is why Dexter/Modular Robotics wrote their own software-based i2c libraries.
Is it Raspberry Pi’s fault? Especially since this seems to go back to The Dawn Of Time with no hint of a resolution, this may actually be a Broadcomm hardware issue as opposed to a balls-up by the Raspberry Pi people. Regardless of who’s to blame, it’s something to be aware of when working with i2c on the Pi.
I noticed this after I posted my reply. . . . Sounds like you’ve got a winner!
(side note to @mountbaldybrewing: I never knew that pH probes could “freeze” or “dry out”. Thanks! It appears yours did both - freeze-dried pH probes?)
You are obviously doing much better than he was, his readings were all over Hell and Half of Texas, and that’s BEFORE he connected power! ()
Seriously, it’s nice to have someone to validate his assumptions and conclusions about his probe having issues. Total respect and many thumbs up!
I don’t know where you are, (the interesting lower-and-upper quotes in one of your replies has my curiosity riz, as the mountain 'folks I’m related to used to say. . .), but here in Russia they sell a nearly 80% “vinegar acid” (acetic acid) in the grocery stores that’s used in dilution for making pickles.
Here in germany (hence the lower/upper quotes) we call it Eisessig, but I think I don’t need that stuff. And from my studies of chemistry some 20 years ago I recall that pH-electrodes are at least sensitive to dry out, so maybe @mountbaldybrewing just had bad luck with his sensor.
Considering that i haven´t done anything with GPIO / Python / Cloud data storage / Sensors and Soldering until some weeks ago I think this is quite OK.
Next steps:
check if the pH-electrode can be calibrated a bit better
build a housing for all that stuff
deploy into live aquarium, right now the AquaPi measures values in a cup on my windowsill
That being true, is there a way to re-moisten them and make them work again? What happens if you need to store them?
Back in (U.S.) high school, (think early to middle '70’s), as a senior project I wanted to investigate the relationship between electromotive potential and PH. Unfortunately, getting a platinum reference electrode - or a tank of hydrogen gas - wasn’t trivial for a high-school student. I also wanted to investigate the relationship between extreme cold and “standard” semiconductor components like transistors and such. Cryogenic fluids like liquid nitrogen were also difficult to come by.
Sigh.
At least my teachers were sufficiently impressed with both the ideas presented and the test protocol I proposed for the investigation that I totally aced, (got top marks), for the project.
Does the instructions say anything about the PH of the shipping solution?
If not, then I would suggest, (though I don’t know for a fact), that the shipping solution is just to keep the sensor moist with the correct chemicals and it may not be meant as a “standard” or “reference” solution.
As I mentioned: It´s a prototype, but it works fine. I think I will replace the display and the switch for it with components with a grove-connector. This reduces wiring and after all I already spent the money for the hat, so why not use it?
As for the pH-electrode, this is what i found in seeeds wiki:
The pH electrode is the most sensitive component of your pH instrument. And the pH electrode cannot be allowed to dry out or freeze. The proper maintenance will provide years of reliable measurement. So the pH electrode care and maintenance is no less important than calibration. Please remember: when it’s not in use, you should wash and keep it in the 3mol Kcl container. The 3mol KCL need you to prepare.
So my guess would be that the shipping solution is 3mol KCL, which should be fairly neutral (fits with my mesurements, at least).
That being true, is there a way to re-moisten them and make them work again? What happens if you need to store them?
My days as a student of chemistry are long gone and electrochemistry never was my favourite subject. As far as I remember the electrodes we used were stored in a buffer solution. It should be possible to “water” a dried electrode and make it work again, but I don’t know what would be the best way to do this. I also wonder how long my electrode will work if it is permanent use within an aquarium. With lots of organic substances in the water my guess would be that I should plan for maintenance and cleaning of the electrode …
If you’re going to re-package it, how about a Pi with the 7" touch-screen and an Element-14 case.
Do you have a repo where you store code? I’m sure there are more than a few people who want to see how you did it - especially that totally cool-beanies dashboard.
Maybe you should send in an article about it to MagPi magazine? I’d read it in a heartbeat!
Oh, I don‘t deserve much kudos for the dashboard. Adafruit does the work here, all I do is post my values and do a little bit configuration and layout. I‘ll stick with a LCD display for showing the values, a Touchscreen sounds nice but would really be over the top for now.
Unfortunately I don‘t have a repo for code, I‘ll post it here after some refactoring and integrating the grove LCD and Button.
Just a small 16x2 LCD Display as seen in the picture above. The current one is connected to the I2C-Ports on the GPIO, the new one will come with a grove connector, so that I can plug it into the hat and also runs via I2C. I will have to use the seeed-Libraries to print values on the display I think, but I have those installed anyway for the pH-electrode.
I’d still send to MagPi, and maybe even to Adafruit, they love this stuff.
Don’t knock yourself or your contributions. Builders don’t necessarily cut the wood or make the bricks, but they still build the house!
Which screen? I’m looking for an i2c display for my 'bot.
Total props and respect for you!
P.S.
If you’re going to spend any time with this stuff experimenting, you will need to get yourself a GitHub repo. It’s almost like the name-badge at a conference. . .
Not to mention it’s cheap insurance against the dreaded “type, type, type, OH SH**T!!!” moments.

 …
… Bad pun, given the context.)