Thank you for your reply. This was an interesting article and I decided that because I am not using Bluetooth in my project I would add the following lines to my config.txt file
enable_uart=1 # this was already set by me
pi3-disable-bt
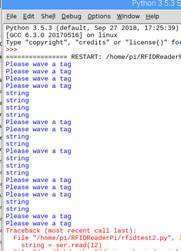
then I ran the test code shown below. It seems to be okay but the print statement returns the word string not the id of the tag. I am not familiar with python, can you advise how I can get the tag id?
Kind regards
Anwar
import serial
For PiB+ 2, Zero use:
ser = serial.Serial(’/dev/ttyAMA0’, 9600, timeout=1)
I am having issues using this code with a Raspberry pi 4 and a Grove 125kHz reader. Before actually reading the tag, the first few attempts result in many printed strings looking like 'x80\x00\xf8 etc.
After some time and some attempts, the RFID ID does get read, but then never again. The system seems to fail to read it again.
Has anyone else encountered this issue before?
Thanks for any help!
Hy there. I’m having the same issues like @csilla92. I’m really new in to this and I was really happy to get something but the result is not that what I want.
I can read the tags once or twice, sometimes 3 times but then it’s over. Also the little green LED on the Reader is not working anymore. If I stop and start the script again, It works again for a few times.
This is my Hardware
RP4
GrovePi+
Grove 125kHz rfid Reader
This is the python code I use:
import serial
import time

rpiser = serial.Serial("/dev/ttyS0", 9600, timeout=1)
rpiser.flush()

print("active, waiting...")

while True:

    rng = rpiser.read(100)
    if len(rng) != 0:
        print (rng)
I tried diffrent numbers. I had no plan at the begining then I read somewhere that these are the bytes to read. A unique ID of a rfID seems to have 4 to 8 bytes, debends on the tag-technology (see here). With reading 12 I see no difference.
I tried also to flush after the read, but the script finished after the first try looking like this
I got a new question. There is a difference if i execute the script with sudo python rfid_new.py or sudo python3 rfid_new.py. Which one I should use?
Here is my actual code:
import serial
import time

rpiser = serial.Serial("/dev/ttyS0", 9600, timeout=1)
rpiser.flush()

print("active, waiting...")

while rpiser.inWaiting() == 0:
    time.sleep(0.005)
    rng = rpiser.read(12)
    if rng != "":
        print (rng)
If I execute with Python 3 it prints a b'' every time if it passes the while loop. Executing it with the older Version of Python writes only active, waiting... and prints just a line if I wave a tag over the antenna.
Me too and that’s why I have no idea what kind of data I’m expecting as result. I thought it’s a unique ID.
since you are starting out new with python, I suggest you stick with the newer Python3
Especially since the SerialAPI that you are using is different between the versions:
Python2.x: rpiser.inWaiting() returns number of bytes ready in serial stream
Python3.x: rpiser.in_waiting returns number of bytes ready in serial stream
(Python2.x it is a method, but in Python3 it is a property so no parenthesis)
Basic flow should probably be:
Main Loop
wait until bytes in the serial buffer
read the bytes
print the bytes
end of loop
“sudo” is needed to access the serial port? no problem, just wondering.
I would be interested in what this does:
#!/usr/bin/env python3

# FILE: try1.py

# USAGE:  sudo python3 try1.py

# REFERENCES:
#  Serial API: https://pyserial.readthedocs.io/en/latest/pyserial_api.html
#  Grove RFID Sensor: https://wiki.seeedstudio.com/Grove-125KHz_RFID_Reader/

import serial
import time

rpiser = serial.Serial("/dev/ttyS0", 9600, timeout=1)
rpiser.flush()

while True:
    print("active, waiting...")

    # wait until first byte is seen in the serial stream
    while rpiser.in_waiting == 0:        # note that in_waiting is a property in Python3
        time.sleep(0.005)

    # Bytes coming in!  Wait until the 1s timeout to get them all
    time.sleep(1.0)
    bytes_available = rpiser.in_waiting
    print("Tag Detected with {} bytes ready".format(bytes_available))
    rng = rpiser.read(bytes_available)
    print("RFID Info:{}:".format(rng))
    print("RFID Info without first byte:{}:".format(rng[1:]))
pi@raspberrypi:~/Dexter/GrovePi/Software/Python $ sudo python3 rfid_new2.py
active, waiting...
Tag Detected with 0 bytes ready
RFID Info:b'':
RFID Info without first byte:b'':
active, waiting...
#!/usr/bin/env python3

# FILE: try2.py

# USAGE:  sudo python3 try2.py

# REFERENCES:
#  Serial API: https://pyserial.readthedocs.io/en/latest/pyserial_api.html
#  Grove RFID Sensor: https://wiki.seeedstudio.com/Grove-125KHz_RFID_Reader/

import serial
import time

rpiser = serial.Serial("/dev/ttyS0", 9600, timeout=1)
# rpiser.flush()  # this is for writing, don't think it is needed when only reading

while True:
    rng = rpiser.read(100)
    if len(rng) != 0:
        print("\n")
        print("Tag Detected {} bytes".format(len(rng)))
        print("RFID Info--{:02x}--".format(rng))
    else:
        print("active, waiting...",end="")   # print w/o scrolling
Some good news for the start of the new week. I just googled a lot during the last days I found something to configure the serial port. I think it’s working now with your old script you sent. And also the script is not crashing after 3 trys.
here the results I got:
pi@raspberrypi:~/Dexter/GrovePi/Software/Python $ sudo python3 rfid_new2.py
active, waiting...
Tag Detected with 15 bytes ready
RFID Info:b'\xfe\xff\xff\xfe\xfe\xff\xff\xfe\xfe\xff\xff\xff\xff\xfe\xff':
RFID Info without first byte:b'\xff\xff\xfe\xfe\xff\xff\xfe\xfe\xff\xff\xff\xff\xfe\xff':
active, waiting...
Tag Detected with 15 bytes ready
RFID Info:b'\xfe\xff\xff\xfe\xfe\xfe\xff\xff\xfe\xff\xfe\xff\xff\xfe\xff':
RFID Info without first byte:b'\xff\xff\xfe\xfe\xfe\xff\xff\xfe\xff\xfe\xff\xff\xfe\xff':
active, waiting...
Tag Detected with 13 bytes ready
RFID Info:b'\xff\xfe\xff\xfe\xff\xff\xfe\xff\xfe\xff\xfe\xff\xfe':
RFID Info without first byte:b'\xfe\xff\xfe\xff\xff\xfe\xff\xfe\xff\xfe\xff\xfe':
active, waiting...
^CTraceback (most recent call last):
  File "rfid_new2.py", line 22, in <module>
    time.sleep(0.005)
KeyboardInterrupt
I’m two steps further minimum
Now I have the problem to intrepret the result. I tried with
print(rng.decore('utf-8'))
I got the message:
UnicodeDecodeError: 'utf-8' codec can't decode byte 0xff in position 0: invalid start byte
Here again the code I used:
#!/usr/bin/env python3

# FILE: try1.py

# USAGE:  sudo python3 try1.py

# REFERENCES:
#  Serial API: https://pyserial.readthedocs.io/en/latest/pyserial_api.html
#  Grove RFID Sensor: https://wiki.seeedstudio.com/Grove-125KHz_RFID_Reader/

import serial
import time

rpiser = serial.Serial("/dev/ttyS0", 9600, timeout=1)
rpiser.flush()

while True:
    print("active, waiting...")

    # wait until first byte is seen in the serial stream
    while rpiser.in_waiting == 0:        # note that in_waiting is a property in Python3
        time.sleep(0.005)

    # Bytes coming in!  Wait until the 1s timeout to get them all
    time.sleep(1.0)
    bytes_available = rpiser.in_waiting
    print("Tag Detected with {} bytes ready".format(bytes_available))
    rng = rpiser.read(bytes_available)
    print("RFID Info:{}:".format(rng))
    print("RFID Info without first byte:{}:".format(rng[1:]))
    # print(rng.decode('utf-8'))
It would be great if you have still any ideas! But already a huge thank you!!
Of course I tried all. And of course I also tried to switch the Jumper. And finally of course I forgot to put it back.
The Jumper is now on the left side again and the result is much diffrent:
pi@raspberrypi:~/Dexter/GrovePi/Software/Python $ sudo python3 rfid_new2.py
active, waiting...
Tag Detected with 14 bytes ready
RFID Info:b'\x0214005AD657CF\x03':
RFID Info without first byte:b'14005AD657CF\x03':
active, waiting...
^CTraceback (most recent call last):
  File "rfid_new2.py", line 23, in <module>
    time.sleep(0.005)
KeyboardInterrupt
Seems like I got the ID of the RFID or what do you think?
#!/usr/bin/env python3

# FILE: rfid_read.py

# USAGE:  sudo python3 rfid_read.py

# REFERENCES:
#  Serial API: https://pyserial.readthedocs.io/en/latest/pyserial_api.html
#  Grove RFID Sensor: https://wiki.seeedstudio.com/Grove-125KHz_RFID_Reader/

import serial
import time

rpiser = serial.Serial("/dev/ttyS0", 9600, timeout=1)
rpiser.flush()

while True:
    print("active, waiting...")

    # wait until first byte is seen in the serial stream
    while rpiser.in_waiting == 0:        # note that in_waiting is a property in Python3
        time.sleep(0.005)

    # Bytes coming in!  Wait until the 1s timeout to get them all
    time.sleep(1.0)
    bytes_available = rpiser.in_waiting
    print("Tag Detected with {} bytes ready".format(bytes_available))
    rfid = rpiser.read(bytes_available)
    print("RFID Info:{}:".format(rfid))
    print("RFID Info without first and last byte:{}:".format(rfid[1:-1]))
pi@raspberrypi:~/Dexter/GrovePi/Software/Python $ sudo python3 rfid_new2.py
active, waiting...
Tag Detected with 14 bytes ready
RFID Info:b'\x02380040B539F4\x03':
RFID Info without first and last byte:b'380040B539F4':
active, waiting...
I’m very thankfull for the help of @cyclicalobsessive !!
I hope this will help in future!
For those of you who have never dealt with Wiegand access control cards, a Wiegand card is a plastic card, about the same size as a credit card, that has two rows of metal pins across the bottom of the card. One row is the “bit” row and the other row is the “clock” row. The presence of a metal pin in the bit row indicates a “1” and the absence of a pin indicates a “0”
A Wiegand reader has four wires: +5, ground, data, and clock - which are driven low when an associated pin is read within the card.
Here are two interesting articles, one on the interface itself and the other on the Wiegand effect.
I used to work with the “original” swipe-type Wiegand cards in the middle 90’s when I was working for a big access control system manufacturer on Long Island.
The readers had a distinctive shape and were potted with what can only be described as kryptonite () because it required an atomic blast to remove it. (And yes, I tried.)
Back when I was working with access control systems I was told that the Wiegand interface had two signal lines:
A “1” bit line
A “0” bit line
And depending on which row on the card had a wire, either the “1” or “0” line would toggle.
Today while I was researching this, I found a site that claimed that a Wiegand card had one row of wires for data and the second row was a “clock” row, with all bit positions occupied to generate a coherent clock for the data.
“Hmmm. . .” I thought. “That’s not the way I remember it, but who knows, that that was a long time ago. And who knows, I could be loosing my grip.”
Turns out that when I read the physical interface part of the Wikipedia article on Wiegand, they mentioned two things:
The canonical version of the Wiegand interface and card design had two data rows, one for the “1” bit and the other for the “0” bit, (like I remembered), and the two data lines were the “1” and “0” data bit lines.
— AND —
Because of the physical data limits of a Wiegand card, (only a limited number of bits could be programmed into the card before data integrity issues raised their ugly head), other formats were created to try to overcome this limitation.
 and that’s why I have no idea what kind of data I’m expecting as result. I thought it’s a unique ID.
 I found something to configure the serial port. I think it’s working now with your old script you sent. And also the script is not crashing after 3 trys.
 ) because it required an atomic blast to remove it. (And yes, I tried.)