I am using GoPiGo3, PS4 Dualshock Controller, Raspberry Pi 4, with Raspian (Legacy) and Python 3.7.3. I have followed this tutorial to connect my PS4 controller via bluetooth: Connect PS4 Controller to Raspberry Pi and Python - YouTube and it successfully connects. When running my Controller.py script all buttons are recognised but the motors do not run.


1 Like
You are showing that some controller buttons are being recognized, but I have not seen that it is executing any of your overloaded buttons.
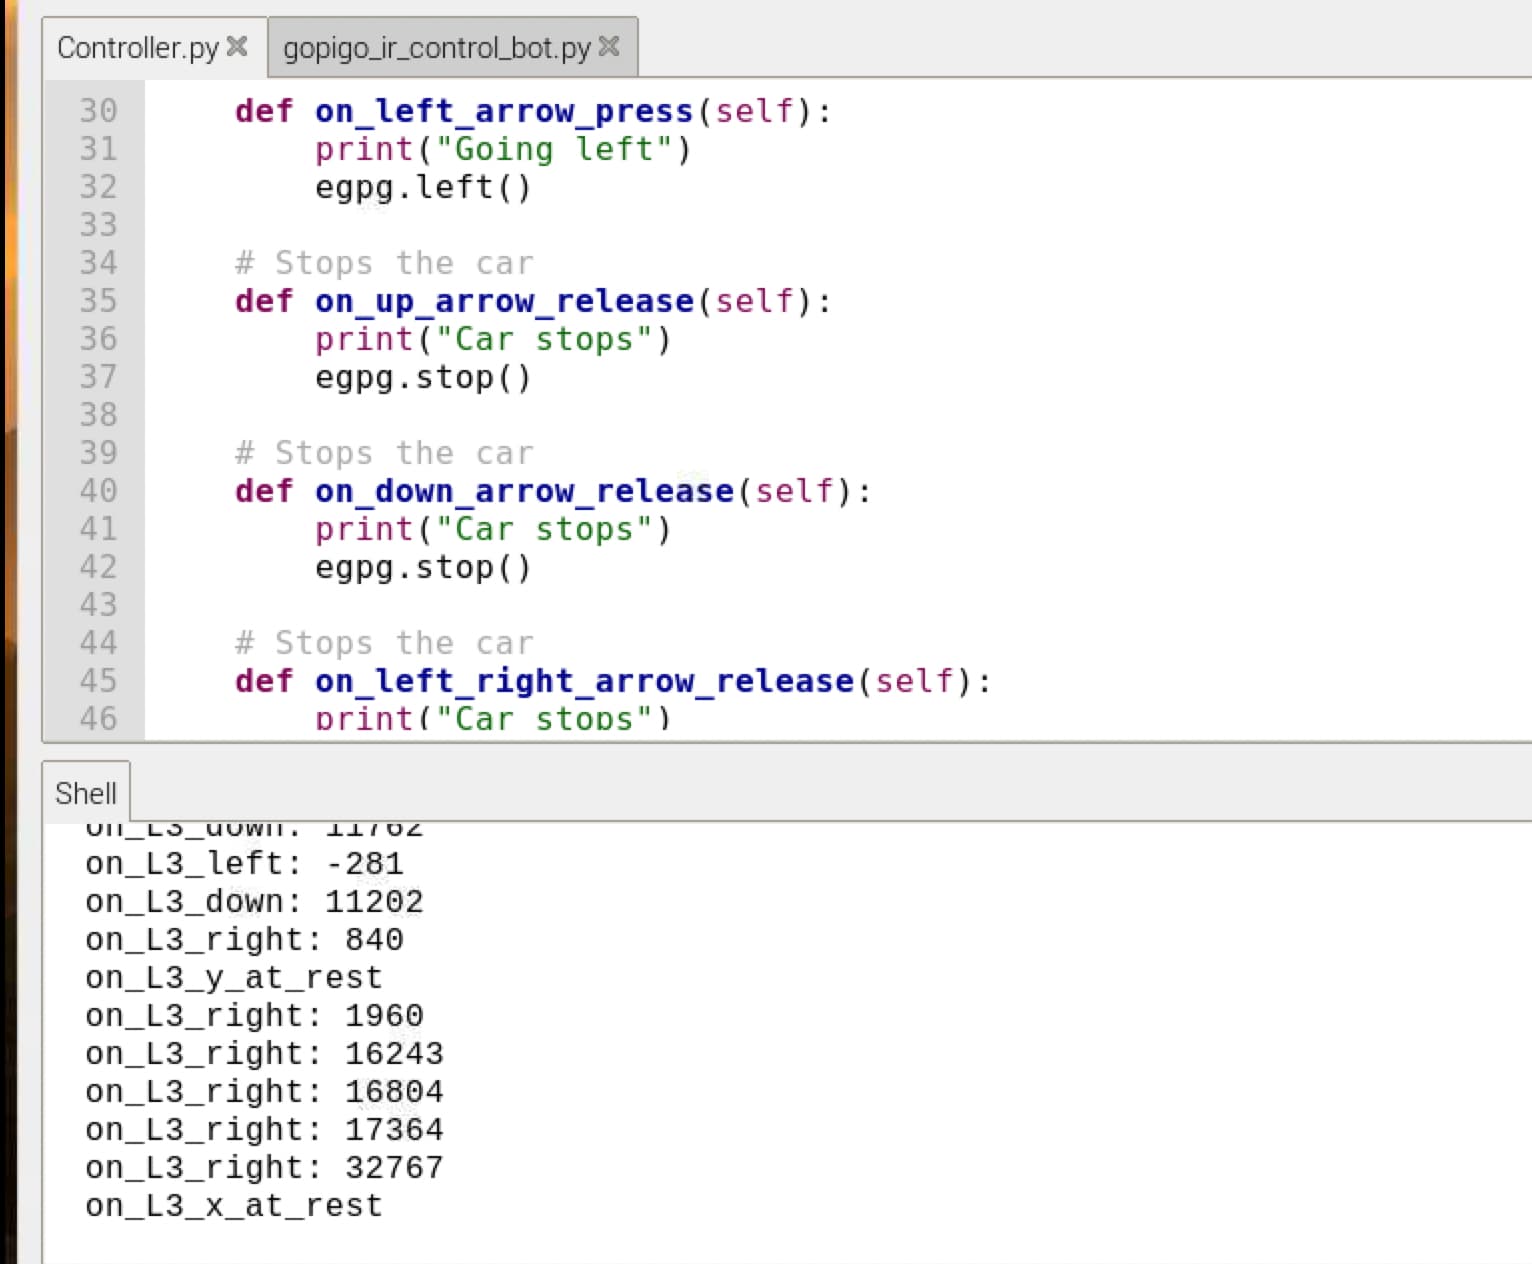
This shows on_L3_down is working but not overloaded:
Did you try overloading one of the commands that you know are being recognized like:
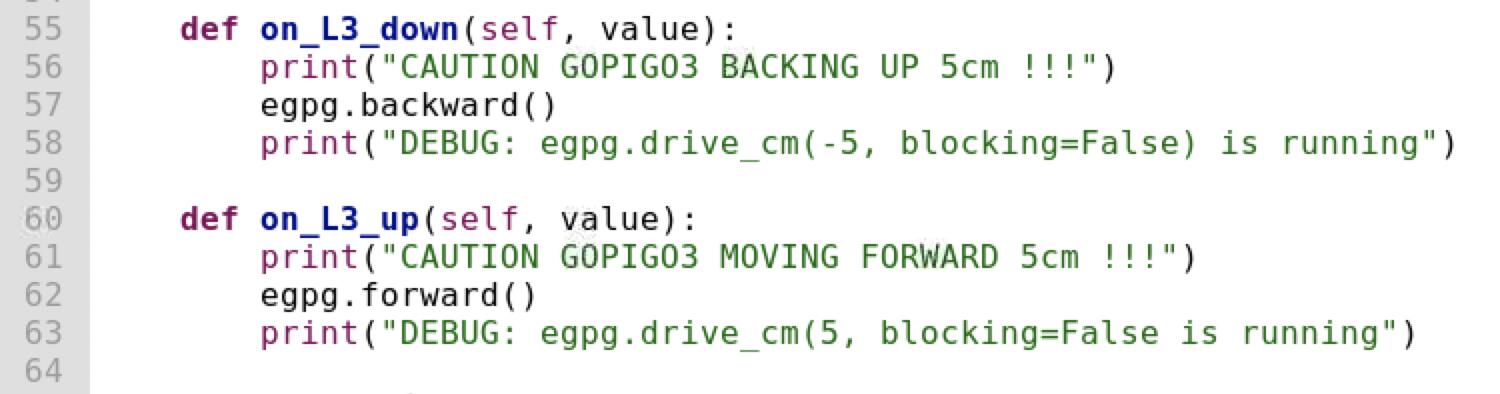
    def on_L3_down(self, value):
       print("CAUTION GOPIGO3 BACKING UP 5 cm !!!")
       egpg.drive_cm(-5, blocking=False)
       print("DEBUG: egpg.drive_cm(-5, blocking=False) is running")
And of course you have confirmed that running the GoPiGo3 example programs work?
Such as:
python3 ~/Dexter/GoPiGo3/Software/Python/Examples/Read_Info.py
Ok, I see you did test that:
So indeed the problem has to be getting the overloaded functions to execute.
Please try the on_L3_down overload and report what happens
- do you see the “Caution…” printing, or still see the “on_L3_down: nnnn” printing?
3 Likes
It seems that not all of the buttons were recognised when I pressed them but I think that the PyPS4 library even says that is a common issue.
I have tried overloading the command and it worked with L3, when I press this button the car moves backwards which is great! I also see the print statements fine aswell like “Caution egpg backing up”. I will try and do that for the other directions now and test it again. Thankyou for your help 
3 Likes
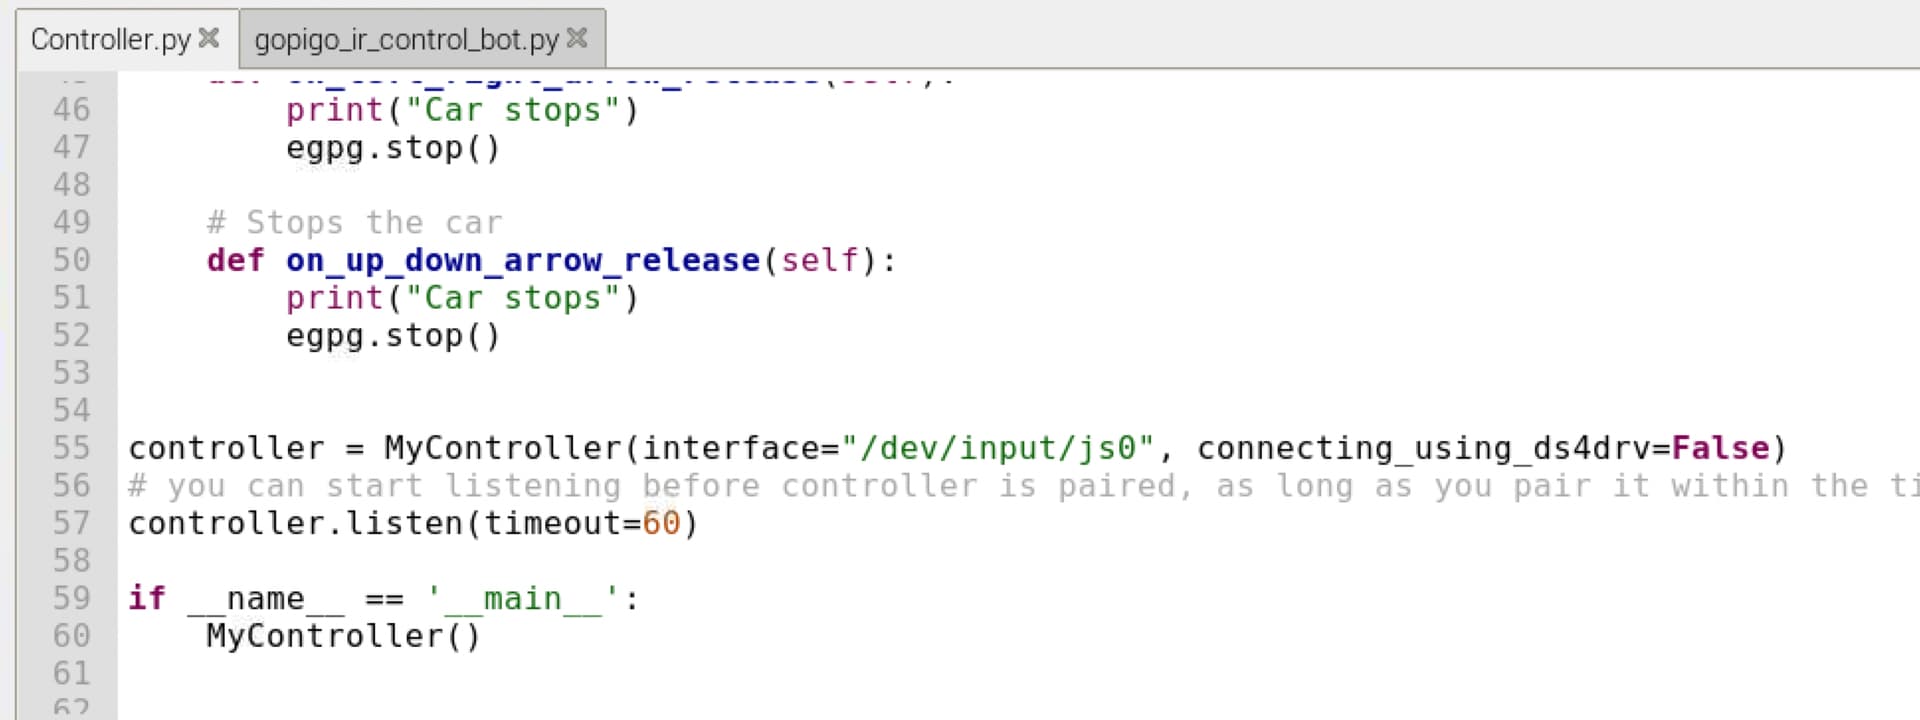
Ok so I thought I would be able to work it out from here. It does seem to be working fine the code but how would I allow the car to go left or right? And how would i be able to do it continuously until the joystick is released? I’ve tried changing it to egpg.forward() instead of egpg.drive_cm but it doesn’t like that I have only one value in the code. Also I’ve tried doing def on_L3_down_release (self) and then egpg.stop() but it doesn’t seem to work.

3 Likes
I tried a lot of different things with my New Remote Camera Robot, which inherits its ideas from the original remote camera robot project that was included in earlier versions of Raspbian for Robots.
What I eventually got working:
- Note: These are code snippets. I will attach the complete python code at the bottom.
- Note: This code will not work standing alone. It requires the corresponding javascript code and libraries, the controlling index.htm. and the corresponding CSS stylesheet. AND a Saitek X52 joystick like mine. . .
 Getting it to work with a HTML-5/W3C “standard” gamepad is a refinement I will attempt later on when I program to allow joystick/gamepad configuration files.
 - Note that
- The x_axis and y_axis are values between -1 and +1 with zero being centered.
- Force is the absolute value of the y-axis reading.
- trigger_1 and trigger_2 are the two steps of the primary trigger on my joystick.
- trigger_1 = 0 and trigger_2 = 0 means not squeezed at all
- trigger_1 = 1 and trigger_2 = 0 means squeezed half-way.
- trigger_1 = 1 and trigger_2 = 1 means the primary trigger is fully squeezed toward the joystick handle.)
- As a consequence of this, I use trigger_1 as the “motion enable” switch - the robot is only allowed to move if the trigger is being squeezed - since trigger_1 is set if the trigger is being squeezed at all.
- trigger_2 is used as a “turbo-speed” selection. If the trigger is fully squeezed, the robot uses the maximum allowed speed (turbo_speed) as the basis for speed calculations.
Viz.:
#  Default / initial values
force = float(0.00)
normal_speed = int(150)  #  Max speed if the trigger is pressed half-way
turbo_speed = int(300)  #  Max speed if the trigger is fully pressed
speed = int(0)  # this represents the currently selected maximum, either normal or turbo speed
desired_speed = int(0)  #  This is the adjusted speed based on joystick force.

[. . . .] <== some irrelevant code was skipped here

[code to retrieve the joystick data from the browser]
[this sets x_axis, y_axis, force and the trigger values]

#####################################
##    Speed Calculation Routines   ##
#####################################
#
# These routines calculate the various speed constants we'll
# need while running the robot as a fraction/percentage of
# speed vs force or desired_speed vs the x_axis deflection.
#
#  Desired_speed is the fraction of the currently allowable maximum speed, ('speed', either normal or turbo)
#  represented by the deflection of the joystick, either forward or backwards.
#  If the robot is moving ahead or backwards, this is the speed of both wheels
#  If the robot is turning, this is the speed of the outside wheel.

def calc_desired_speed(speed, force):
    desired_speed = int(round_up(speed * force))
    if desired_speed > speed:
        desired_speed = speed
    #  print\("calc_desired_speed: speed =", speed, "force =", force, "desired_speed =", desired_speed)
    return (desired_speed)

#  calc_differential_speed
#  When making a turn, the "inside wheel", (the wheel being turned toward),
#  should spin more slowely than the "outside wheel" by some factor based
#  on the degree of x_axis deflection - the greater the deflection,
#  the slower the inside wheel should turn
#
#  calc_differential_speed calculates the reduced speed value to apply to the inside wheel
#  using the formula round_up(desired_speed - abs(desired_speed * x_axis))

def calc_differential_speed(desired_speed, x_axis):
    differential_speed = int(round_up(desired_speed - abs(desired_speed * x_axis)))
    if differential_speed > desired_speed:
        differential_speed = desired_speed
    #  print\("calc_differential_speed: desired_speed =", desired_speed, "x_axis =", x_axis, "differential_speed =", differential_speed)
    return (differential_speed)

# Implement "correct" (away from zero) rounding for both
# positive and negative numbers
# ref: https://www.pythontutorial.net/advanced-python/python-rounding/

def round_up(x):
    x = 100 * x  #  This will allow two decimal digits of precision ranging from zero to one.
    if x > 0:
        return (int(x + 0.5) / 100)
    elif x < 0:
        return (int(x - 0.5) / 100)
    else:
        return(0)

[. . . .]

def process_robot_commands(args):

[. . . .]

#  This reduces the x_axis sensitivity
#  Select a number that allows the x_axis to do what is necessary,
#  without undue "touchiness"
    x_axis = x_axis * 0.50  #  reduces sensitivity by a factor of 2.

#  Enable "Turbo" speed
    if trigger_2 == 1:
        speed = turbo_speed
    else:
        speed = normal_speed

    # Insist on sane values
    if (abs(x_axis)) < 0.05: # provide a little bit of dead-zone for the x_axis
        x_axis = 0

    if x_axis > 1:
        x_axis = 1

    elif x_axis < -1:
        x_axis = -1

    elif y_axis > 1:
        y_axis = 1

    elif y_axis < -1:
        y_axis - -1

    elif force > 1:
        force = 1

    else:
        pass


############################
##    Motion Selection    ##
############################
#  Depending on the position of the x and y axes
#  and the state of trigger_1, we determine
#  **IF** the robot should be moving,
#  and **WHAT DIRECTION** it should be moving in.
#
    if force == 0 or trigger_1 == 0:
        my_gopigo3.stop()
        print("Robot Stopped. . .\n")

    elif trigger_1 == 1 and y_axis < 0:
        # We're moving forward - either straight, left, or right.
        print("The robot is moving forward and is ", end="")

        # if we're not moving directly forward, the inside wheel must be slower
        # than the outside wheel by some percentage.

        # When moving to the left, the left wheel must be moving slower than
        # the right wheel by some percentage, depending on the sharpness of the turn.
        # "set_motor_dps" allows the wheels to be set to individual speeds.
        if x_axis < 0:  #  Moving fowrard to the left
            desired_speed = int(calc_desired_speed(speed, force))
            differential_speed = int(calc_differential_speed(desired_speed, x_axis))
            my_gopigo3.set_motor_dps(my_gopigo3.MOTOR_RIGHT, desired_speed)
            my_gopigo3.set_motor_dps(my_gopigo3.MOTOR_LEFT, differential_speed)
            print("moving forward to the left\n")

            # Moving to the right, we apply the same logic as before, but swap wheels.
        elif x_axis > 0:  #  Moving fowrard to the right
            desired_speed = int(calc_desired_speed(speed, force))
            differential_speed = int(calc_differential_speed(desired_speed, x_axis))
            my_gopigo3.set_motor_dps(my_gopigo3.MOTOR_LEFT, desired_speed)
            my_gopigo3.set_motor_dps(my_gopigo3.MOTOR_RIGHT, differential_speed)
            print("moving forward to the right\n")

        else:  # Moving directly forward
            desired_speed = int(calc_desired_speed(speed, force))
            my_gopigo3.set_motor_dps(my_gopigo3.MOTOR_LEFT, desired_speed)
            my_gopigo3.set_motor_dps(my_gopigo3.MOTOR_RIGHT, desired_speed)
            print("moving forward straight ahead\n")

    elif trigger_1 == 1 and y_axis > 0:
        # We're moving backward
        #  This is the exact same logic and calculation as moving forward
        #  Except that it's "backwards" (bad pun!)
        #  We do this by changing the sign of the speed requested.

        # if we're not moving directly backward, the inside wheel must be slower
        # than the outside wheel by some percentage.
        print("The robot is moving backward and is ", end="")

        #  reduce maximum reverse speed to 1/2 forward speed
        speed = speed * 0.5

        if x_axis < 0:  #  Moving backward to the left
            # Moving to the left, the left wheel must be moving slower than
            # the right wheel by some percentage.
            desired_speed = int(calc_desired_speed(speed, force))
            differential_speed = int(calc_differential_speed(desired_speed, x_axis))
            my_gopigo3.set_motor_dps(my_gopigo3.MOTOR_RIGHT, -desired_speed)
            my_gopigo3.set_motor_dps(my_gopigo3.MOTOR_LEFT, -differential_speed)
            print("moving backward to the left\n")

        elif x_axis > 0:  #  Moving backward to the right
            # Moving to the right, we apply the same logic, but swap wheels.
            desired_speed = int(calc_desired_speed(speed, force))
            differential_speed = int(calc_differential_speed(desired_speed, x_axis))
            my_gopigo3.set_motor_dps(my_gopigo3.MOTOR_LEFT, -desired_speed)
            my_gopigo3.set_motor_dps(my_gopigo3.MOTOR_RIGHT, -differential_speed)
            print("moving backward to the right\n")

        else:  #  Moving directly backward.
            desired_speed = int(calc_desired_speed(speed, force))
            my_gopigo3.set_motor_dps(my_gopigo3.MOTOR_LEFT, -desired_speed)
            my_gopigo3.set_motor_dps(my_gopigo3.MOTOR_RIGHT, -desired_speed)
            print("moving straight backward\n")

[. . . .]
You will notice that what I do here is to get the joystick values for the x and y axes which are values between -1 and +1, with zero = centered.
Based on the y_axis deflection, (forward and backward), I determine the base speed, either as a positive number, (forward), or as a negative number (backward)
Based on the x_axis deflection, (left or right), I determine the “differential speed”, (how much slower must the inside wheel turn than the outside wheel).
So, overall, what happens is this:
- The amount of forward or backward deflection of the joystick determines how fast the robot wants to go overall.
- The amount of left-or-right deflection of the joystick causes the left or right wheel to slow down by a corresponding amount.
Therefore:
- If the joystick is pushed all the way forward and is canted to the left, it will make a rapid left-hand turn. In the same way, if the joystick is pushed partially forward and to the right, it will make a slower right-hand turn.
- The harder the joystick is pushed to the left or right determines the steepness of the turn - less deflection = shallower turn.
Take a look at this and let me know if it helps.
This is the entire Python file for my remote camera robot. To use it you also need the corresponding browser scripts and libraries - AND a working camera!
Joystick_Data_Test.zip.txt (6.9 KB)
Remove the “.txt” and unzip it somewhere to look at the Python source file.
Let me know what happens.
1 Like
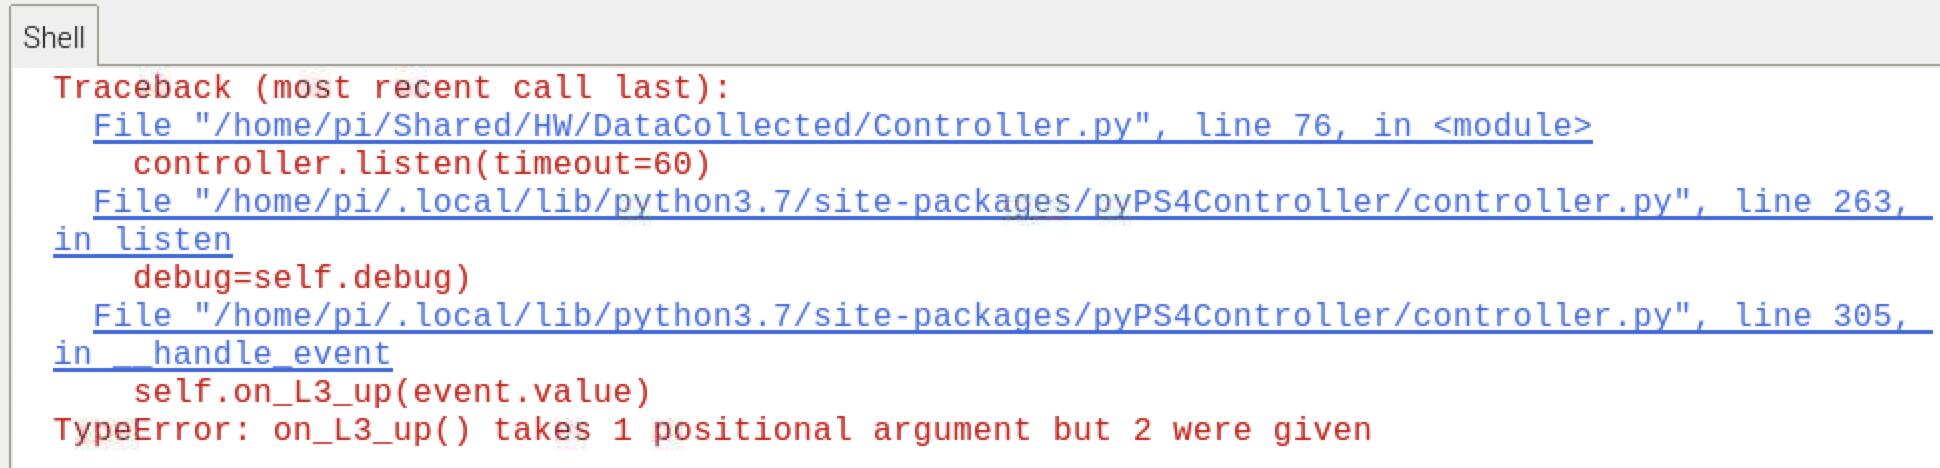
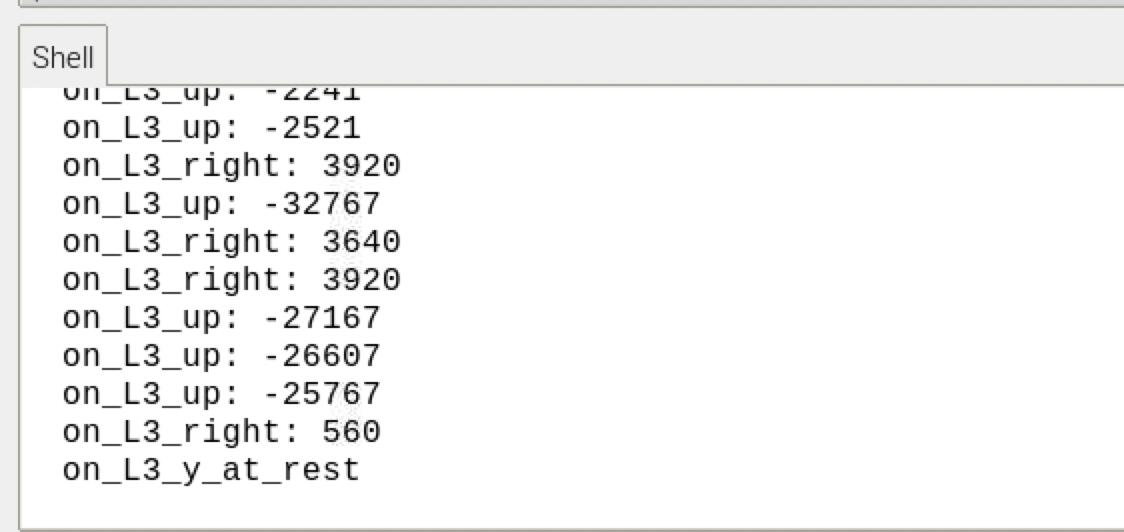
Try to understand what it is telling you - the error says “on_L3_up() takes 1 positional argument but 2 were given”
So you wrote overload function on_L3_up(self) ← note only one argument,
but the existing PS4 code tried to call “controller.on_L3_up(self, value)” ← note two arguments
Remember I showed you thus:
See the two parameters… on_L3_up() expects two parms just like on_L3_down().
Using forward() and backward() instead of drive_cm() will work BUT the reason I had you try with drive_cm() first is that you have not figured out how to issue the stop() command!
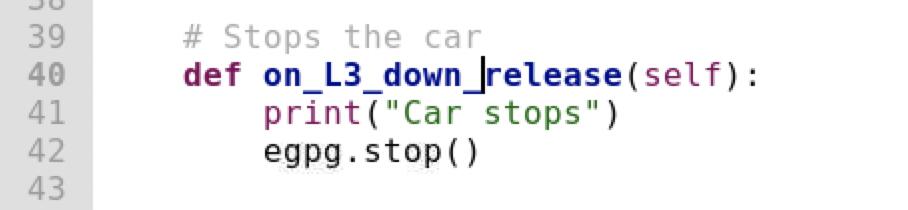
For stopping, you are trying to use on_L3_down_release() but there is no “down_release” method.
There is an on_L3_release() but that is for when the joystick is “pressed (clicked)” and then “released”.
I think the methods you want to overload with stop() are:
on_L3_x_at_rest  # L3 joystick is at rest after the joystick was moved and let go off on x axis
on_L3_y_at_rest  # L3 joystick is at rest after the joystick was moved and let go off on y axis
I found those by looking at the README file for the PS4 controller package.
Of course the doc is not complete to tell you if it takes only one “self” parameter, but I would guess there is no “value” associated with being at rest or “zero”.
Indeed by looking at the code for the class in controller.py we find:
def on_L3_y_at_rest(self):
        """L3 joystick is at rest after the joystick was moved and let go off"""
        print("on_L3_y_at_rest")

    def on_L3_x_at_rest(self):
        """L3 joystick is at rest after the joystick was moved and let go off"""
        print("on_L3_x_at_rest")
so your egpg.stop() goes in these two methods with only one parm (self).
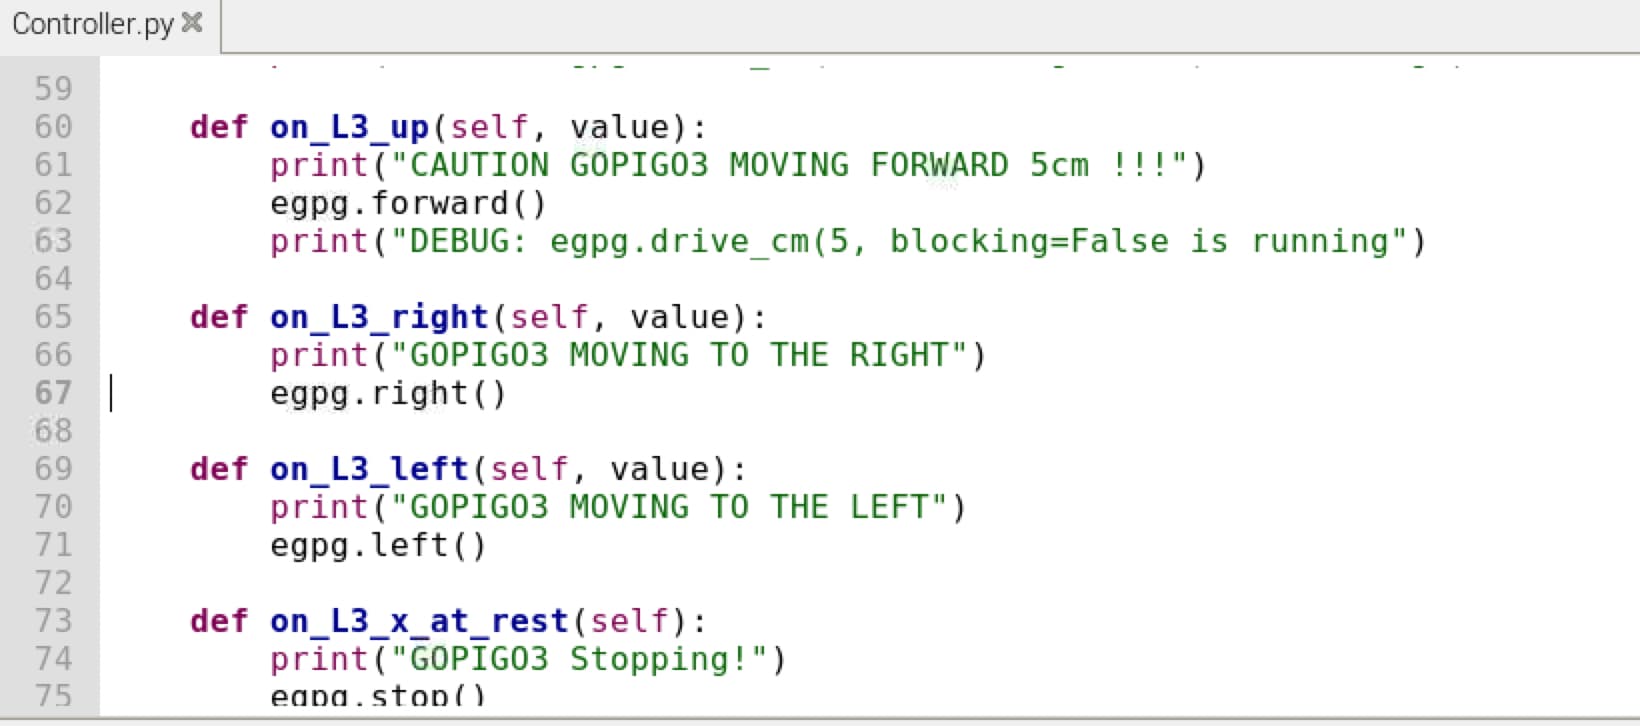
Like on_L3_up and down, you should overload:
   def on_L3_left(self, value):
        print("on_L3_left: {}".format(value))

    def on_L3_right(self, value):
        print("on_L3_right: {}".format(value))
adding egpg.left() and egpg.right()
AFTER YOU HAVE PROVEN YOUR STOP IS GETTING CALLED WHEN YOU LET GO OF THE L3 JOYSTICK!!
For a “stretch goal” after you get left/right/forward/backward/stop working - you can try translating the “value” parameter into a speed by issuing something like
     egpg.set_speed( int(value/32767.0 * egpg.DEFAULT_SPEED)   # note that dot zero makes float division
     egpg.forward()
before the egpg.forward and backward calls, but you may want much more complicated control than that as @jimrh will attest. Managing speed with the four direction commands is a mess and often requires individually controlling left and right wheel speeds with a combination of the forward value and the left/right value.
3 Likes
Another thing to be aware of is that Python’s definition of “rounding” is nothing like the usual 5/4 rounding we were taught in school, especially with regards to negative numbers. Instead of rounding away from zero to the next largest integer, (away from zero), Python always rounds towards zero if the number is negative. And that can be the cause of really annoying divide-by-zero exceptions.
I did some looking around and decided to implement my own rounding based on something I saw on-line:
# Implement "correct" (away from zero) rounding for both
# positive and negative numbers
# ref: https://www.pythontutorial.net/advanced-python/python-rounding/

def round_up(x):
    x = 100 * x  #  This will allow two decimal digits of precision ranging from zero to one.
    if x > 0:
        return (int(x + 0.5) / 100)
    elif x < 0:
        return (int(x - 0.5) / 100)
    else:
        return(0)
There’s a big caveat:
The usual run-of-the-mill rounding routines, round to the nearest integer value, they don’t work if you have a number with a fractional component.
I my case, I needed two decimal-digits of precision to the right of the decimal point, so what I did was to multiply by 100, do the rounding, and then divide by 100 again.
What I ***should *** do is bite the bullet, (or maybe I should say “byte the bullet”?), and make an includable class that handles arbitrary precision rounding by passing the number of decimal digits as a parameter.
What say ye?
1 Like
Arbitrary precision round up or down:
And if you really want a class that acts like you expect:
" The decimal module provides support for fast correctly-rounded decimal floating point arithmetic."
- Decimal “is based on a floating-point model which was designed with people in mind, and necessarily has a paramount guiding principle – computers must provide an arithmetic that works in the same way as the arithmetic that people learn at school.” – excerpt from the decimal arithmetic specification.
2 Likes
Thank you for your response! I can see your code is a lot more complex than mine and I will definitely try and do something similar with setting the speed like you have done. I’m just going to try and get it to work with the different directions and functions I have done and then may create a function to calculate speed I could do it so that when the x button on PS4 Controller is pressed it accelerates using ‘turbo_speed’ like you’ve done. But first, I need to make sure I can get it working and then I will implement more functions.
Thank you I will look at the file you have added.
2 Likes
Ok I think I understand why it’s showing this error now. I have changed these 2 functions and tested them and they work. I have also implemented the functions for stop on_L3_x_at_rest and on_L3_y_at_rest. These work fine aswell, the car successfully stops. After doing this, I have tried to implement the functions for left and right and have tested these and the car seems to be confused on which direction to go I don’t know if it’s because the joystick is very sensitive. But I’m not too sure if I would need to specify more than gpg.left() and gpg.right() or maybe implement these directions for other buttons instead on the PS4 Controller? Because when I run the code and point joystick to the right the car goes forwards and backwards and the same when I point the joystick to the left.
– Yes I will definitely implement something like that when I have got the left and right working.
3 Likes
The reason I sent you that information is because the simple left() and right() methods don’t allow you to control the degree of turn - it simply goes right or left.
By using the set_speed methods, (and some simple calculations), you can make both speed and the sharpness of the turn directly related to the amount of joystick deflection.
2 Likes
The issue is the robot can only do one thing at a time using the forward/backward/right/left commands, but the joystick can command two things at the same time - a little forward AND a little left or right. The robot doesn’t know which to do - forward OR left/right.
You have two choices, simple or complex:
-
SIMPLE: create a class variable -
fwd_bwd=False- set fwd_bwd=True in on_L3_down and on_L3_up
- set fwd_bwd=False in on_L3_y_at_rest
- add
if (fwd_bwd == False):to on_L3_right and on_L3_left
which will only tell the bot to turn left or right when not being commanded to go forward or backward. Meaning the robot will only be able to do one command OR another, and never is asked to do one command AND another. - P.S. If it is still touchy trying to get left/right to work, you may need to only set fwd_bwd True if the value is greater than some minimal value.
-
COMPLEX:
- separate the driving from the commanding
- on_L3_up/down commands set a class variable fwd_bwd by the y value
- on_L3_left/right commands set a class variable left_right by the x value
- on_L3_x_at_rest sets left_right to 0, on_L3_y_at_rest sets fwd_bwd to 0
- every on_L3 command ends with a call to a class method
do_drive_command() - do_drive_command(self) merges:
- fwd_bwd and left_right into a steer(left_motor_percent, right_motor_percent)
- probably can get hints how to do this from @jimrh’s code which I think uses set_motor_dps() instead
- separate the driving from the commanding
BTW, it appears when you changed the drive_cm(5) and -5 to forward() backward(), you forgot to change the print statements; made the code harder to grasp at first glance.
2 Likes
This is because the basic forward, backward, left, and right commands don’t allow for precision in turning or motion - these commands are intended to be used in simple “teach me about the robot” cases - like bloxter - where precision is not a requirement.
To move and turn with precision, you need to use the set_motor_dps commands like this:
- Measure/capture the actual value - with the sign - of the y_axis, (forward and back) and the x_axis, (left and right).
- Decide on what maximum speed you want the robot to travel at - 100 dps, 500 dps, whatever - and set
max_speedto that value.- 300 is a good starting point. Use a smaller number if you want the robot to move more slowly.
- For forward and backward motion, you need to generate a speed value for the motors that is proportional to the degree of deflection of the y_axis.
- Since a normalized gamepad’s joystick returns values between 0 and 1, you can use these as percentages directly and calculate the speed by doing this:
desired_speed = int((max_speed * y_axis) * -1)- The “-1” flips the sign so that the robot moves in the correct direction and the
intmakes sure the value is a whole number without a fractional part.)
- The “-1” flips the sign so that the robot moves in the correct direction and the
- For straight travel, you do this:
- Since a normalized gamepad’s joystick returns values between 0 and 1, you can use these as percentages directly and calculate the speed by doing this:
my_gopigo3.set_motor_dps(my_gopigo3.MOTOR_LEFT, desired_speed)
my_gopigo3.set_motor_dps(my_gopigo3.MOTOR_RIGHT, desired_speed)
- In order to turn, the inside wheel - the wheel you are turning toward - has to be moving more slowly than the outside wheel. To do that, you need to calculate a “differential_speed” which is a speed value that is some fraction of the desired_speed - such that the greater the x_axis deflection, the slower the inside wheel goes. This way, a small movement of the joystick to the left or right makes a small turn and a large movement of the x_axis makes a correspondingly sharper turn.
- You do that calculation like this:
differential_speed = int(desired_speed - abs(desired_speed * x_axis))
This requires a bit more explanation:
- The (
desired_speed * x_axis) gives the fractional part of the desired speed represented by the x_axis movement.- (i.e. If the x_axis is moved a small amount, (0.1), the product becomes a very tiny number. If it is moved more, (0.5), that number becomes larger.)
- What we want is the amount of the desired speed left over after the tiny number is removed - so we subtract it from the desired speed.
- As you move the x_axis further, the number gets larger and the subtracted speed becomes smaller - which is what you want since that will make the turn sharper the further the x_axis is moved.
- You then apply the
differential_speedto the inside wheel. - Moving backward is exactly the same, except the sign is negative.
-
You also have to test the sign of the x_axis value so you know which wheel needs to move more slowly.
- If the x_axis is negative, you apply the
desired_speedto the right wheel anddifferential_speedto the left wheel. - If the x_axis is positive, you apply the
desired_speedto the left wheel and thedifferential_speedto the right wheel. This will make the robot turn in the correct direction regardless of if it is moving backwards or forward.
- If the x_axis is negative, you apply the
Try it and tell me how it works.
=======================
Update
I tried adjusting my calculations as shown above and there were difficulties.
My original logic works.
############################
##    Motion Selection    ##
############################
#  Depending on the position of the x and y axes
#  and the state of trigger_1, we determine
#  **IF** the robot should be moving,
#  and **WHAT DIRECTION** it should be moving in.
#
    if force == 0 or trigger_1 == 0:
        my_gopigo3.stop()
        print("Robot Stopped. . .\n")

    elif trigger_1 == 1 and y_axis < 0:
        # We're moving forward - either straight, left, or right.
        print("The robot is moving forward and is ", end="")

        # if we're not moving directly forward, the inside wheel must be slower
        # than the outside wheel by some percentage.

        # When moving to the left, the left wheel must be moving slower than
        # the right wheel by some percentage, depending on the sharpness of the turn.
        # "set_motor_dps" allows the wheels to be set to individual speeds.
        if x_axis < 0:  #  Moving fowrard to the left
            desired_speed = int(calc_desired_speed(speed, force))
            differential_speed = int(calculate_differential_speed(desired_speed, x_axis))
            my_gopigo3.set_motor_dps(my_gopigo3.MOTOR_RIGHT, desired_speed)
            my_gopigo3.set_motor_dps(my_gopigo3.MOTOR_LEFT, differential_speed)
            print("moving forward to the left\n")

            # Moving to the right, we apply the same logic as before, but swap wheels.
        elif x_axis > 0:  #  Moving fowrard to the right
            desired_speed = int(calc_desired_speed(speed, force))
            differential_speed = int(calculate_differential_speed(desired_speed, x_axis))
            my_gopigo3.set_motor_dps(my_gopigo3.MOTOR_LEFT, desired_speed)
            my_gopigo3.set_motor_dps(my_gopigo3.MOTOR_RIGHT, differential_speed)
            print("moving forward to the right\n")

        else:  # Moving directly forward
            desired_speed = int(calc_desired_speed(speed, force))
            my_gopigo3.set_motor_dps(my_gopigo3.MOTOR_LEFT, desired_speed)
            my_gopigo3.set_motor_dps(my_gopigo3.MOTOR_RIGHT, desired_speed)
            print("moving forward straight ahead\n")

    elif trigger_1 == 1 and y_axis > 0:
        # We're moving backward
        #  This is the exact same logic and calculation as moving forward
        #  Except that it's "backwards" (bad pun!)
        #  We do this by changing the sign of the speed requested.

        # if we're not moving directly backward, the inside wheel must be slower
        # than the outside wheel by some percentage.
        print("The robot is moving backward and is ", end="")

        #  reduce maximum reverse speed to 1/2 forward speed
        speed = speed * 0.5

        if x_axis < 0:  #  Moving backward to the left
            # Moving to the left, the left wheel must be moving slower than
            # the right wheel by some percentage.
            desired_speed = int(calc_desired_speed(speed, force))
            differential_speed = int(calculate_differential_speed(desired_speed, x_axis))
            my_gopigo3.set_motor_dps(my_gopigo3.MOTOR_RIGHT, -desired_speed)
            my_gopigo3.set_motor_dps(my_gopigo3.MOTOR_LEFT, -differential_speed)
            print("moving backward to the left\n")

        elif x_axis > 0:  #  Moving backward to the right
            # Moving to the right, we apply the same logic, but swap wheels.
            desired_speed = int(calc_desired_speed(speed, force))
            differential_speed = int(calculate_differential_speed(desired_speed, x_axis))
            my_gopigo3.set_motor_dps(my_gopigo3.MOTOR_LEFT, -desired_speed)
            my_gopigo3.set_motor_dps(my_gopigo3.MOTOR_RIGHT, -differential_speed)
            print("moving backward to the right\n")

        else:  #  Moving directly backward.
            desired_speed = int(calc_desired_speed(speed, force))
            my_gopigo3.set_motor_dps(my_gopigo3.MOTOR_LEFT, -desired_speed)
            my_gopigo3.set_motor_dps(my_gopigo3.MOTOR_RIGHT, -desired_speed)
            print("moving straight backward\n")
You will have to adjust variable names and such to match your code.
3 Likes
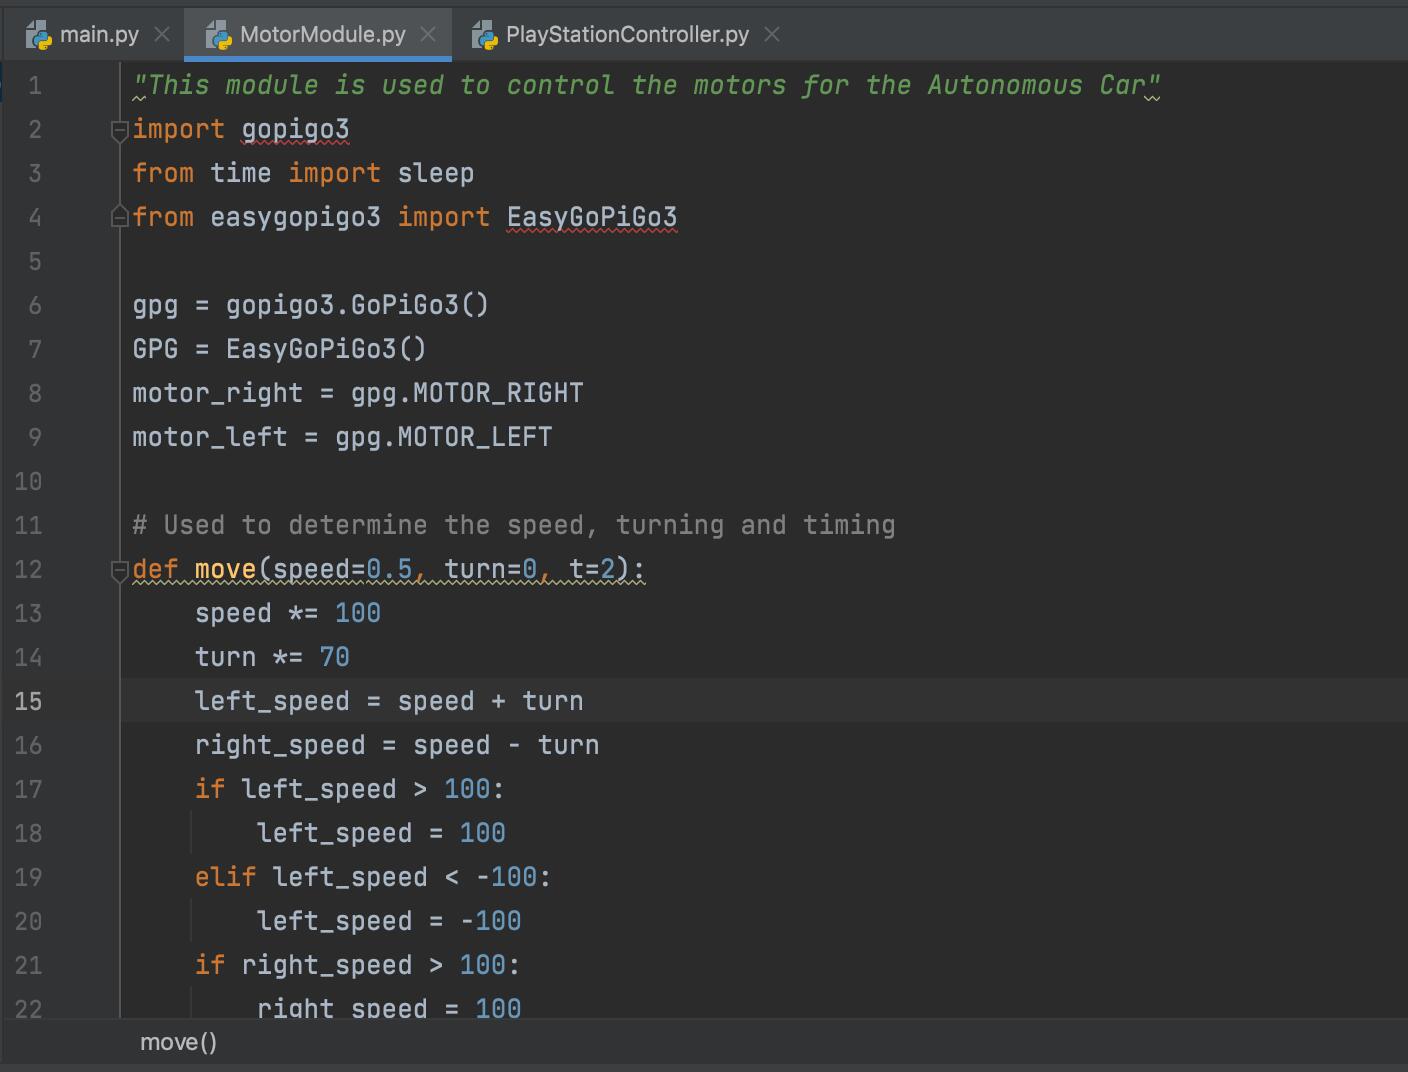
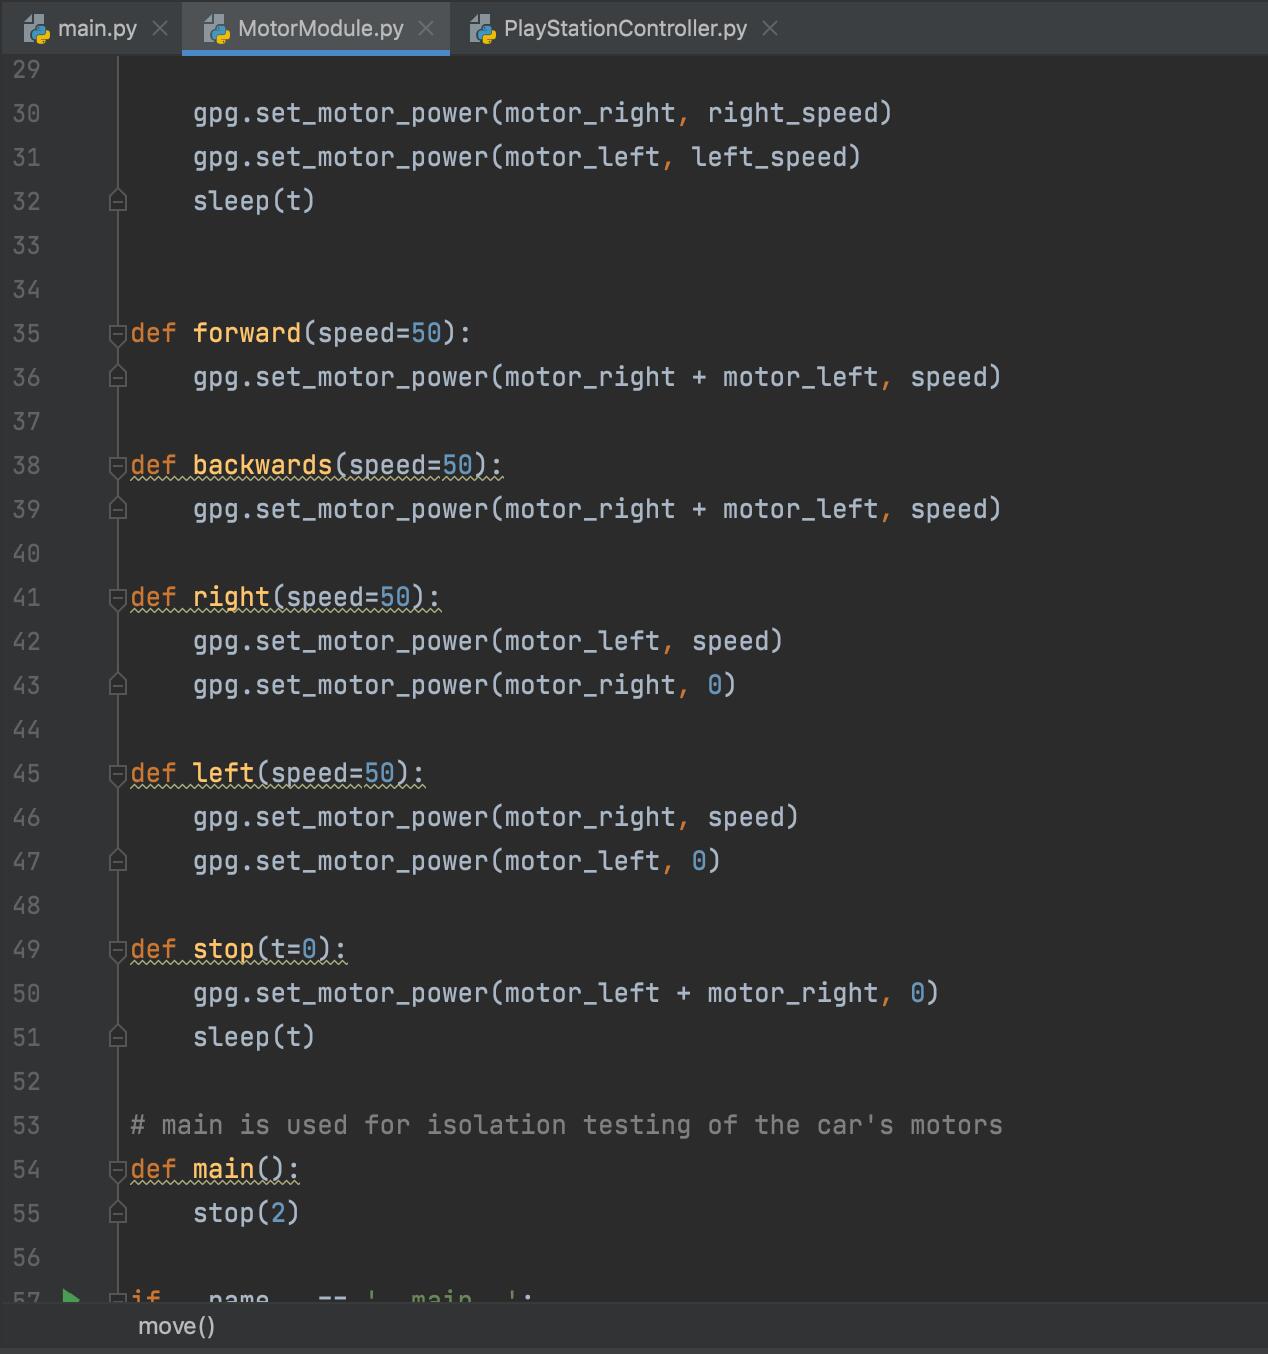
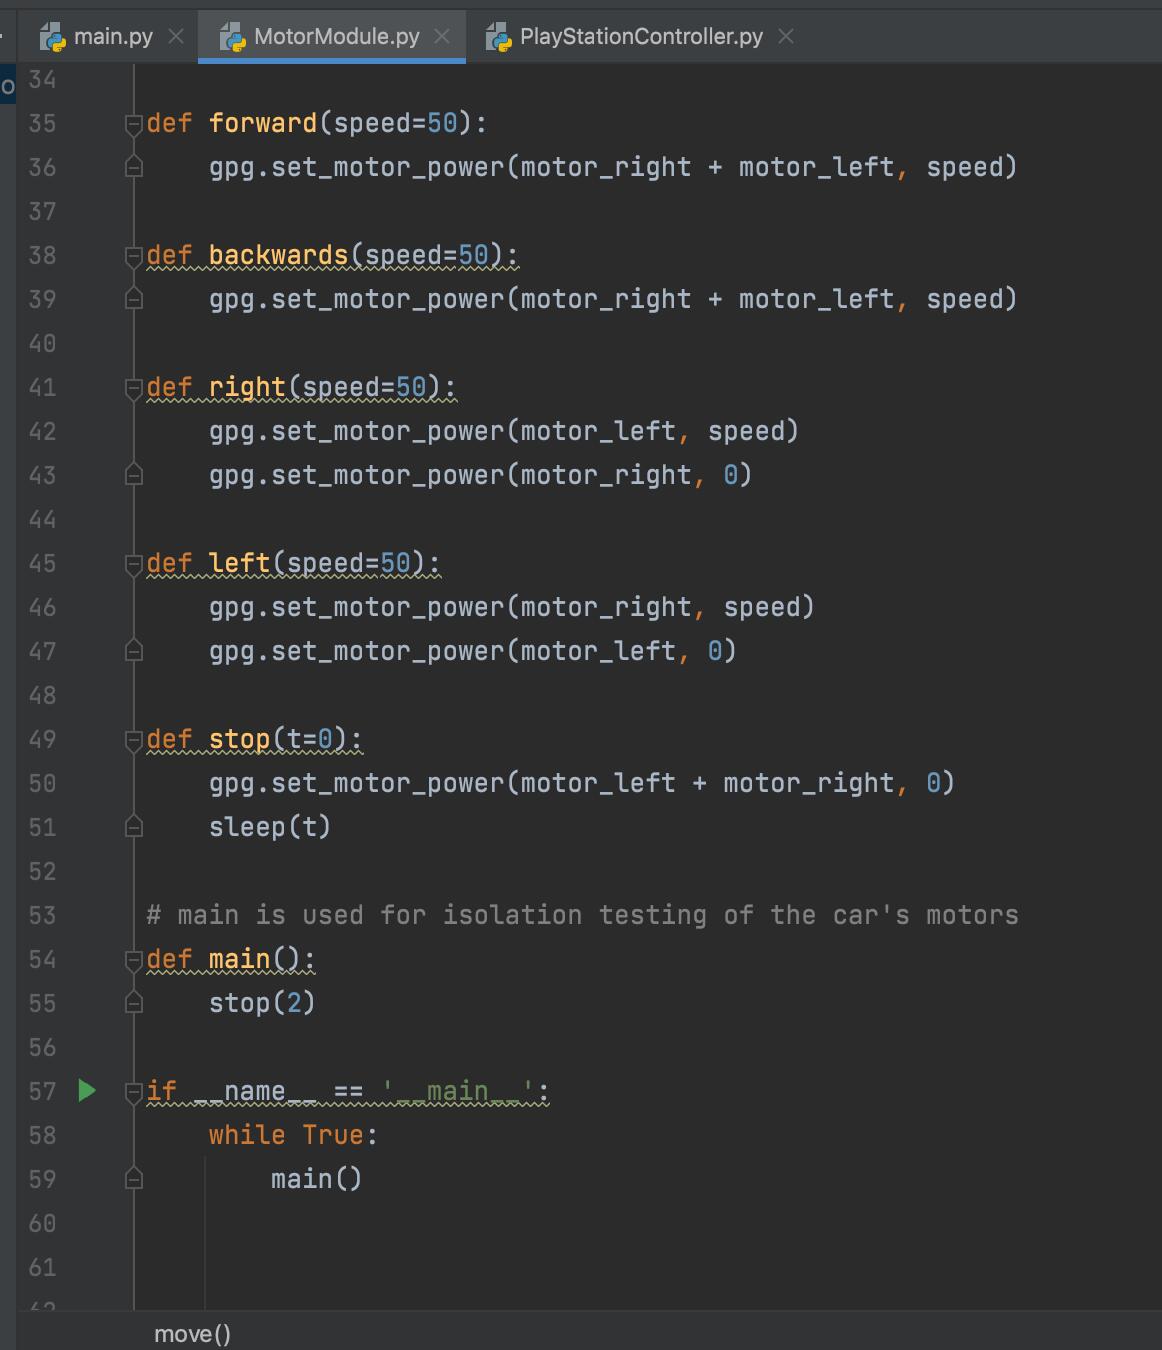
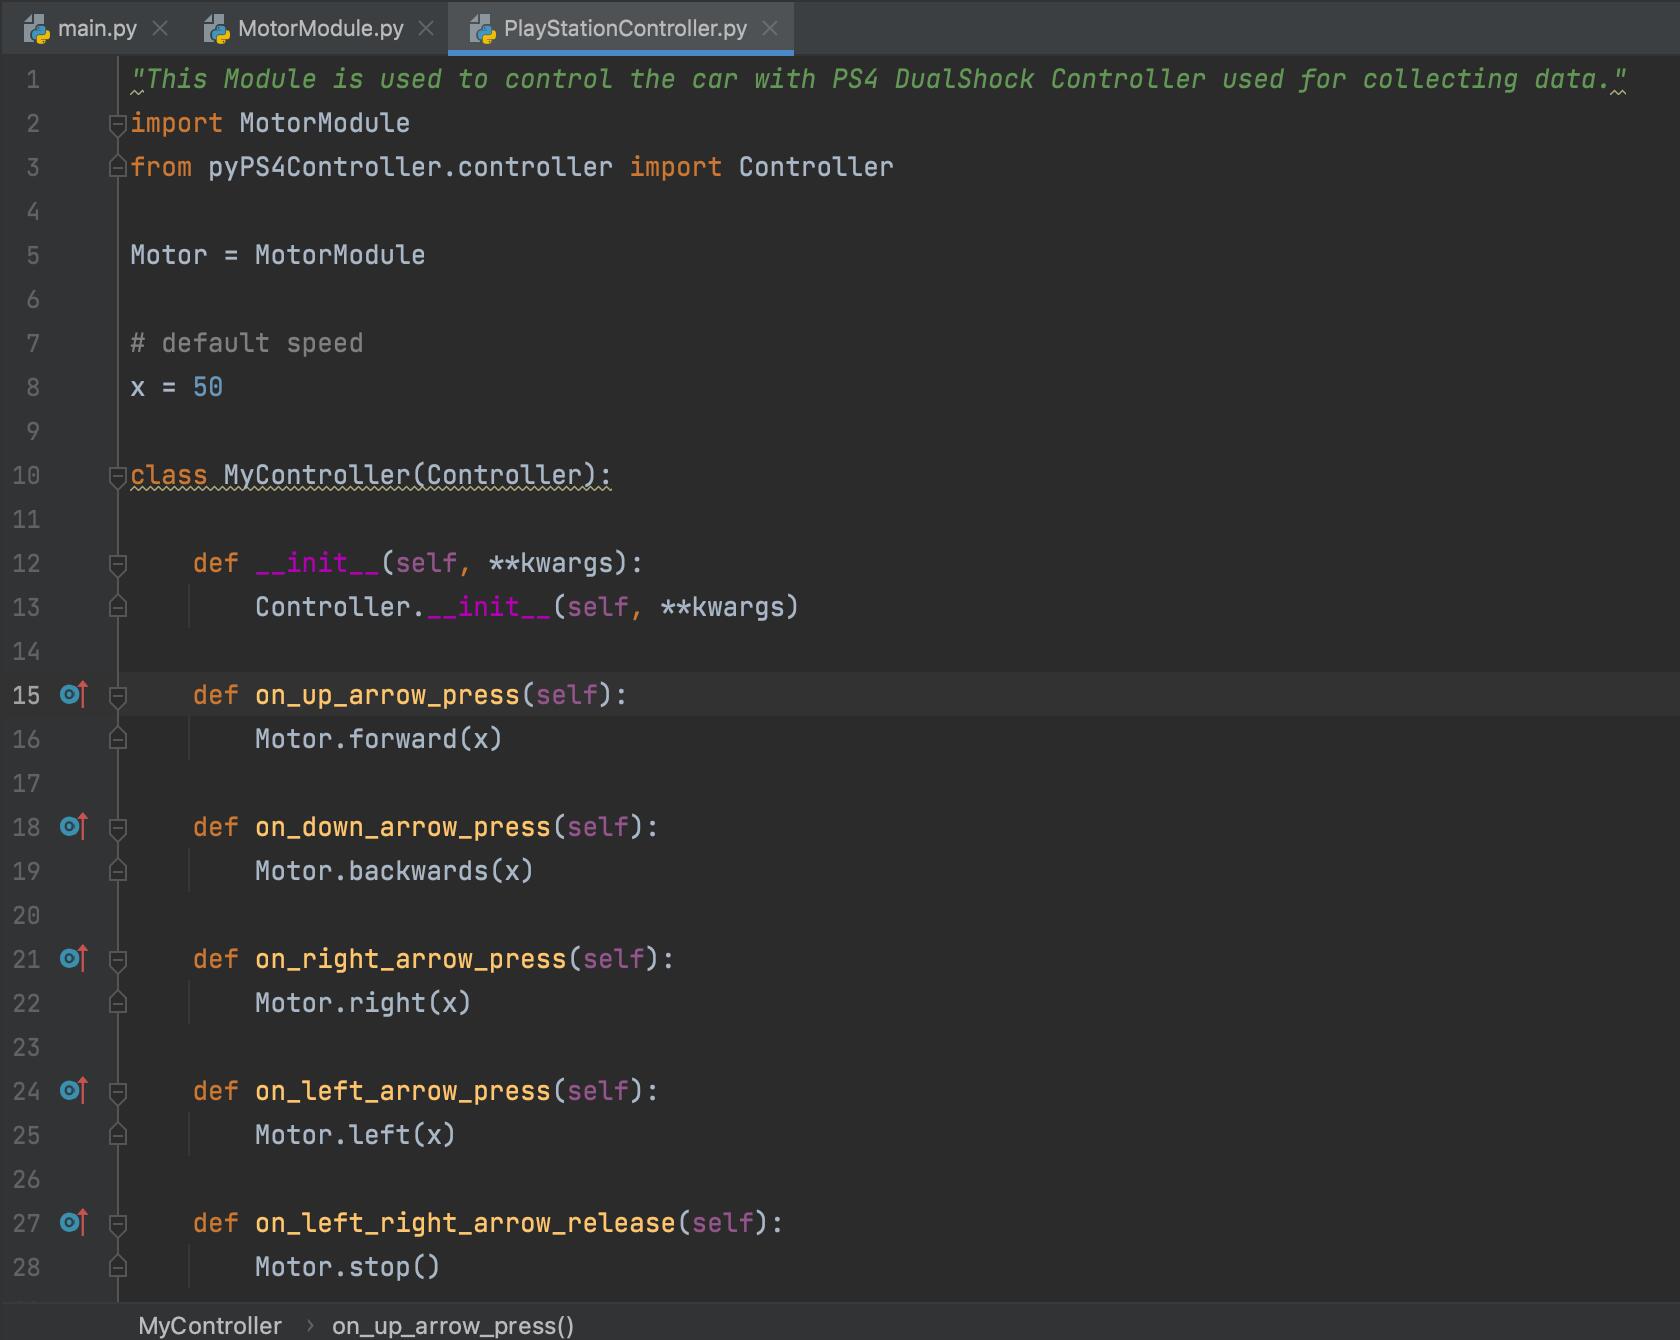
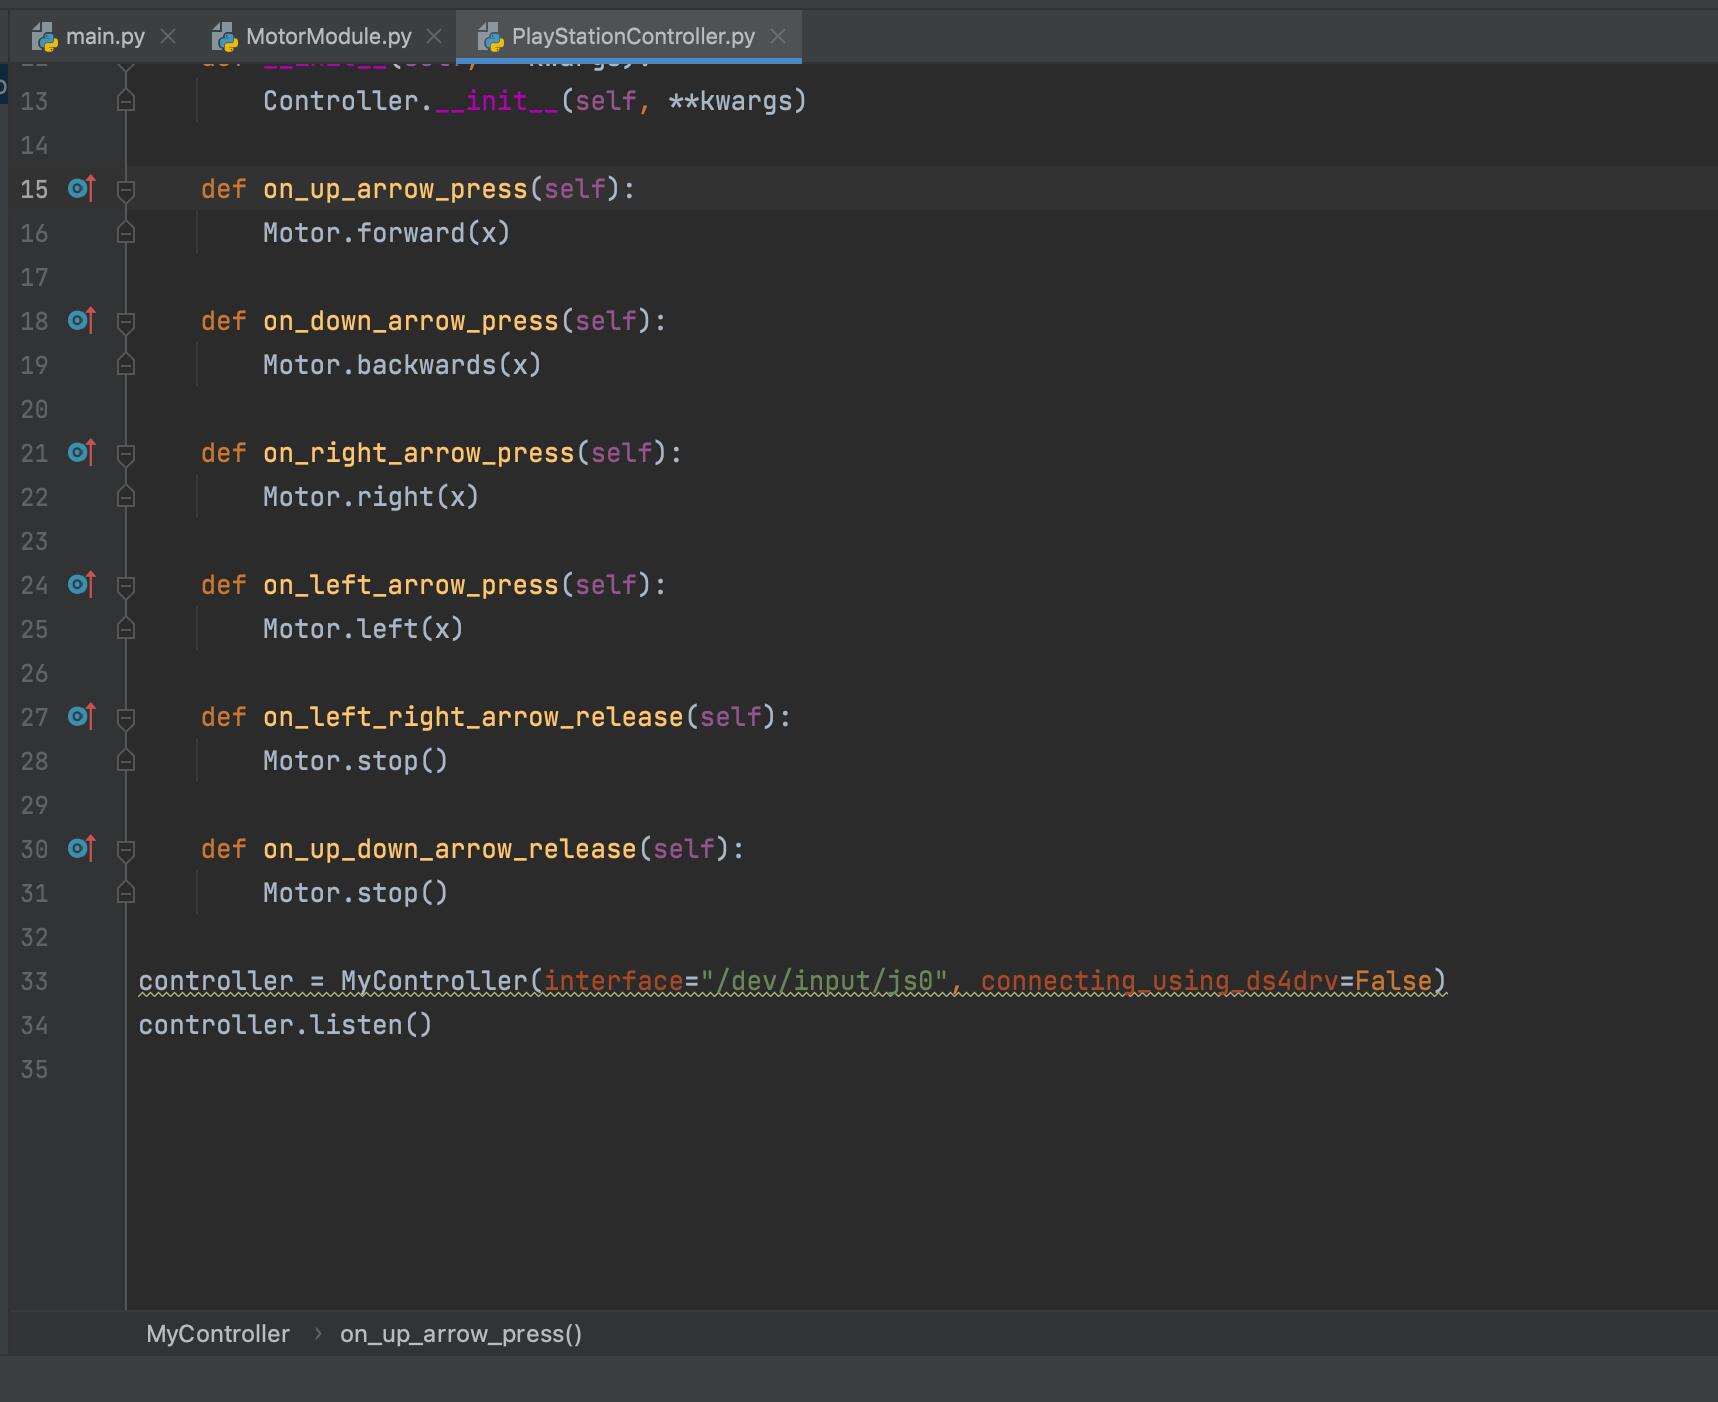
This is what I have done so far I have created in a class MotorModule which determines the speed, turning and timing and then have my PlayStationController class aswell I have tested this and it doesn’t work. I think I may need to change the buttons because the d-pad doesn’t seem to be recognised at all when I press the buttons.
1 Like
@jimrh I’m going to change the buttons to how I had them previously and try again! Because the joystick seems to be recognised by the PyPS4 library. I’ve just tried the ‘on_L3_up’ and it went forward so I’m hoping right and left may run smoother with the added logic that I’ve done in the MotorModule.py

1 Like
Get rid of the gpg= instantiation and the gopigo3.GoPiGo3 import
Change all gpg to GPG
(Then change all GPG to egpg)
Reason: EasyGoPiGo class is derived from the GoPiGo3 class, so all GoPiGo3 class methods are available.
Python conventions:
- Constants are all caps
- variables and class instances are lowercase or start with lowercase
If you want a shorter constant name than egpg.MOTOR_RIGHT, I suggest RMOTOR=EasyGoPiGo3.MOTOR_RIGHT
That Motor=MotorModule statement makes me want to lock up your robot in my closet until you complete a Python course. Sorry to have to say it, but that scrambled my brain so much I cannot help you further.
2 Likes
@cyclicalobsessive Ok I didn’t know this I will make these changes to my code now thank you! And I will also check I have the correct Python conventions and make changes to these aswell.
Haha I do apologise for that  , to be honest this is my first time working with Python I may need to look over some of the basics again. My background is more in Java.
3 Likes
There is a complete Java API library for the GoPiGo3
Perhaps there is a Java lib for the joystick somewhere.
Not too many folks doing GoPiGo3 in Java though. I was forced by employment to endure Java and JavaScript, and was fortunate to be able to say goodbye to all that many years ago.
Wishing you fun and success with your GoPiGo3!
3 Likes
I will have a look at that just to see what it is like. Thank you!
But to be honest I will stick with Python it is a lot more appealing to me and I’ve always wanted to work with it. Java was the first programming language I learned in my Software Engineering degree. Oh really? Yeah Java isn’t my favourite language I’ve worked with
Thank you very much!
3 Likes
Re: Programming/naming conventions.
- Do what makes things easier for you, regardless of what PEP-8 may say.
- Comments are Your Friend!
With all due apologies to @cyclicalobsessive, my opinion about “naming conventions” is more Calvin and Hobbs than Guido and Python.
If I think it’s a good idea, if I think it’s visually appealing, and if it makes sense to me, I do it. Otherwise, I do what makes sense to me, regardless of what the “naming conventions” say.
The bottom line is that YOU have to read the code, and YOU have to maintain it.
It also depends on who is going to be grading your project. If this guy is really strict about PEP compliance, then be strict. If he likes Java naming conventions, do it the way he’ll like best.
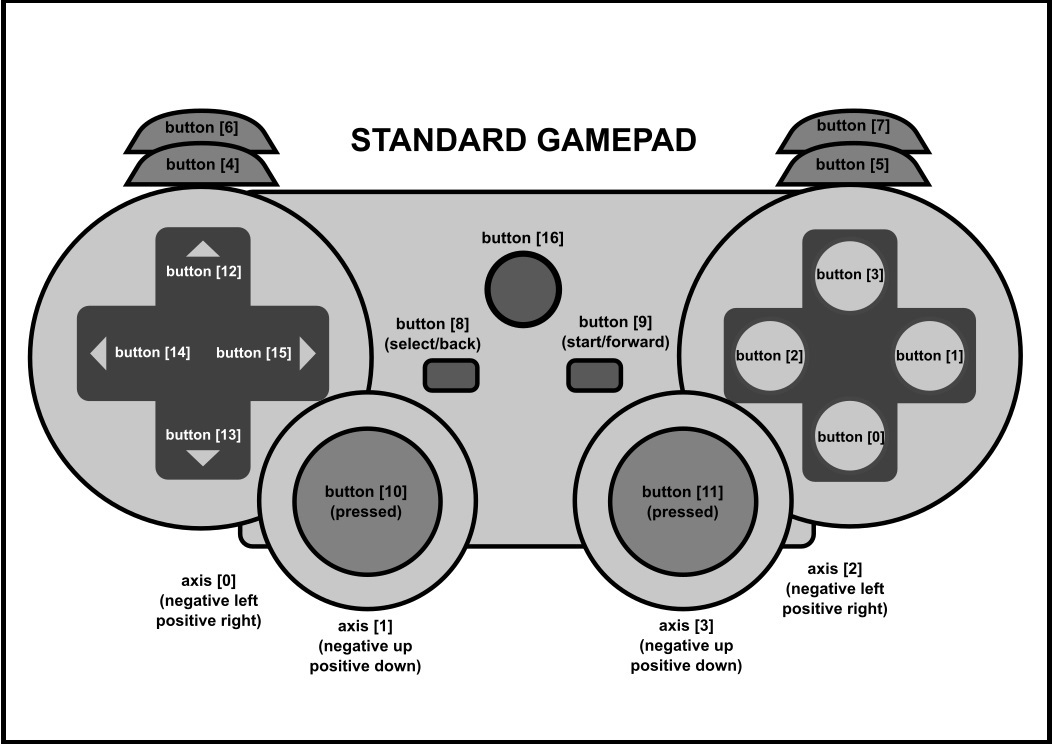
With regard to your gamepad:
I found this little gem on-line, (https://gamepadtest.com/), that allows you to use a browser to check and verify that all the analog axes and buttons are doing what you expect them to do. You can also use it to verify what the joystick and button indexes are.
In my case, I bought a cheap “Ritmix” gamepad. Before I started coding with it, I tried it with the gamepad tester - and boy was it a revelation!
It turned out that:
- The buttons worked if, and when, they decided they wanted to work - and when they did work, sometimes they stuck “active” and sometimes they didn’t.
- The joystick axes acted more like buttons than axes - the entire analog effect was within the first 1/3 of the travel of the stick.
- The button numbering had nothing to do with the “W3C Standard Gamepad” layout.
So, I went out and spent about 4-5 times the money and bought a Logitech gamepad, and the difference was like night-and-day!
- Button action was smooth and precise. There was also a nice mechanical “snick!” that you could feel when the button activated.
- The joystick action was smooth over the entire range of motion.
- The button and joystick axes were consistent with what you would expect them to be.
Translation: The difference between a 400₽ gamepad and a gamepad that was more than 2000₽ was massive - being like $5 vs $25 USD - and the quality difference was immense.
I am going to recommend you take a peek at your gamepad online, just to make sure the joystick and button action is smooth and correct. This way you don’t waste time trying to make your program compensate for a poor quality joystick - or conversely, you can concentrate on your code when you have confidence that your gamepad is working properly.
Here is an illustration I shamelessly stole from the W3C’s “Standard Gamepad” site. I also changed the colors around, (made it black-and-white), changed the font size and moved a few things around to make them easier to see.
Here’s my “Standard Gamepad” reference diagram that I use primarily to remind me which direction the values of the joystick axes go.
As far as classes and stuff is concerned, @cyclicalobsessive is your man. He probably knows more about that than any five other people here, including - ESPECIALLY including - me.
As far as getting a joystick and a robot talking to each other - that’s something I’m working on and I will be glad to give you whatever help I can.
Keep on Truckin’!

(Don’t loose your faith in yourself!)
3 Likes