This also taught me about getting the correct tool for the job.
In my case. . . .
When I bought my first laser printer, I looked at the HP laserjet and an Epson “just-as-good” that included the Centronix printer port as standard equipment. At about 1/3 to 1/2 the price, I considered it to be a no-brainer.
Turns out that getting supplies was a pain and the durability left a lot to be desired.
Today that printer is nowhere to be found, (unless it’s in a museum somewhere), but it’s an acknowledged fact that HP Laserjet 4’s still exist, still work, are still supported,[1] and you can still find both repair parts and supplies without resorting to voodoo or The Black Arts.
Another thing:
The HP Laserjet-4 is the “standard reference implementation” for CUPS in Linux.
Unfortunately, later generations of HP printers, (and the highly monopolistic nature of HP’s marketing), have not lived up to that standard of excellence.
So, if the TurtleBot is the “HP Laserjet-4” of the ROS community, by all means go get one!
Though have pity on us poor souls who only have a measley GoPiGo, and try to continue at least some of that research.
I mentioned this in another thread, but it may bear repeating here:
When drilling hard plastics like Polycarbonate (Lexan-like), plastics, you need to:
Use a variable speed drill that can go SLOOOOW - like one rev per second or slower.
Use a SHARP wood-bit that has a centering point and two raised teeth on the outer edges. The two outer teeth can be used to verify that you are perfectly aligned and are making an even cut all around.
Note that even the best and hardest bits will become unacceptably dull after a very few holes are drilled. Don’t be afraid to change-off for a new bit if it’s not cutting quickly enough as you don’t want to risk either burning the plastic, or having the bit get stuck and crack the workpiece.
Apply GENTLE pressure, primarily allowing the weight of the tool to do the work.
Stop frequently to remove chippings from the hole and inspect the cut so far.
Use a “backer-board”, (a stiff and hard piece of wood to drill against), when drilling to prevent bending and cracking the plastic.
Actually this is good advice for drilling any kind of plastic, except (maybe) for soft and thin polystyrene plastics. Then the only change is to use a sharp metal bit with a stiff backing board.
Cutting hard plastics is the same:
Use a SHARP, FINE-TOOTHED blade on a manual jigsaw to make the cuts and use a backer-board to support the plastic.
Hope this helps someone else not break chassis parts.
Agree with all (except I don’t drill quite that slowly). Also helps to put a piece of painters tape on top - easy to mark, keeps the tip from slipping initially, and helps keep the top edge cleaner. Do not try to mark a divot to start the hole - that is a good way to crack the plastic.
Buy a 3D-printer and learn to print slots so the LIDAR can be rotated to align exactly 0 degrees?
I used Keith’s tape method, but without a bench, clamps, or a drill press, using a hand-held drill I was not able to achieve perfectly aligned holes with no cracks. Luckily, the crack did not damage the plate’s integrity.
I probably will have to factor in the slight, off-axis pointing angle into the URDF “joint_ydlidar” rpy=“0 0 0.0261799” (first guess is 1.5 degrees) to get the scanned wall angles to match reality. It is really hard to measure small angles in three dimensions.
I use a hand-held drill with a small wood-boring bit running around 1rps and haven’t cracked the plastic.
A metal bit will crack the plastic if it’s too big (larger than about 1mm or so)
The key is to drill slowly and don’t apply too much force.
If you need a relatively large hole and don’t have a set of wood boring bits, drill a small one (1mm) and then go up 1 or 2 mm at a time, carefully up sizing the hole. The smaller the change, the slower the drill, the less chance of cracking the plastic.
No idea. The bits had two stages, and I had to drill eight 0.125 inch and two 0.250 inch holes. One of the smaller assaults tried to ruin my day, but stopped just short of being a problem.
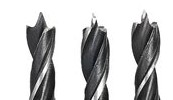
The three on the right are wood-drilling bits, the middle set are masonry bits for drilling concrete and/or bricks, and the three on the right are metal (for drilling metal), bits.
Note that the wood bits have:
A sharp pilot-point. This is used to accurately start and center the hole.
Some wood bits actually have what looks like a small screw-thread for a pilot-point. You don’t want that for drilling plastic.
Do NOT drill a pilot hole for a wood bit! It causes the bit to wobble and break.
Two raised teeth on the outside edge that cut the wood fibers away from the center section so the drill doesn’t split the workpiece.
Two sharp planer edges that cut away the material to be removed.
Deep flutes that are large enough to remove large chunks without clogging.
The shiney edge on the flutes are actually cutting edges that “plane” the sides of the hole to make them smooth.
This is what makes wood drilling bits so wonderful for drilling hard plastics, because the plastic acts like a very hard hardwood.
Because of this, you drill directly to the desired size. (i.e. If you need a 6mm hole, you don’t drill a smaller hole first - you drill the 6mm hole directly using the correct size wood bit.)
For very small holes, (less than 3mm or 0.12"), use an appropriately sized metal bit and be very careful. (The smallest wood bit I can find is 3mm.)
If you can get metric sizes they’re very convenient since there’s none of the “adding and converting fractions” B.S. Also most items are even metric sizes anyway, including the GoPiGo.
I cannot over emphasize how important it is to TAKE IT SLOWLY, not press too hard, and clear the hole often.
That should also work - I was thinking of one of those punches, which would be a no-no.
I actually don’t remember what bit I used when I mounted my lidar. But I am sure I only did it in one stage. Maybe it was a wood bit as @jimrh recommends.