I entirely agree. You need to get the required assignment done within the professor’s stated goals. If the professor is happy with straight lanes, give him straight lanes. Concentrate on accomplishing that - though you may think this is “dumbing down” the result - remember this is a Bachelor’s thesis, not a Masters or Ph.D. - you don’t have to re-invent an entirely new mathematics from the ground up.
Get the assignment done.
Then - as @cyclicalobsessive said, you can indicate in your report additional research that could be done to extend the project and improve on the results. That, (indicating additional research to accomplish additional goals), is something professors just love to see in reports, as it indicates serious research and thought on your part.
Yeah that’s all true… Of course I have to get the straight lane detect going first and see how long that is gonna take… After that I can think about turns. But it’s also very true, that I can’t figure out a task… I can still write about it in my thesis which fills my pages, so win win I guess… in a way it least
In a way, this is like the military - give them exactly what they ask for. If you try to get fancy and clever, you just give them additional ways to hammer you into the ground, or you run the risk of balling-up the entire project.
Many, (MANY), years ago, I worked as a technical person for a company that did high-reliability electronics and avionics for airplanes and submarines - and the spec’s were brutal, as they should be - because people’s lives literally depended on it.
Inspections by agencies like the FAA, the Department of Defense, the Department of the Navy, (and so on), were tough. I learned the best way to “pass” an inspection like this was to “show them what they want to see”. In other words, show them that you know the spec’s, you know the rules, and you know what you’re doing. No more and no less.
Know the limits of your authority and the specification - that way when they try to “bag” you with something you are not required to do - you can tell them just that; “Sorry sir, but that’s not a requirement for us because we’re not certified to Cat-B yet.”
Give the professor what he expects to see and talk about your wish-list in the report.
There is a whole “cottage industry” right now about what suite of sensors are needed for obstacle detection for “real cars” in “real life situations”. Every sensor has benefits and limitations.
You should pick the simplest to achieve obstacle detect to start with in your project. Choosing if that is image processing for “a new object crossing central horizontal line” or a physical distance sensor will be very important to how quick you get something up and running. The physical distance sensor would be my choice, because I have not tried the image processing solution before and it (image analysis) will require more processor than simply polling a distance sensor.
BTW, I was notified today that a “Luxonis Oak-D-lite smart vision sensor” is ready to be shipped to me. This is fitting with the concept of reserving the GoPiGo3’s RaspberryPi for sensor fusion, decisions, and control. Performing image processing on the only processor on the GoPiGo can only be for learning. Cars today have a network of smart sensors and distributed processors, so a GoPiGo3 with no smart sensors can only begin to simulate a partial solution to the whole problem
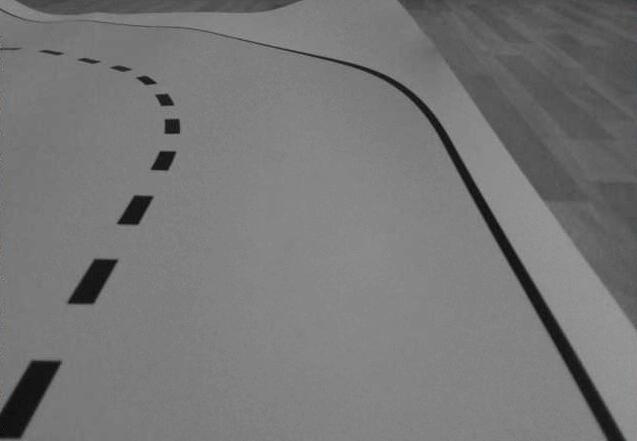
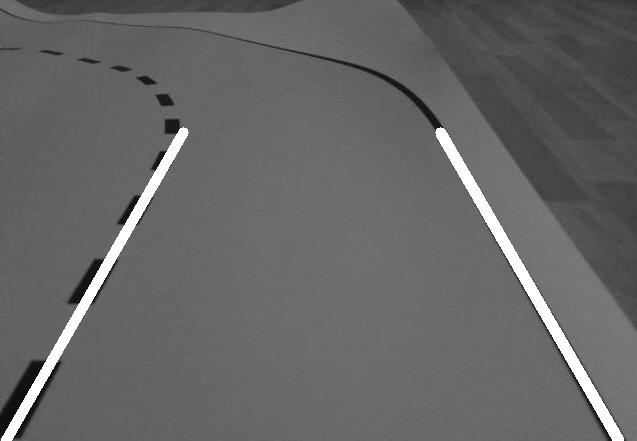
We end this day on a “high” note. I made the lane detection algorithm work that I tried a couple of weeks ago with a picture of the raspberry pi cam:
Before:
After:
I think you have, if not the lion’s share, than at least the tiger’s share of the work done. Great job!
I have to laugh at that. . . .
One of the major limitations is dollars, (or Kroner, or whatever you call your currency there), as some of these solutions cost far more than the robot itself.
The one @cyclicalobsessive is talking about “supposedly”, (I want to see it working before I believe it), does all the fancy image processing in the camera head itself - and draws power like an automobile’s starter motor! - leaving your robot the job of analyzing the results and deciding what to do with them.
That might be a “stretch goal” you could mention in your report - some of the new technologies that would make the job easier.
No there is no speed controller. Or let’s say there is no specification about it. In my mind, I execute the code via ssh and the gopigo drives the course
Thank you! Always nice to hear words of encouragement. Yes that’s a fair point your making! Before deciding for the gopigo I had the openmv h7 cam in mind with a lego based car. This cam is basically a microcontroller with a cam built for machine learning. Incredible piece of hardware!
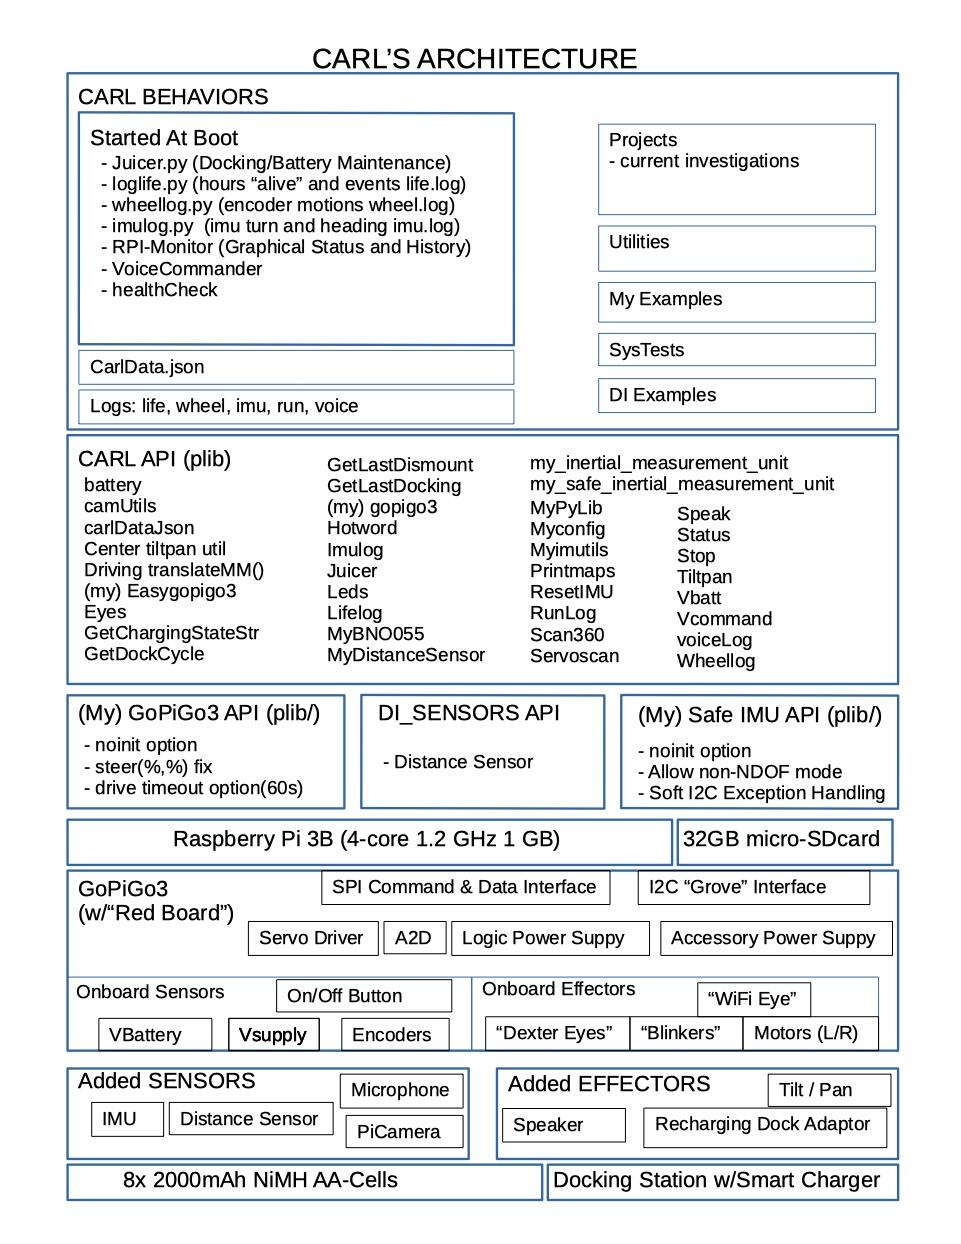
Central data is stored in CarlData.json
Separate Python Programs implement major “Behaviors”
(There are multiple instances of the EasyGoPiGo3() class and there are some collisions possible since there is no “static class data”.)
oh my goodness I have so much to learn… But very nice overview to be honest… Could be a nice paragraph for my thesis if I can transform this. I have to be honest… I have no idea what a json even is So this is basically an overview of all hardware and all functions that are called and used?
quick question… I just had diner and was thinking about the curved lane detection problem and had an idea. I am wondering what you think about it.
Let’s say the image is 480 pixels high and my ROI is 360 pixels.
I perform canny filter and blur it with a gaussian filter like I did in my picture above
I am grouping like 10 rows of pixels together which makes 36 groups of rows
Then I am comparing rows to get the gradient. For example group 1 with group 5 and 10. This way I should be able to determine where the lane is going roughly.
After that I am intersecting points for each group(left lane and right lane) to transform the curved turn into a series of straight lines instead
I am not really sure if this theory is understandable . But in my head it sounded like a good solution
That’s one of the clever tricks graphics software does since drawing curves is very complicated and drawing straight lines is very easy, they just turn a curve into a zillion tiny straight lines.
I just thought of a lane-following idea that is stupid, simple, and requires almost zero logic. So simple, even a total neo like me can do it - in Bloxter!
Required materials:
Robot
GPGOS
Line following sensor, (black version, it has more sensors)
Road with clearly marked margins, either black on white, or white on black.
Note that it doesn’t matter if the road is curved or straight.
Logic:
Robot goes straight ahead and continues until a line-follower sensor on the outer edge (either side), starts to flip. You can wait until two flip just to be sure if you want.
Turn away from the side that flipped.
Go back to step 1.
Object detection:
If “object” is closer than “x” distance on distance sensor, stop.
Elseif bumper switch is activated, stop.
Else continue
Quick and dirty.
Doable in Bloxter. No fancy configuration or high-powered programming required.
Maybe I should do something like this, except I don’t have the floor space, or a wife willing for me to make a big road in the middle of her imported silk tapestry rug.
Of course you probably can’t do something like this for actual credit, but you could do something with a line follower and a bumper to detect edges and obstacles you can’t see/detect.
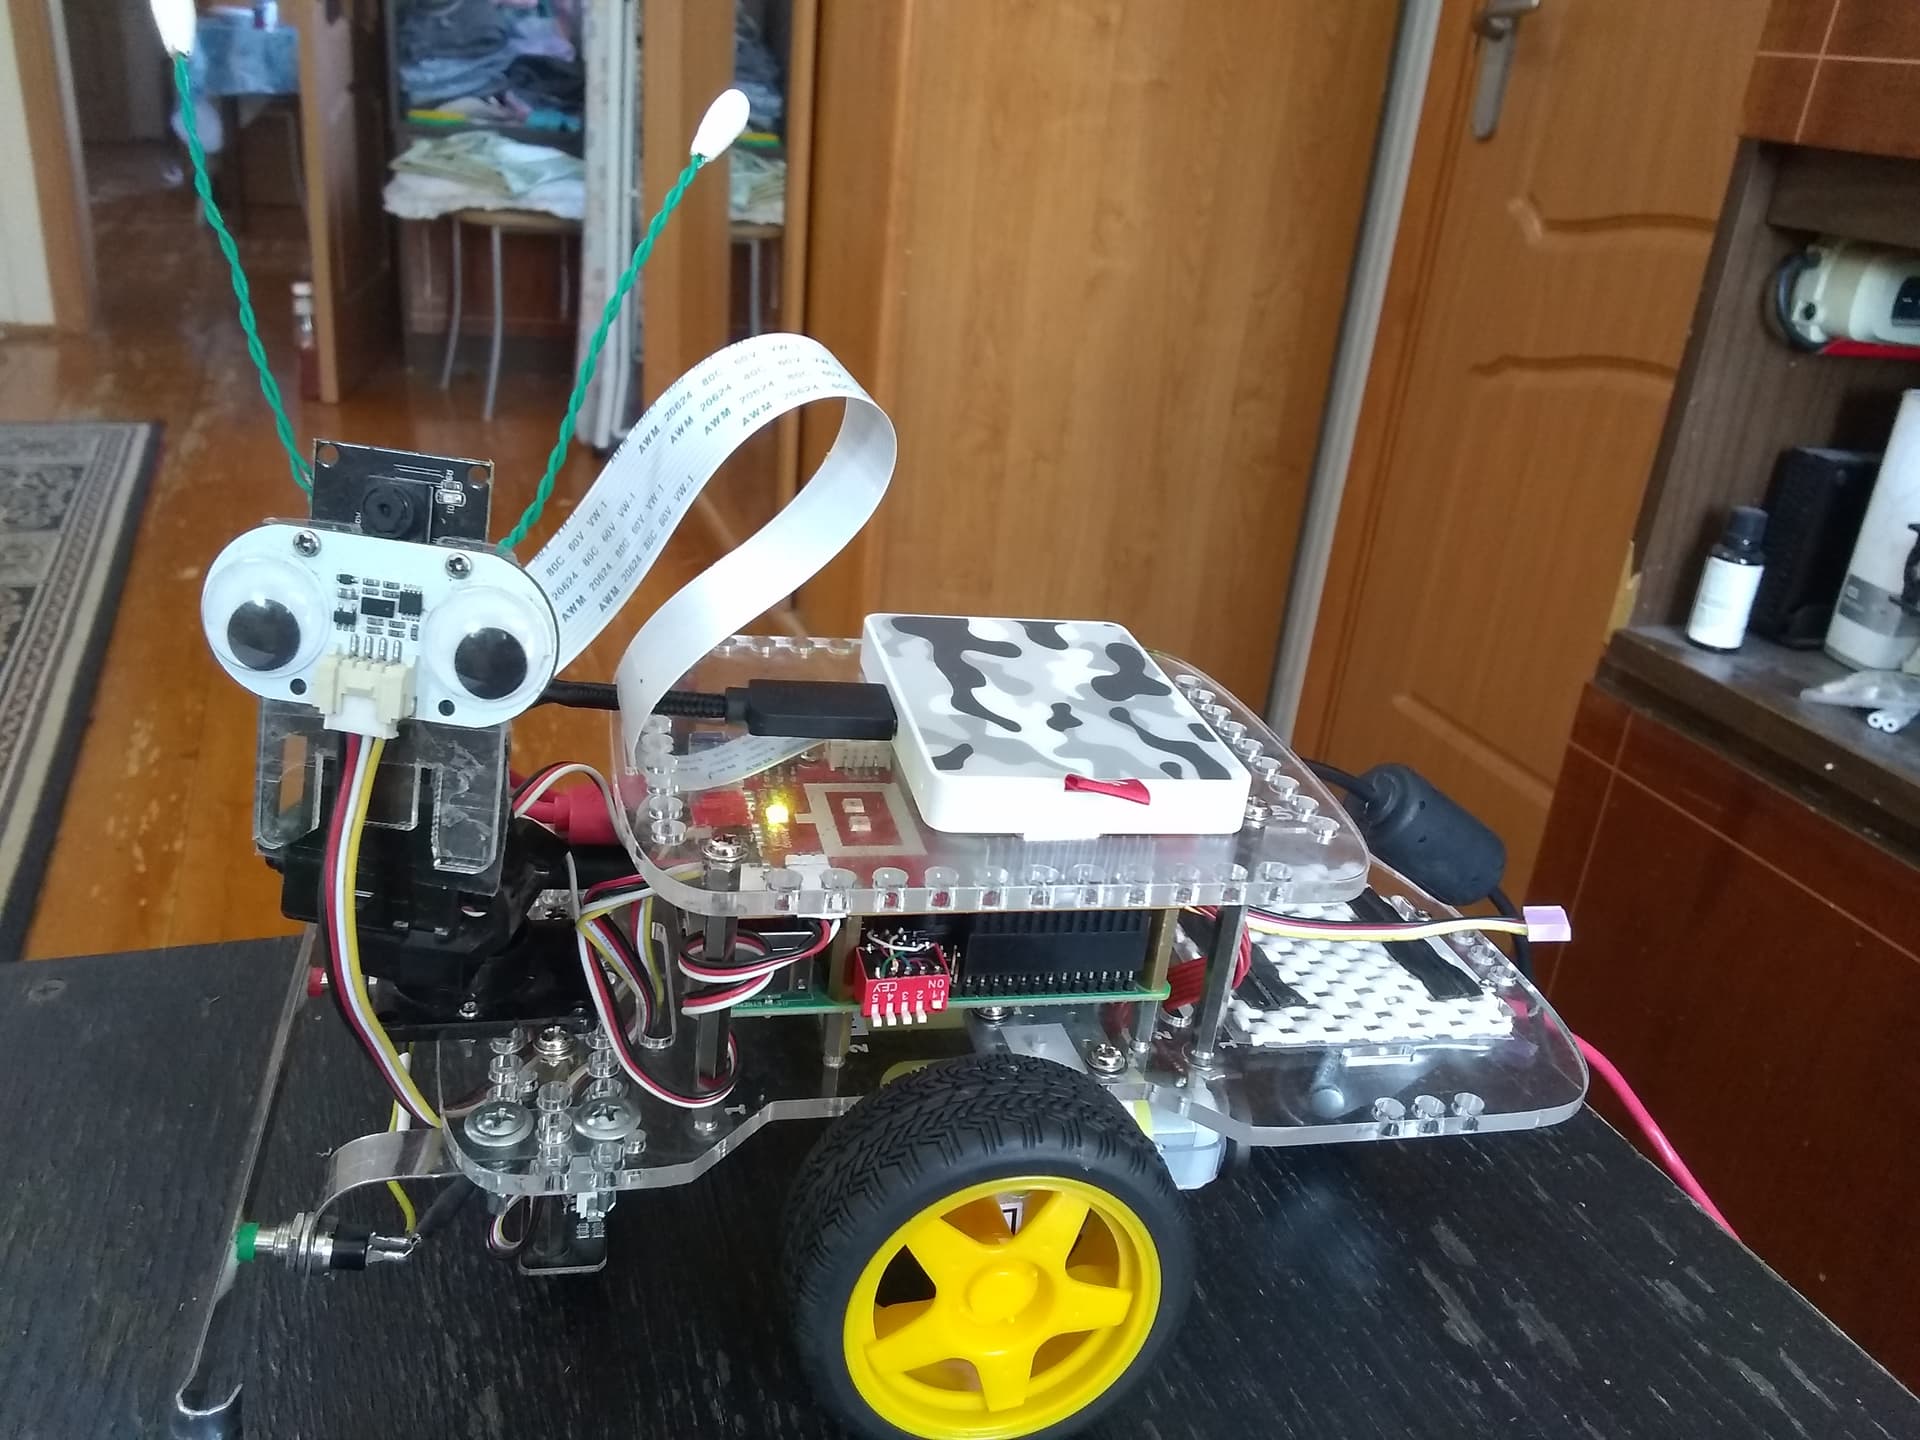
Here’s a picture of Charlie showing his bumper, SSD, and the dip-switch that I use to select which operating system I want to boot. (My multi-boot project is an entire thread in itself!)


 ! Again… thanks to both of you for your time and help!
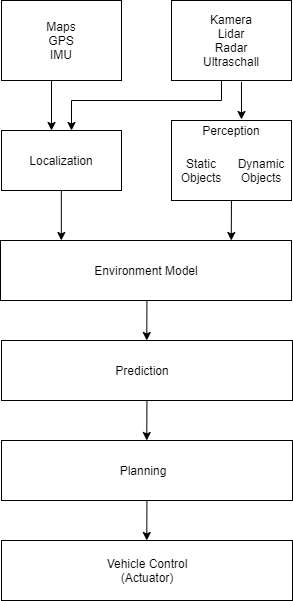
 So this is basically an overview of all hardware and all functions that are called and used?