Autonomous driving GoPiGo3 - bachelor project

Congrats. I’ve been lurking since I have nothing substantive to add. But agree completely with @cyclicalobsessive and @jimrh - get the minimum expected done. If you have time after that you can add additional bells and whistles.

Looks like you’re a long way to an MVP (minimal viable product). Great work!!!
/K

2 Likes

Perhaps this is over thinking it?

If you gave me the

  • mid point of the bottom of the image p0,
  • the midpoint p1 between the left lane line pBL and right lane pBR at the bottom of the frame,
  • the mid point p2 between the left lane pTL and right lane pTR somewhere between 1/3rd to 1/2 of the vertical field of view (FOV),

I expect

  • the radius of lane curvature is related to dH(p2:p1) for rotation amount/heading algorithm
  • the current heading error from the lane at the vehicle is related to dH(p1:p0),
  • the current position in the lane is (p1:pBLpBR) for lane keeping algorithm
  • if one of either pBL, or pBR are not found, use half the previous lane width (in pixels) at the bottom to compute p1
  • if one of either pTL, or pTR are not found, use half the previous lane width (in pixels) at the forward point to compute p2

and all those other lines you are computing may only be good for proving to a human you can process an image for human consumption. They may be of redundant value or even a drag on a basic control algorithm. Later with more processing resource, perhaps more points improve confidence or allow for broken middle lane lines, or the missing lane lines when passing an exit.

For initial proof of concept, without a GPU to do all the calculations, and running an interpreted/bytecode language such as Python - start simple and optimize later.

As another investigation, running a Kalman Estimation Filter on p1, and p2 each detection loop, might cover the temporary loss of both lane lines condition.

3 Likes

Can you elaborate what you mean with dH? :thinking:

3 Likes

I have two generell questions about a raspberry pi that I just can’t figure out.

  1. I am using VNC to work with the pi. The resolution of this pi is set at 640x480 or 800x600 not sure right now. But I couldn’t find a way to increase it. If I open the command or showing camera footage the whole screen is used. Do you know a way to increase the resolution up to a reasonable amount?
  2. Since I am coding on VS Code on my computer, I am copying codes that I tested to the pi with the remote ssh extension. But if I want to test images or videos on the pi I need to send them from my computer. I figured out that VNC has a function that allows me to send data from the computer to the pi. But not the otherway around. So If I save images from the raspi cam on the pi and I want to use it on the computer first to test it. I need to screenshot it. Is there a better way to do that?
3 Likes

First:

To change the resolution:

  1. Use a keyboard, monitor, and mouse to connect to the robot.
  2. In a terminal window, type sudo raspi-config
  3. Select “display options” and then “display resolution” (at the top).
  4. Select a reasonable resolution.

(I am not near my system and I am doing this from memory.  Names may be slightly different.)

Reboot and see what you get.  Retry as needed to get it right.

I noticed that to get a reasonable resolution, I had to set up a desktop, and set that resolution to something reasonable.  Since VNC simply “mirrors” the desktop, you need a configured desktop to mirror.

Second:

What kind of a computer are you using?

On a PC you can use FileZilla to set up a secure connection to the 'bot to transfer files.

Another thing you can do with VS Code is to set up remote development.  that puts some software on the 'bot and allows you to run VS Code on your main system and develop code directly on the 'bot itself.

You will have to look that up yourself as I am not near my system right now.

2 Likes

So the one method to change the resolution is with peripherals and a monitor? But that also means that I need to have the monitor connected at all times if I want the resolution to not change back, right?
I am using a win10 pc. Nothing special. Okay FileZilla ist good to know. I am already using VS Code with the remote ssh extension to code on my pc and run the code on the gopigo

3 Likes

No. You don’t need the monitor all the time, just to configure the desktop resolution.

You can use VNC all other times.

As far as huge picture resolution is concerned, you might need to look at wherever the camera/video is configured to set that differently.

2 Likes

You do not need to attach a monitor/keyboard, just ssh in, and make changes:

2 Likes

Use scp secure copy command but FileZilla is easier

2 Likes

dH Delta horizontal = x1 - x2 (pixel)
dV Delta vertical = y1 - y2

2 Likes

Oh my god… It worked… Thank you so much!

3 Likes

Nice, Filezilla also works :+1: Thanks you both!

3 Likes

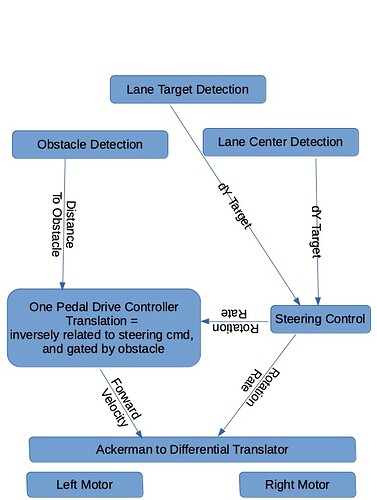
This is an example architecture that would include a speed controller:

2 Likes

Since I cannot see what you are doing, I’m not sure what resolution you’re talking about.

If everything else is OK and its the CAMERA or VIDEO that’s taking too much room, you can change that by adjusting the /etc/uv4l/uv4l-raspicam.conf file.

Somewhere between lines 50 and 60, (depending on the version of raspicam and the config file you are using), you will see something that looks like the following:
(this is from the current version of raspicam’s uv4l-raspicam.conf file)

encoding = mjpeg
#  width = 640
#  height = 480
framerate = 30
#custom-sensor-config = 2

With the width and height lines commented out, the video image is HUGE  - filling the entire screen/browser width.

Un-commenting these lines makes the image smaller, but still too big for what I want.

The original version of the config file as shipped with GoPiGo O/S 3.0.1 has this:

encoding = mjpeg
width = 320
height = 240
framerate = 15
#custom-sensor-config = 2

Which produces an image that’s a bit too small for my taste, and a bit blurry, so I increased the size by half, and upped my framerate to 30.

Viz.: (my current settings)

encoding = mjpeg
width = 480
height = 360
framerate = 30
#custom-sensor-config = 2

. . . and that produces an image that is large enough, but not TOO big.

Maybe this will help?

Follow-up note:

In order to maximize the field of view, make sure the settings maintain a 4:3 aspect ratio.

2 Likes

Quick update: I spoke to my professor about the minimum result, that I need to achieve for my thesis. He said that the minimum result is the perception of the environment, which means lane detection and obstacle detection of certain objects. I don’t need to achieve lane keeping, but it would be amazing if I did. So I try to get the lane detection with turns going. After that I will search for a obstacle detection algorithm for cars or stop signs or pedestrians. After that my focus is mainly on writing the thesis and which the time in mind, I can think of improvements of any kind.

3 Likes

Correct me if I am wrong, but (AFAIK) a “stop sign” isn’t an obstacle, right?

A person in the road, or another car, or a cow, or a fallen tree - these are obstacles, but a stop sign (or a traffic light) isn’t an obstacle.

Or, am I missing something here?

2 Likes

Correct a stop sign isn an obstacle. I was just brain storming while writing this :sweat_smile:. I need to prove that I can detect certain things basically. It doesn’t really matter what I am trying to detect. The easier to implement the better.

3 Likes

Do you have to use the camera for obstacle detection, or can you use another sensor (e.g. ultrasound)?
/K

2 Likes

Absolutely!

Forgive me for being a bit long-winded, but the topic of engineering/over-engineering reminded me of a story I read in a 1950’s/1960’s era trade magazine for television repairmen of that day.

:rofl:

1 Like

Yes, I am only using the raspberry pi cam v2 for that.

3 Likes