The updated firmware and software for the GrovePi has been released.
You can download the latest firmware and software from out Github Repo https://github.com/DexterInd/GrovePi/.
The major changes in the firmware are:
*DHT, ultrasonic, RTC support added
*Support for multiple modules for same type added (Not tested)
*Protocol made more robust
Changes in the Python Library:
*Better Exception handling added
*Default support for both Rev 1 and Rev 2 added
*Strict timing in dependent functions added to increase stability
If you want more features or face any problems, please post it on the forums and we’ll help you out.
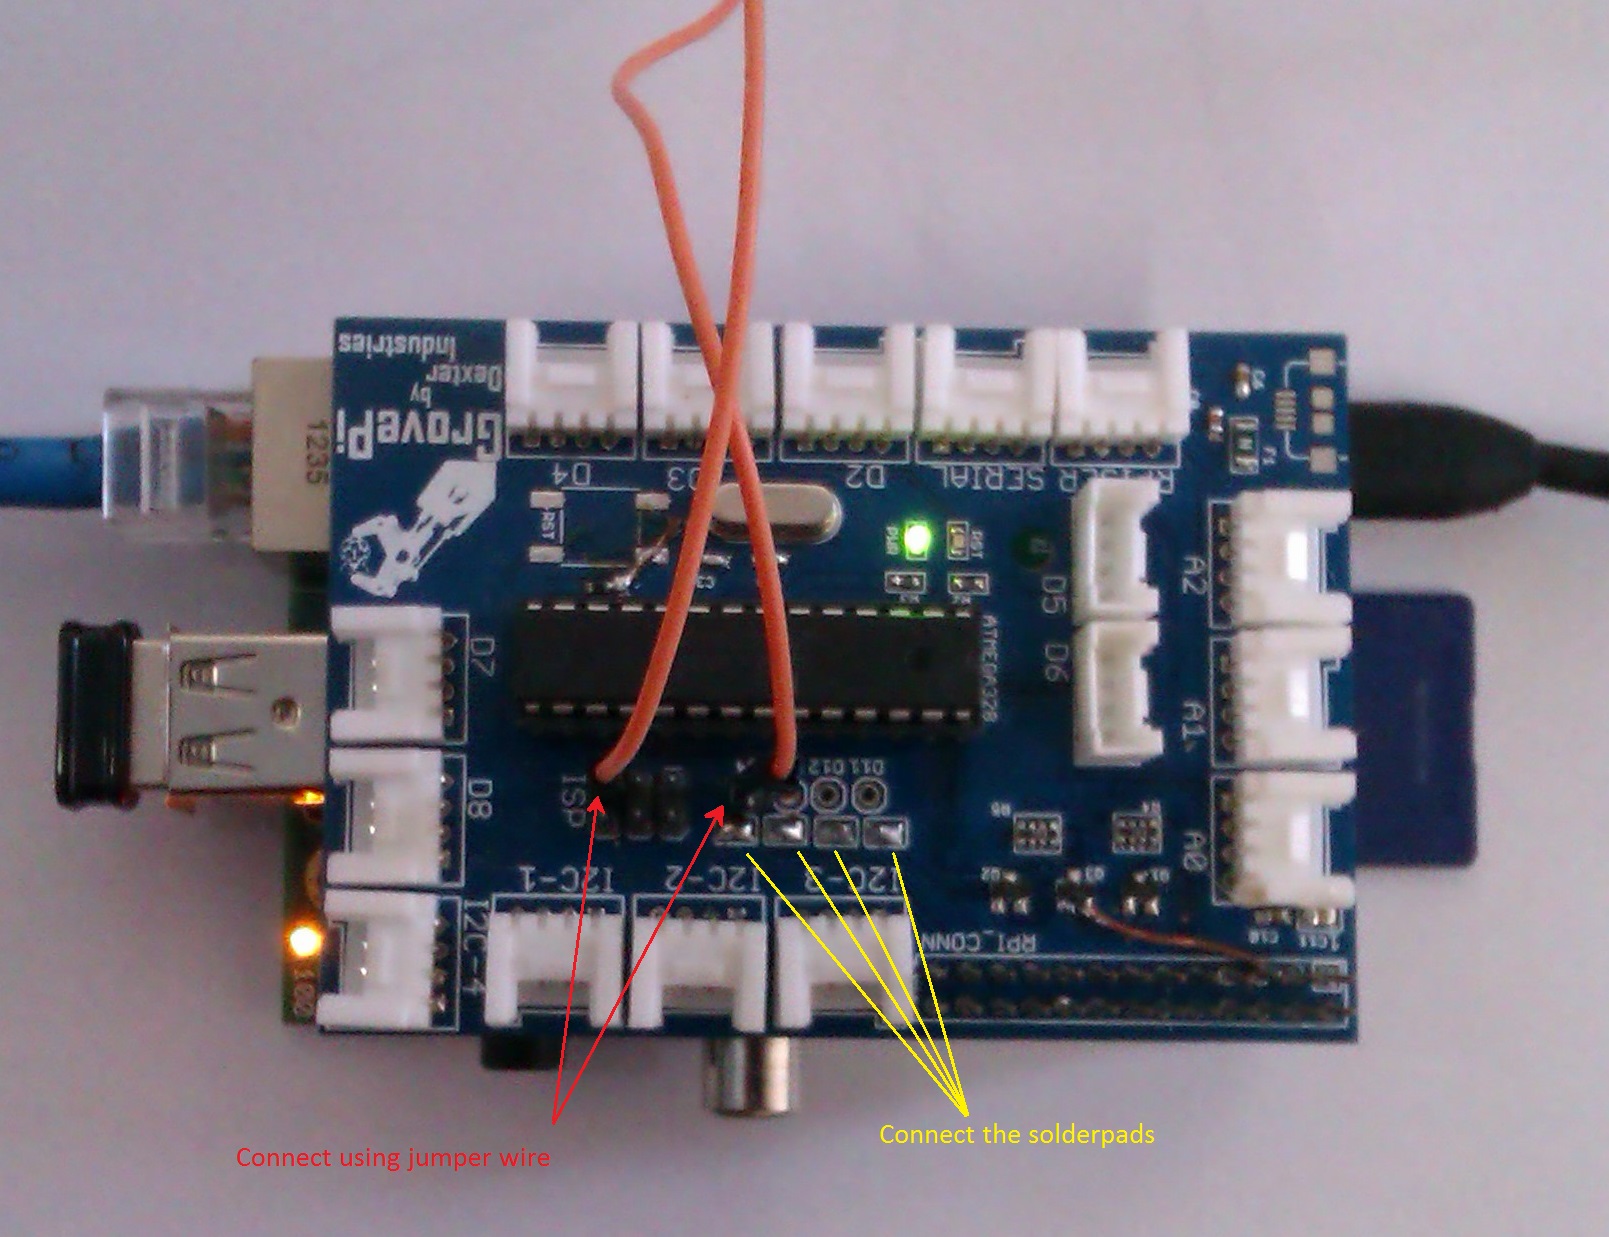
Can you provide more detail on the update process? I’m a bit of a novice. What do you mean by ‘connect the four solder pads’? Also, I do not have header pins on where the jumper cable is attached. Should I solder some on?
Hi lunawire,
If you look carefully just below the microcontroller and above the I2C ports, there must be 4 solerpads and 4 header pins. Apply a dab of solder to each of the solderpads so that they are shorted and connected together.
Is there a command to find out the current version of the firmware so you can see the version before, do the update and then see the version afterwards to confirm it all went on OK ?
Do you leave the header pins all soldered up from now on after upgrading ?
Hi kwiatks,
In the firmware folder in the GrovePi directory, there is a files called “version.txt”. If the files has 1.1 in it then you have the new version with you, if you don’t have the file then you are probably on the previous version.
We have released only one version update as of now. So I’ll suggest you to update your local repository and to get the new python library and run the update_firmware.sh to update the firmware on the GrovePi too.
You can always check the forums to see if a new firmware update is available or run the new_fw_search.sh to automatically check if a new firmware is available or not.
Dear Karan,
I need your precious help.
I have tried many time to upgrade Firware, without success.
I have setting up the software, apply dab on each of solderpad, connect wire beetwen two pins as defined… no way.
At each time, the Grove Pi is found, wire seems to be ok because led of reset (RST) is red, but the script return :
GrovePi Found. Connect the jumper to the Reset pin and Press any key to start firmware update
. . .
avrdude: AVR device not responding
avrdude: initialization failed, rc=-1
Double check connections and try again, or use -F to override
this check.
avrdude done. Thank you.
I have check connections, again and again… no way. I desapear…
I have try with -F parameter, same result.
Why didn’t you give GrovePi with solderpads allready shorted ?
I would prefer a easy way to upgrade Firmware.
Buy a new GrovePi at each upgrade is not a good solution for me.
Hi eric33,
I am extremely sorry for the problems that you have been facing with the GrovePi. We are in the process of a revision of the hardware to accomodate more features and enable an easier firmware update too.
Now coming to the problem that you have been facing, try connecting the reset jumper and run avrdude -c gpio -p m328p in terminal and please post what you see as the output. I have attached a file with the expected output.
Please let me know what the output is on your end.
Dear Karan,
I went to your partner in France (http://www.generationrobots.com) who helped me to do the firmware update. Thanks to them, my GrovePi is updated.
thank you
Hi eric33,
Glad to hear that the problem has been resolved.
It would be great if you could let us know what the source of the problem was and how was it resolved. It’ll help us to avoid such problems in the future.
I can’t upgrade the firmware. I follow the instructions but got the same error as eric33.
I have setting up the software, apply dab on each of solderpad, connect wire beetwen two pins as defined… no way.
At each time, the Grove Pi is found, wire seems to be ok because led of reset (RST) is red, but the script return :
GrovePi Found. Connect the jumper to the Reset pin and Press any key to start firmware update
. . .
avrdude: AVR device not responding
avrdude: initialization failed, rc=-1
Double check connections and try again, or use -F to override
this check.
avrdude done. Thank you.
When I connect the reset jumperwire and I run avrdude -c gpio -p m328p I got this responce:
Hi johan,
Sorry for all the troubles. The Raspberry pi should detect the GrovePi when you run avrdude -c gpio -p m328p. Does your GrovePi work fine with the old firmware? Have you the run the GrovePi setup script https://github.com/DexterInd/GrovePi/blob/master/Script/install.sh. Can you double check the connections once more and if possible post a photo of the whole setup.
I have installed the GrovePi software with the GrovePi setup script. It gave no errors and the GrovePi works fine with the older firmware. My Raspburry Pi detects the GrovePi in normal operating mode. If I use the following command sudo i2cdetect -y 1 it answers this:
When I use the command avrdude -c gpio -p m328p it gives allways the same answer (with or without the reset jumper wire and the four soldering pads connected):
pi@raspberrypi - $ sudo avrdude -c gpio -p m328p
avrdude: AVR device not responding
avrdude: initialisation failed, rc=1
Double check connections and try again, or use -F tot override this check.
avrdude done. thank you.
In Python I can read others sensors but not the Temperature & Humidity sensor Pro (because it needs firmware 1.1).
The attached file is a photo of the setup. You can clearly see that the 4 soldering pads arre connected and that the jumperwire (I use the red wire on this wire) connects the write pins. The reset LED (red) and the power LED (green) both give light.
Hi johan,
First,power off your Raspberry Pi immediately. From the picture that you had sent, it looks like all the four solderpads seem to be soldered together. You might end up destroying both the boards.
thanks for the assistence. I did power down the Raspberry Pi and removed the solder form the 4 soldering pads and replaced it with new solder only connecting both solder pads on each of the four pads, but not connecting the four pads together. Then I powered up the Raspberrt Pi again and gave this command at the terminal sudo avrdude -c gpio -p m328p. The AVR device was then recognized.
When I ran the update_firmware_sh script, it worked and the new Firmware is now installed. The GrovePi finally is able to read the Temp. & Humidity sensor Pro.
Since I made the mistake to connect the 4 pairs of solderpads together, it should be better to mention on not to do that and only connect both sides of each of the 4 solderpads together. In this page this message should be put in the text under number 2 above the same figure as well.
Hi John,
Great to hear that it’s working and sorry for all the trouble. We’ll update the pictures and the description to make it clear for other users too.
The solder dabs are to enable SPI communication from the Raspberry Pi which is used for uploading new firmware.
You can desolder them if you want to use a SPI device with the Raspberry Pi or the the GrovePi. They’ll go away in the next hardware iteration and would be replaced by something that is much more easier to handle.
Hi,
If you cannot see the GrovePi in i2cdetect -y 1 after the firmware update, just run the firmware update again. You should see the GrovePi address in the i2cdetect as soon as the firmware update is successful.
If you are still unable to see the i2c address, do post the output of the Firmware update here.
