Hi,
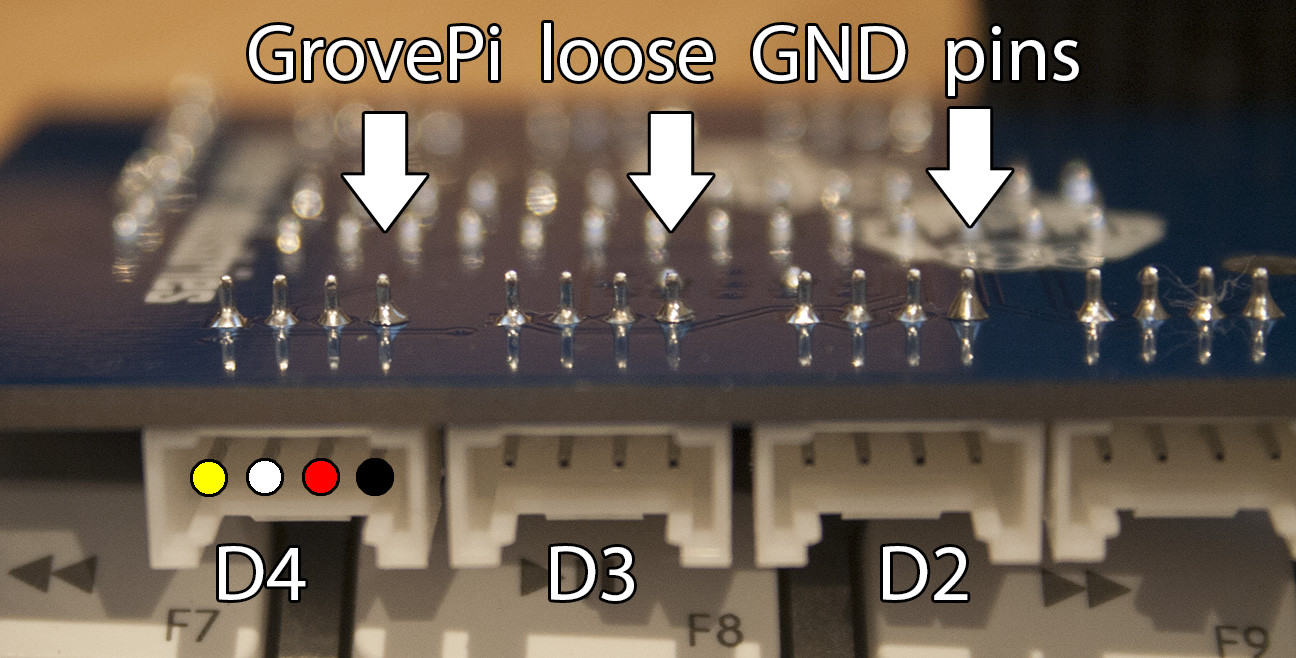
Socket D3 on my GrovePi has a loose connector pin.
It seems where the pin was soldered onto the board has come loose.
Explains why none of my examples would work in that socket!
I should be able to fix this myself.
I am a novice at soldering.
Any tips, so I don’t break it?
Soldering is quite easy. First you need to have these things:
A soldering iron with a small pointed tip (not a broad chisel-tip), if possible on where you can control the temperature. If you do soldering of IC's or other fine material, it is best not to set the temperature to high or to solder to long to prevent damaging the component. Since you only need to solder a connector (which isn't sensitive to high temperatures) any soldering iron will do.
Solder. This is a mixture of conductive metals mixed with a cleaning substance known as flux. Make sure the solder you buy is suitable for electronics works. Thick, plumbing solder is cheap but may damage delicate circuits, because it requieres too much heat to melt. Best is to use unleaded solder because it is better for the environment and produces no toxic vapors which you could inhale when you melt it.
Not necessary but easy to work with: a work stand (also known as 'third hand' or 'helping hands'), this are small weighted stands with two or more clamps that hold the item to solder in place. Some work stands include an integrated magnifying glass for delecate work, while the most expensive work stands add a light to help illuminate the work area.
Not necessary but easy to remove old solder: a soldering pump, this is a small device which creates an underpressure if you push the button, so the liquid solder is suck away from the soldering point.
Stand and sponge: It's important to have somewhere to put the hot soldering iron when it's not in use, and a way of cleaning the tip of the iron while you're using it. Some soldering irons come with a stand with a build-in cleaning sponge. If yours didn't, buy a seperate stand-and-sponge set.
Tweezers: Tweezers are an absolute necessity because if you have to hold a component with your fingers while soldering it, you'll burn your fingers.
To solder the connector on your GrovePi, turn it upside down (with the connector downwards and the pins to solder upwards). Make sure the GrovePi is attached to the work stand or hold it firm so it can’t be moved when you push the soldering iron on it.
Plug in the soldering iron and wait until it reach its soldering temperature. 250°C should be sufficient to solder a connector. Hold down the point of the soldering iron on the soldering pad of the GrovePi and make sure the point touches both the soldering pad and the pin of the connector. Wait until the remaining of the solder is melted and add hold the solder-wire against one of the components both not directly to the tip of the soldering iron. If both components (the soldering pad and the pin of the connector) are hot enough, the melted solder will flow en connect both items. If needed, you have to add more solder until both the soldering pad and the connector pin are completely covered with liquid solder and the solder forms a concave joint upwards the pin. Move the soldering iron away of the joint and the solder will harden. If the solder look shiny, the joint is OK. If it seems
Here are some video and tutorials to show how to do it:
Mike is there any way you can post a picture of the problem? At worst we could learn and make a better QA/QC for the GrovePi. At best we might be able to convince seeed to send you some replacements if it was manufacturing error.