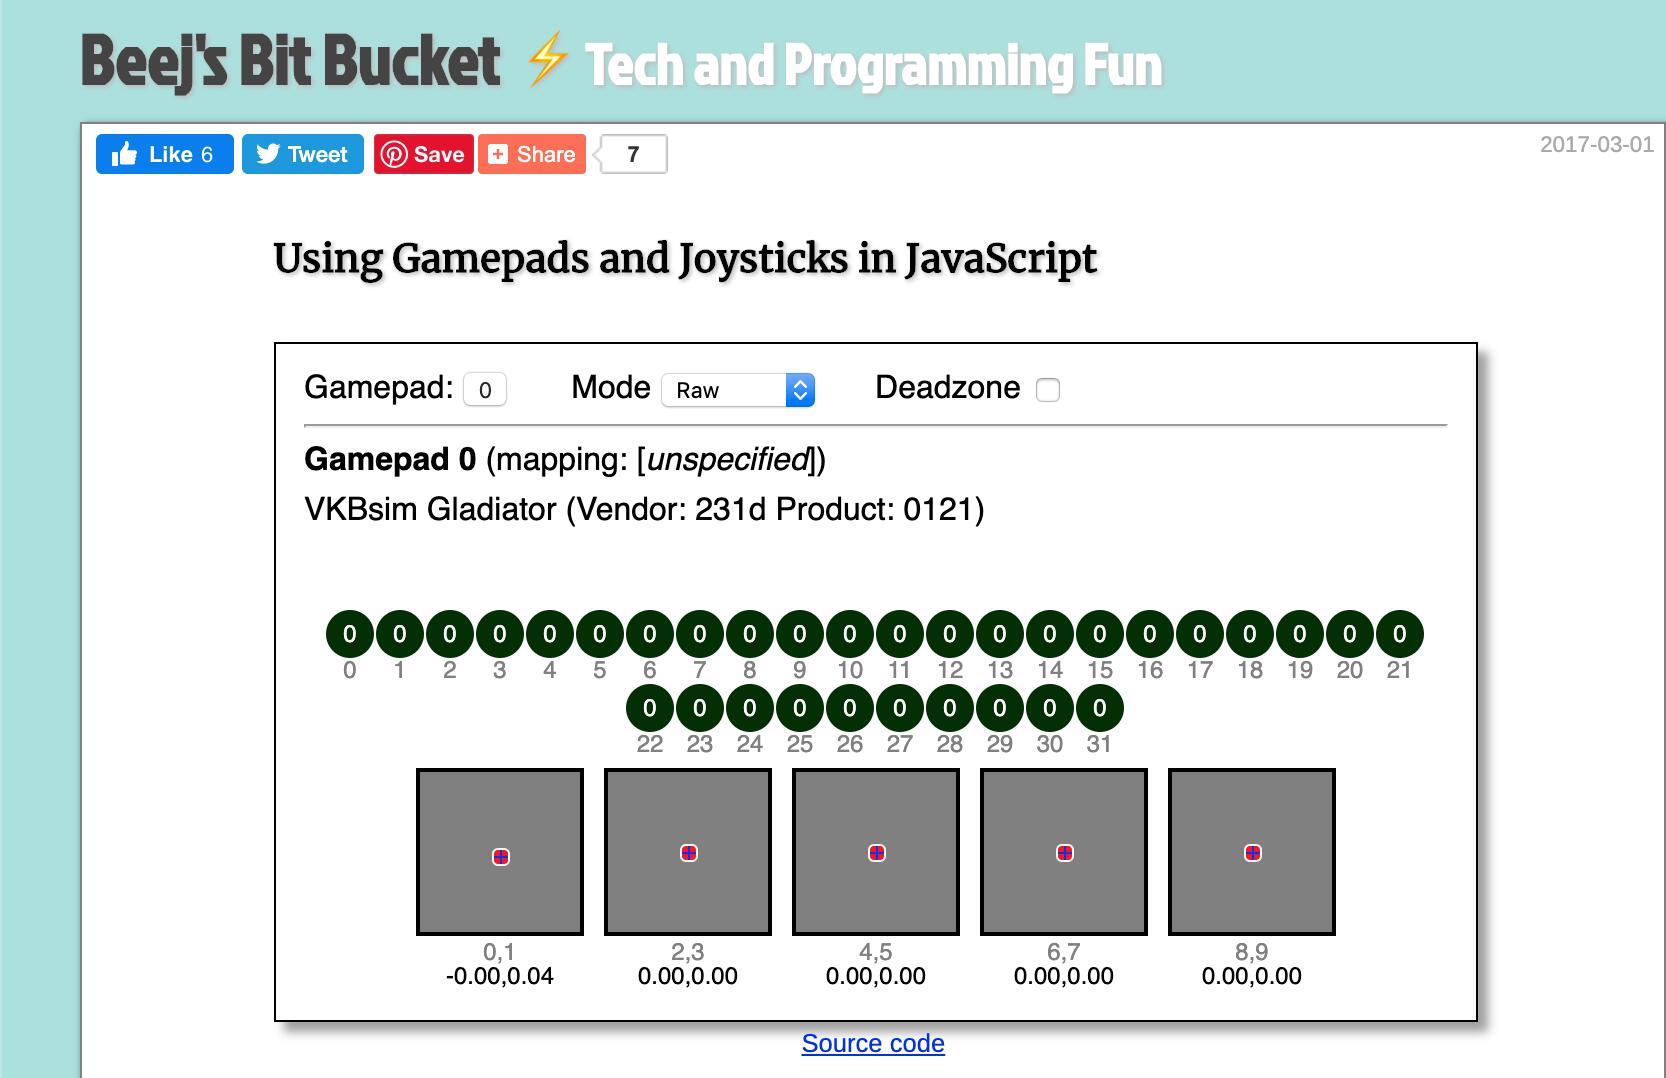
Now that is cool - I fly a LongEZ with a (Russian made) VKBsim Gladiator. That code understands it as well:
1 Like
Cool Beanies! That kind of broad applicability is promising. BTW, which axes are your X, Y, Z, and Throttle axes?
He links to the source code on GitHub and - amazingly enough - it doesn’t have twenty folders, a thousand dependencies, and no way to know which end is up.
It’s a simple listing of four or five files that even I should be able to figure out! My hope is that I don’t have to reinvent the wheel and re-write a joystick utility that’s already been written 20 times already.
The fact that its already in JavaScript and already runs in a browser like a wizard, is making me really excited about it - maybe I can throw out that pesky “nipple” software altogether!
Update:
I downloaded a ZIP of the program files - less than 7.5k! - and ran the “index.html” file. Opened up a window with the demo running.
I’m attaching it here so that others can enjoy!
jsgamepad-master.zip.txt (7.4 KB)
Remove the “txt” and you should be good to go.
1 Like
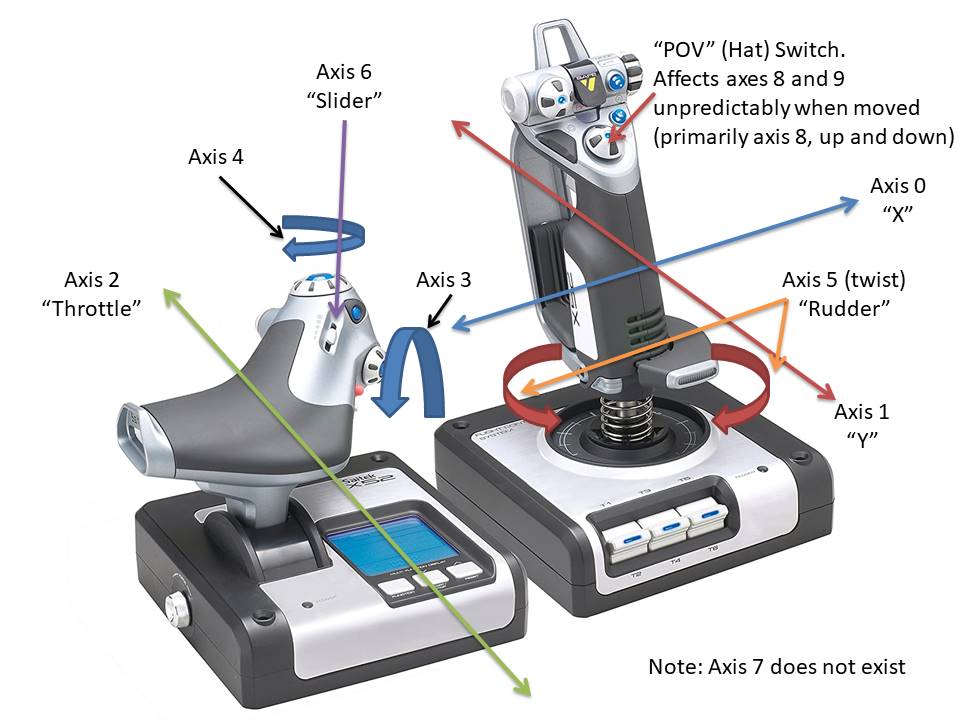
On my Saitek X-52 HOTAS stick/throttle combo:
This is an illustration of the axes as they map to the demo’s display:
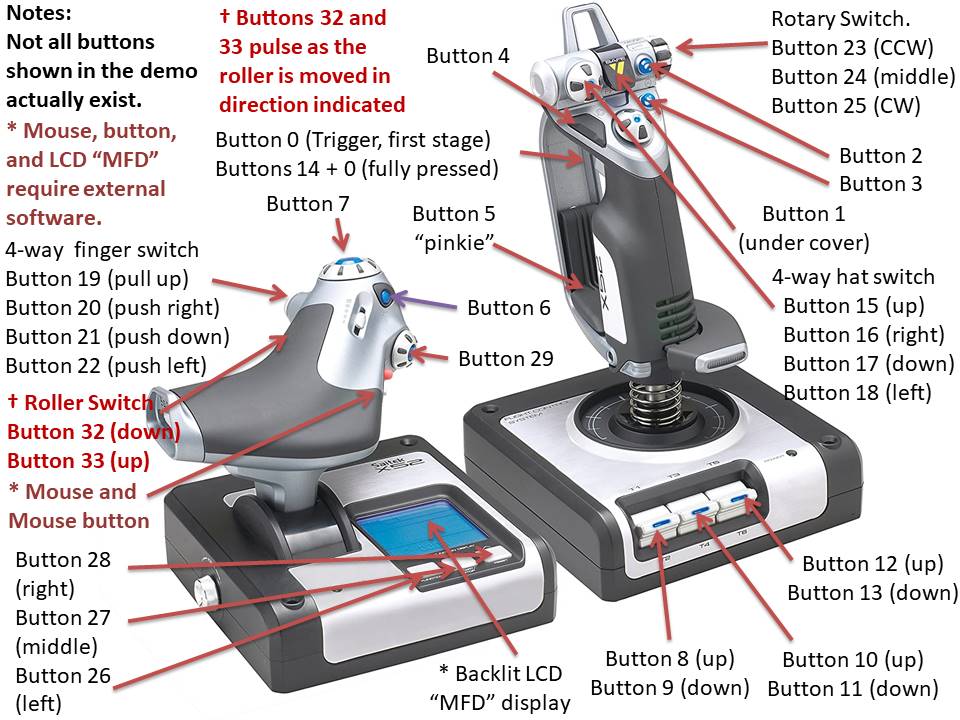
And here is the way the buttons map:

It is interesting that the demo shows axes and buttons that do not appear to exist on the actual joystick. I don’t know if this allows for re-mapping in the software, or the provision for extra buttons and/or axes in the future. It is also interesting that axes 8 and 9 are only “partially” implemented, at least with respect to the demo software.
Some features, (the mouse and it’s button, the LCD display and it’s backlight, and perhaps a fully functional POV switch), do not appear to be accessible via JavaScript.
Don’t worry, I didn’t do this just for you,  I needed a button and axis map anyway!
It would be interesting to know if your joystick implements, (at the very least), the primary axes in the same way as mine. It would also be interesting to know how the buttons map - at least if the first few like trigger and “missile” (covered) are similar.
One potential issue is button mappings for various and sundry joysticks since it’s a Lead Pipe Cinch that they’re not standardized. One possible solution is to implement a JSON file that could hold joystick configuration mappings. How I am going to do this, I have no idea as of yet.
P.S.
I did the graphical mark-up in PowerPoint 2010.
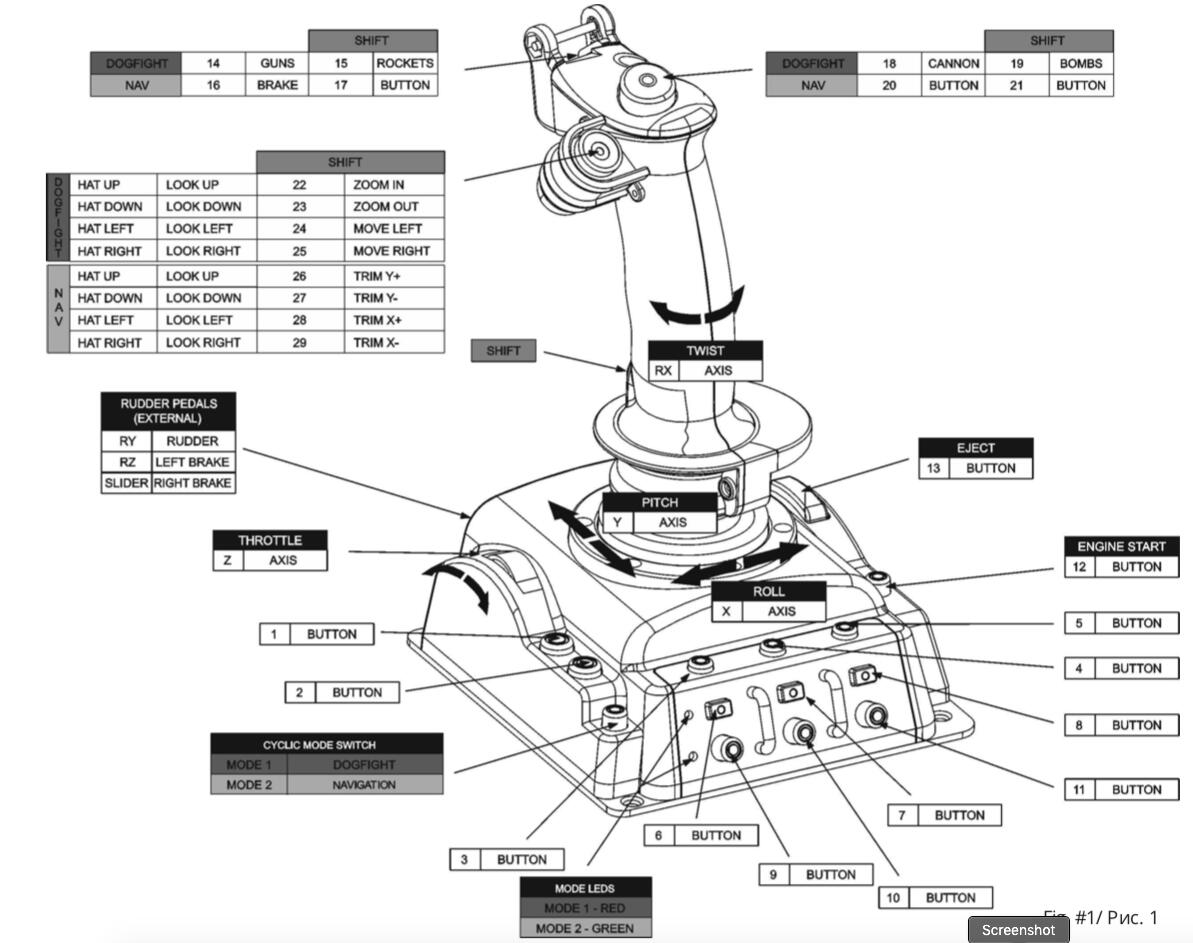
I am assuming the numerical designations are the way the buttons map on your version of the demo. How do the axes map?
Update:
Corrected button map. I wanted to update the one in my original posting, but it wouldn’t let me - so here it is.
Here’s the axis map again, just in case I made changes that I don’t remember.
I’m looking at the (supposedly simple) demo code and it looks like I’ve signed myself up for a college level HTML5/CSS/JavaScript class!
AFAICS, (As Far As I Can See), half the functionality is in the JavaScript and the other half is in the CSS file. The .html file seems to do nothing else but load everything up and kick it up the bum to get it moving. Not what I’m used to.
Sheesh!
1 Like
@cleoqc, a little help here please. . .
(along with anyone else who wants to comment )
If this stuff borders on insanely stupid, please accept my apologies, I’ve bee researching just about everything - HTTP, JavaScript, various Python thingies, Flask, Nipple, you name it! I have more tabs open in Firefox than I have ever seen before - even when my son is playing his MMO’s, handling several chat sessions, and chasing a server bug at work - all at the same time.
I have been studying this stuff and I think I have my arms around some of it. Check me and let me know what I’ve messed up.
First: The landscape:
- The Python file and its dependencies run in the context of the web server (i.e. What the web browser connects to when you run the Remote Camera Robot project.)
- The JavaScript file and all it’s dependencies run in the context of the web browser (i.e. When you open your browser and connect to the GoPiGo.)
- The Python program for the Remote Camera Robot is - somehow, I haven’t figured that out exactly just yet - responsible for loading the nipple.js JavaScript file and it’s dependencies up onto the browser and getting it going. I’ll figure that out later.
Second: Data exchange between the GoPiGo and the client-side browser:
- While the Remote Camera Robot code is running and talking to the browser, the GoPiGo really doesn’t send stuff to the browser window that shows the “nipple” and the POV of the robot. (Aside from standard web responses, there is little or no data sent from the GoPiGo to the browser instance - except for the streaming data which is a different thing.)
- Given the following code snippit:
@app.route("/robot", methods = ["POST"])
def robot_commands():

    # get the query
    args = request.args
    state = args['state']
    angle_degrees = int(float(args['angle_degrees']))
    angle_dir = args['angle_dir']
    force = float(args['force'])
    determined_speed = (MIN_SPEED + force) * (MAX_SPEED - MIN_SPEED) / (2 * MAX_FORCE)
    if determined_speed > MAX_SPEED:
        determined_speed = MAX_SPEED

    # add case where force = 0
    if force == 0:
        determined_speed = 0

    if state == 'move':
        # for moving backward
        if angle_degrees >= 260 and angle_degrees <= 280:
            gopigo3_robot.set_speed(determined_speed)
            gopigo3_robot.backward()

        # for moving to the left or forward
        if angle_degrees > 90 and angle_degrees < 260:
            gopigo3_robot.set_motor_dps(gopigo3_robot.MOTOR_RIGHT, determined_speed)

            left_motor_percentage = abs((angle_degrees - 170) / 90)
            sign = -1 if angle_degrees >= 180 else 1

            gopigo3_robot.set_motor_dps(gopigo3_robot.MOTOR_LEFT, determined_speed * left_motor_percentage * sign)

        # for moving to the right (or forward)- upper half
        if angle_degrees < 90 and angle_degrees >= 0:
            gopigo3_robot.set_motor_dps(gopigo3_robot.MOTOR_LEFT, determined_speed)

            right_motor_percentage = angle_degrees / 90
            gopigo3_robot.set_motor_dps(gopigo3_robot.MOTOR_RIGHT, determined_speed * right_motor_percentage)
        # for moving to the right (or forward)- bottom half
        if angle_degrees <= 360 and angle_degrees > 280:
            gopigo3_robot.set_motor_dps(gopigo3_robot.MOTOR_LEFT, determined_speed)

            right_motor_percentage = (angle_degrees - 280) / 80 - 1
            gopigo3_robot.set_motor_dps(gopigo3_robot.MOTOR_RIGHT, determined_speed * right_motor_percentage)

    elif state == 'stop':
        gopigo3_robot.stop()
    else:
        app.logging.warning('unknown state sent')

    resp = Response()
    resp.mimetype = "application/json"
    resp.status = "OK"
    resp.status_code = 200

    return resp
The following is happening:
@app.route("/robot", methods = ["POST"])
If the browser is sending information to the robot. . .
def robot_commands():

    # get the query
    args = request.args
    state = args['state']
    angle_degrees = int(float(args['angle_degrees']))
    angle_dir = args['angle_dir']
    force = float(args['force'])
As part of the data sent, it receives a “blob”, (list?), of data that we call “args” that comes in the structure “request.args” that contains all the data being sent to us by the nipple.js program running in the browser.
Within that structure, we find:
The “state” of the nipple, (stopped, moving, etc.).
The angle of motion, (if moving) in degrees.
The direction of motion, one of “up”, “down”, “left”, or “right”.
The “force” - distance the nipple has been moved from the center rest position.
After all that, beginning with:
determined_speed = (MIN_SPEED + force) * (MAX_SPEED - MIN_SPEED) / (2 * MAX_FORCE)
and continuing with:
    if determined_speed > MAX_SPEED:
        determined_speed = MAX_SPEED

    # add case where force = 0
    if force == 0:
        determined_speed = 0

    if state == 'move':
        # for moving backward
        if angle_degrees >= 260 and angle_degrees <= 280:
            gopigo3_robot.set_speed(determined_speed)
            gopigo3_robot.backward()

        # for moving to the left or forward
        if angle_degrees > 90 and angle_degrees < 260:
            gopigo3_robot.set_motor_dps(gopigo3_robot.MOTOR_RIGHT, determined_speed)

            left_motor_percentage = abs((angle_degrees - 170) / 90)
            sign = -1 if angle_degrees >= 180 else 1

            gopigo3_robot.set_motor_dps(gopigo3_robot.MOTOR_LEFT, determined_speed * left_motor_percentage * sign)
(etc. . . .)
We take the data received and decide what to do with it - translating it into robot activities based on the message(s) received.
My question:
Within the context of the Remote Camera Robot’s Python script, I can understand what’s going on with the received data.
However, after reading the nipple.js code over and over again, along with the Nipple doc file, I cannot figure out how the nipple.js code is sending (via POST), the data back to the GoPiGo - I don’t see anything that looks like: “OK now, we’ve gotten all this data, now package it up and send it off.”
As far as I know, the nipple.js script should take all the calculated data, package it up as a JSON structure that matches what the Python program expects to receive, and then send it all off with a “POST” request to the GoPiGo.
- Am I correct?
- How does the data get from the nipple.js script back to the Pi? I don’t see where that’s happening.
Thanks for any help you can provide.
Ahhh!
I figured it out.
The Python script does, among other things, launch the “index.html” start page for the Remote Camera Robot.
The index.html code then does things and “calls” the functions in both nipple.js and jquery, sending them back to the 'bot.
If you want to be able to trigger a splitting migraine headache as a repeatable event, just open the jquery.js file, stare at it, and try to figure out what it’s doing. It’s 86,659 bytes in length - almost 87k - and yet takes up only four lines. What a jumbled mess!
I’m still trying to figure it out.
Yes - events trigger handlers, (onclick, on, resize) and then there is that 250ms repeating throttler sending “data” to the bot.
1 Like
Slowly but surely getting this figured out. . . . I may pass this course after all!
I am just about at the point where I am going to try some of my ideas within the pure “browser based” code and see if they do what I expect. Once I am convinced that I have a slight idea (  ) what I am doing, I’m going to try writing a joystick library and send the data from the browser to the 'bot.
My ultimate goal is to put something together for joystick/game-pad control that is event driven and not dependent on needing a wire-frame game/animation loop. Or, if that is absolutely unavoidable, create the absolute minimum of animation/game overhead possible.
Stretch goal:
- Allow the library to read, and apply, data from a previously created profile for a particular joystick. This will allow joysticks/controllers from various manufacturers to be used in a uniform way - with sensible defaults applied if a profile is not loaded.
- Once the library can make use of a profile; create a utility to create joystick/controller JSON “profiles” for individual joysticks and controllers where you can identify, and select, which buttons and axes you wish to use in your software. The profiles would be saved using the controller ID - which is a combination text-string and USB identification string, so this should be adequate to uniquely identify a particular model of controller.
- As a part of the profile, the user can select if a particular axis or button is to be used or ignored. The library would respond to this when started and either include, or exclude, controller elements that are or are not masked.
Additional stretch goal:
- Allow the profile generator to allow the user/programmer to assign meaningful names to the various controller elements, instead of having to refer to it as something like “gamepad.button.attribute( i, j )”, you could call it “fire” or “lower_flaps”.
Time will tell, though I think I have a couple of ideas how I can implement this stuff.
1 Like
First: Happy Mother’s Day.
(I don’t know if you have any children, but just in case!)
Second:
What determines what pulse intervals are associated with a particular angular reading within R4R/easyGoPiGo? I remember seeing an article/posting, but cannot find it.
Thought:
If “90°” isn’t actually 90°, perhaps the PWM values associated with a particular angle could be tweaked? That would be much easier than trying to modify the acrylic chassis! This is something I am thinking about for my updated Control Panel project.
Also, I (finally!) found a pan-and-tilt mount for Charlie’s head, and it might be important to calibrate the servo angles for the Remote Camera Robot.
1 Like
Perhaps not directly applicable to the “web controlled remote robot”, but since you mentioned game-pad control, I just saw this package announcement:
This project currently supports the following controllers:
- Sony PS3 Dualshock Wireless controller
- Sony PS4 Wireless Controller
- The Pi Hut wireless USB game controller
- Rock Candy wireless USB game controller
- Generic wireless USB game controller from Argos
1 Like
Thanks!
You’re right, not directly but interesting nonetheless.
1 Like
There’s an even better solution:
I just bought several servos and the all had (at least) twice as many teeth as the one supplied with my kit.
I suspect that I will be able to get the servo much closer to 90° without having to tweak values.
Maybe the folks at Dexter can consider a different servo with more teeth for future products?
One idea I am thinking of persuing when I get back to the Control Panel project is a tabbed interface with different features and adjustments on separate tabs. This will help keep the interface from being too cluttered.
Question:
Is it possible to create a tabbed interface in Tkinter? I’ve looked but not seen anything on that topic.
Thanks again!
When coding the Remote Camera Robot project, did you do anything directly with the nipple.js library, or did you folks just “include” it and use it as is?
Assuming the latter, I may be making this more complicated than it really is. That being true, I should ignore the nipple.js part and concentrate on the index.html and throttle.js - assuming that nipple.js is “magic” that I throw stuff at and it gives me results.
I’ve been studying nipple.js, (all 22 A4 sized pages of it!), and sorta have my arms around it - but it’s like trying to get your arms around an elephant!
Instead of supplementing nipple.js by adding physical joystick input, I’m thinking it might be better to just toss it and use the HTML5 Gamepad API to handle it directly - nipple.js is a bundle of snakes!
Thanks!
Progress is being made!
First:
I decided to “throw out”, (so to speak), my concentration on understanding nipple.js to re-implement it as a physical joystick/gamepad controller - it is obviously not intended for that.
Second:
I wanted to concentrate on the exchange of messages between the browser and the 'bot. I decided to take my Remote Camera Robot code, strip it, and implement it as a way to control the head servos on Charlie - up, down, left, and right. I now have a test python script that has had most of the message handling logic stripped out and replaced with simple handlers for “up”. “down”, “left”, and “right” event messages.
After innumerable syntax and logical errors, I finally have it working - after a fashion; the camera now follows the position of the dot on the screen. There are still issues - often the program doesn’t know when to stop! I’m thinking that this is more a problem with nipple.js than my test software - apparently, when the mouse stops, nipple.js doesn’t always signal a stop - there is probably another signal I need to track.
Third:
My next steps are to study keyboard events and make the test code responsive to the arrow keys on the keyboard.
Last:
I have a strong suspicion that I am going to, (eventually), throw out nipple.js and implement my own controller scripts.
1 Like
I didn’t work on that project but I do think nipple.js was used as is.
1 Like
So, who DID work on it?
One thing I did notice is that messages from the browser instance seem to queue up between the browser and the robot.
There’s an on-screen window that gives you the current state of the “nipple” and what the motion and force are.
Once I stop moving the nipple, the force and direction both go to zero on-screen, (so I know the in-script force, state, and direction are static), but the robot keeps moving as if the messages to the robot were stacked up somewhere. In fact, the robot can - and will - continue to respond for several seconds after the nipple has been released.
This is true for my “head servo test” code and the remote_robot code as well; the robot will continue moving after the nipple has been released. In both cases, the robot is connected wirelessly. I have not tried this hard-wired.
I wonder where the messages to the robot are queueing up?
After considerable study of the nipple file, I assumed as much. I then had the idea of modifying the python script to eliminate all the movement related code, and substitute code that would move Charlie’s new pan-and-tilt servos based on the direction the nipple is pushed. Right now it’s constrained to purely up, down, left, and right movements.
I’m still wondering where messages get queued. . . . . Once I figure that out, I can try to flush it when the nipple stops.
Major progress to report - I’ve cracked this thing wide open!
The first major step is now 99% done. I can drive the robot around using the mouse and the nipple.js libraries and move the pan-and-tilt using the arrow keys on the keyboard.
What went wrong:
It turns out that I was, indeed, “barking up the wrong tree” by trying to analyze and re-factor the nipple.js code. It’s complicated, it’s convoluted, and it has more classes and methods than an Ivy-League University!
More important, I had lost sight of the fact, (actually, didn’t realize it at first), that nipple.js is a library that is there for my convenience just like the GoPiGo3 and EasyGoPiGo3 libraries - though I will admit that the nipple.js library makes the GoPiGo libraries look like 1975 Standard Basic, right out of Dartmouth College, (where it was invented).
N.B. For those who don’t know this, “Basic” is NOT an acronym, like FORTRAN or COBOL - it’s the actual name of the language, like Python is the name of the language most of us use on the Pi.
Once I realized that re-factoring the nipple.js code was a nightmare waiting to happen, I took a step back and looked at the over-all project again, this time zeroing in on the index.html file. I also made a major step when I decided to fork the remote-robot code and create a stripped-down copy to experiment with HTML messages and head movement.
THIS was the nut to crack - understanding how messages were passed back-and-forth between the browser and the server instance on the 'bot itself. The stripped down code - my “head servo test” code - allowed me to concentrate on the server and client side messaging routines.
The first step was to figure out how to “capture” the communication that was already happening via the HTML and nipple.js files and re-direct it to controlling the servos.
Once that was done, I spent a while concentrating on how keyboard events are handled. Unfortunately, every example and article I found assumes that you want to capture the event within the context of the web page itself, not as a message to be sent back to the server. Figuring that out was like unfolding a gas-station map, (remember those?), and figuring out how to get it folded back up again!
Finally, today, I have working code that will capture the key-events I want and ignore the events I don’t want. I also took the opportunity to re-factor the servo motion code to more effectively modularize it.
The last step was to merge these changes back into the basic Remote Camera Robot code. Just in case you didn’t know, merging “test” code into the main code fork is not a task for the faint hearted. Once that was done - and all the dangling participles were weeded out - the code is now just about 99% working.
There are a few regressions in there, (controlling the robot’s movements is now not working properly), but that’s likely to be some test-code that I left in the base HTML by mistake.
Once I get it working, I’ll make a video and upload it.
1 Like