It seems that clicking the “DI Software Update” icon on the desktop and going through the update causes the “GoPiGo_Scratch_Start” icon not to work. (You click on it, and nothing happens.) That’s because the update process loses the executable bits on the two GoPiGo scratch scripts. Fixing them manually makes it all work until the next update.
I don’t know whether or not things are broken this way on the sd card image, as I had clicked the “update” button before ever trying Scratch with my daughter. I’m somewhat surprised that I don’t see any complaints about this on the forum though. Does Scratch not get much use?
Hey Worried_Guy,
I clearly broke something in my last push to Github. I’m rewriting some of the Scratch and Update software. I’m really sorry for the heartache, thanks for telling us about it.
Can you tell me:
That’s because the update process loses the executable bits on the two GoPiGo scratch scripts. Fixing them manually makes it all work until the next update.
Which bits are you having to repair when this happens?
Those scripts lose the execute permissions when you run the update. The problem you see when this happens is that you click on GoPiGo_Scratch_Start and nothing happens.
A few other commends based on the initial setup experience:
It would be nice if one of the scratch demo programs (such as the basic test) showed an example of moving the servo and reading from the ultrasonic sensor. As it is right now, (I think) the only way to figure out what broadcast commands are available in scratch is by reading the source of the python connector. That wasn’t a problem for me, but for someone who isn’t a software engineer it might be a stumbling block.
It would be nice to have a “reset” program linked right off the desktop – i.e. a short program that would turn off the LEDs, park the servo in the home position, and stop the wheels moving. When playing with the python examples, we had cases where the python basic test wanted to move the servo further than the servo wanted to go - leaving it “shuddering” at one end of the range, and another where the LEDs were left on after ctrl-c’ing out of the led test. It would have been nice to have a way to quickly restore sanity in this case rather than having to cut the power.
For us, we had to readjust the attachment of the servo lip so that the midpoint of servo range would have the lip at the “straight ahead” position. I wonder if others have this problem, or our servo somehow didn’t ship preset in the “home” position.
On the “Assembling the Servo Package” page, several of the photos do not link to a higher-resolution version of the small photo when you click them. I assume this is an error. This problem occurs a few places in the main instructions as well, such as in the steps about attaching the battery box.
Lastly, not easy to fix, but: Why is the power connector from the battery box so tall that prevents the raspberry pi (B+) board from plugging in as far as it should, and why is the usb power connector located behind one of the spaces holding up the cover? (i.e. It’s impossible to use USB power w/o removing that spacer.) Were these problems that came up because the GoPiGo was designed for an earlier version of the Raspberry Pi than the B+?
Thanks for all the feedback. I’m going to try to work to correct #'s 1, and 2. On number 4, we’ll look for those pictures and link them up with the larger originals.
Yup, absolutely. We can probably make this clearer. But when you attach the servo, there’s no set position that it comes in. It will need to be tested and adjusted. We’ll try to make that more clear in the instructions.
The lastly: indeed, we’ve heard that before and we’ll be correcting it shortly.
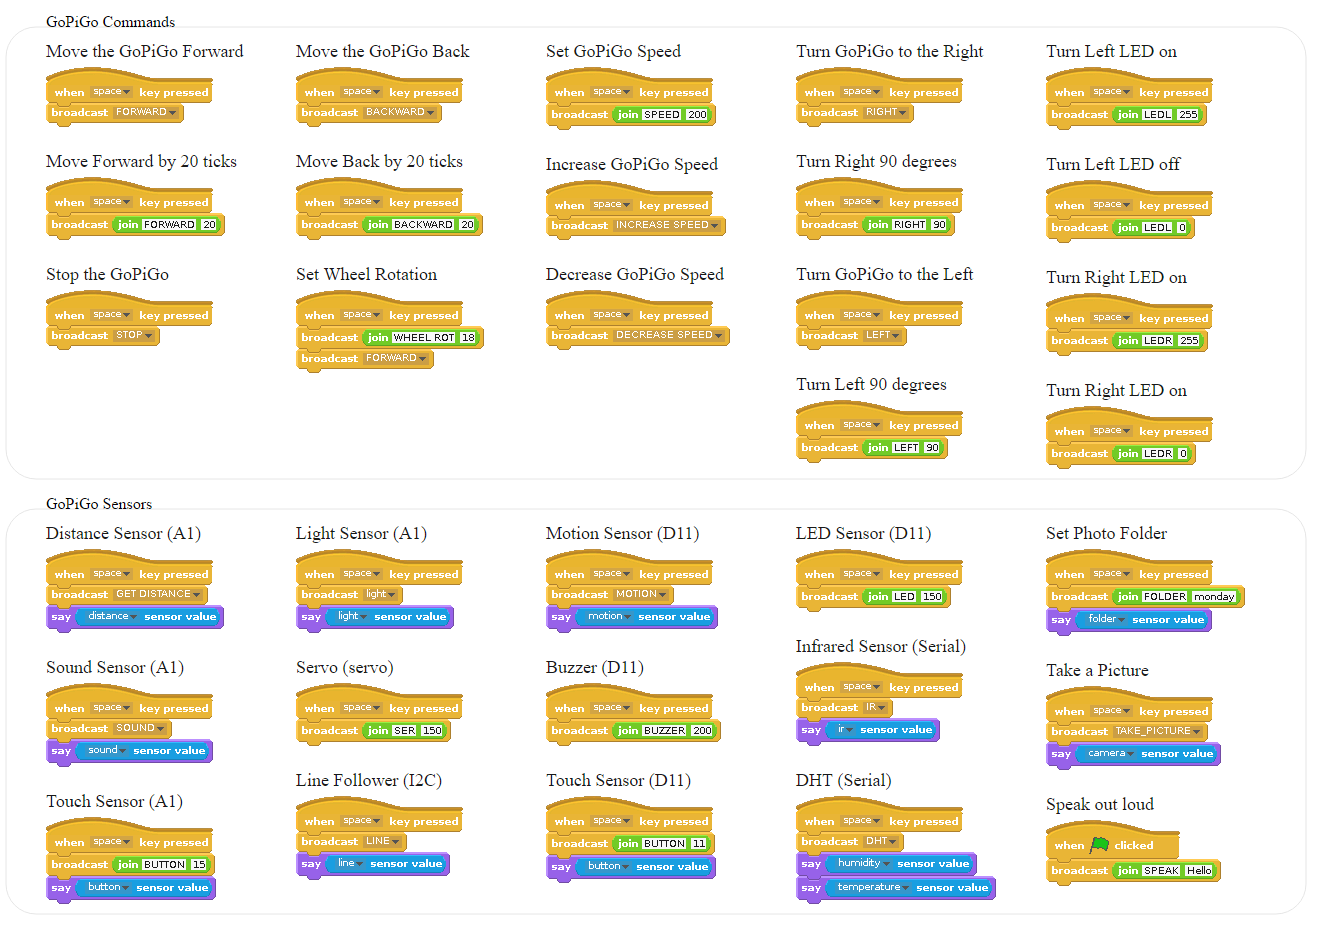
Seems you know what broadcast commands are available in Scratchj for the GoPiGo. Can you help with a list?
I am a newbie and am at a loss regarding how to use various GrovePi sensors I have (ultrasonic, line follower, light, sound, temperature etc.) to program in Scratch.
I do not know what VALUES I need to put in the Scratch broadcast() function to get this done.
Just like the example programs use LEDL, LEDR, FORWARD, BACKWARD, LEFT, RIGHT etc. within the broadcast() functions, what other strings are understood by Scratch on GoPiGo for some of these other sensors? Is there a compehensive list?
Are these broadcast strings already built into Scratch, or do I need to initialize something using Python as well?
And are there example programs with these other sensors that I can view and quickly get up to speed?
Sorry for the multiple questions, but I feel I am stuck and not getting anywhere given the lack of material online. Would greatly appreciate some quick help!
If I recall correctly, all that the broadcast function in scratch does is send a message to a python program, which in turn calls into C to make things actually happen.
To see what messages are supported, look at the python program:
Look at what values of msg are being handled from line 115 onwards to see what’s supported, e.g. the first few you see are SETUP (line 115), START (line 117), STOP (line 124), FORWARD (line 131) and so on. Above every such line (well, at least from line 124 onwards) is a comment saying what the message will do when received.