Easy PiCamera Sensor Class For GoPiGo3 Robots
NOTE: No connection to DexterIndustries or ModRobotics. Do Not Ask Them For Support!
Python3 Class to treat the PiCamera as a unified family of sensors useful in robot programs
including:
- Left, Front, Right Light Intensity (0-100)
- Motion Detector (Left, Right, Up, Down)
- Color Detector With Color Table ReLearning (Black, Brown, Red, Orange, Yellow, Green, Blue, Violet, White)
- Maximum Intensity area horizontal angle from center and value (0-100)
- 320x240 RGB image save to JPEG file or retrieve as numpy array
Refresh rate is roughly 10 per second.
To Bring Down To Your GoPiGo
wget https://github.com/slowrunner/Carl/raw/master/Projects/EasyPiCamSensor/EasyPiCamSensor.tgz
tar -xzvf EasyPiCamSensor.tgz
Requirements
Requirements ( All come in the stock ModRobotics Rasbian_For_Robots ):
- Python3
- (Does not use/require OpenCV)
Other Requirements:
- GoPiGo3 for some example programs
- (Sensor does not require GoPiGo3)
- Not multi-processing-safe (camera does not allow multiple streams)
Note: The tgz contains a version of easygopigo3.py with a working steer(lft_pct,rt_pct) method
- For use with the Braitenberg Vehicle examples
- The current ModRobotics easygopigo3.py steer() method has a problem.
ARCHITECTURE
  The EasyPiCamSensor class encapsulates
  - PiCamSensor class:
    * Creates a thread to run PiCamSensor.update() roughly 10 times per second
      - PiCamSensor.update() computes average light intensity for the left half, the whole, and the right half of a camera image
        and estimates what color is present in the central portion of the image by matching RGB values to a table of colors,
        and estimates what color is present in the central portion of the image by matching HSV values to a table of colors,
        and computes the horizontal angle from centerline to an thresholded area of brightest pixels
    * Starts a PiCamera class object which will capture video frames at 10fps
    * Creates MyGestureDetector for the PiCamera object to analyze motion using three consecutive frames
      - When MyGestureDetector.analyze() finds new motion it latches the direction of motion and the time it occurred
        (reading the latched motion clears the latch, ready to hold the next motion event that will occur)

   EasyPiCamSensor <-- PiCamSensor <-- PiCamera
                                          ^
                                          |
                                   <-- MyGestureDetector
API
- epcs = easypicamsensor.EasyPiCamSensor()
- Create and start Easy Pi Camera Sensor object
- Read values from config_easypicamsensor.json if exists
- light() # return average intensity across entire sensor (0.0 pitch black to 100.0 blinding light)
- light_left_right() # return average intensity across left half and right half of sensor
- color() # returns estimate of color of central area of sensor using “RGB” method
- color_values_dist_method(method=“BEST”) # returns nearest color with distance and method (“RGB” or “HSV”) used
- motion_dt_x_y() # returns time of first motion left|right and/or up|down since last method call
- motion_dt_x_y_npimage() # returns details and image of first motion left|right and/or up|down since last method call
- max_ang_val() # returns the horizontal angle from centerline (+/- half FOV, left negative) of bright area and max intensity (0-100)
- save_image_to_file(npimage=None,fn=“capture.jpg”) # saves passed or last frame to file encoded as JPEG
- get_image() # returns RGB numpy image array
- learn_colors(tts_prompts=False) # learn one or more colors with optional TTS prompting
- print_colors() # print the current color table
- known_color(color_name) # returns True if color_name is in the current color table
- delete_color(color_name) # removes a color from the (local copy) EasyPiCamSensor object color table
(must then call save_colors() to make it permanantly gone) - save_colors(path=“config_easypicamsensor.json”) # save color table in file [default: config_easypicamsensor.json]
(Probably a good idea to save to a .json.test file to protect the existing config file; So use responsibly.) - read_colors() # reads color table from config_easypicamsensor.json file
- save_config(dataname,datavalue,path=“config_easypicamsensor.json”) # save a value or variable in the conf file
e.g: epcs.save_config(“vflip”,True) for later retrieval with vflip = epcs.get_config(“vflip”)
epcs.save_config(“my_color_array”,my_color_array) for later retrieval with my_color_array = epcs.get_config(“my_color_array”) - get_config(dataname=None,path=“config_easypicamsensor.json”) # retrieve a value or entire config dictionaryfrom config file if exists
- get_all_data() # returns dict with all “by-frame” data
- print_all_data() # convenience prints dict returned by get_all_data()
EasyPiCamSensor Example Programs:
- read_sensor.py
- Reads all “by-frame” data from sensor 10 times per second and pretty prints with headings every 15 readings
pi@Carl:~/Carl/Projects/EasyPiCamSensor $ ./read_sensor.py
2020-12-31 22:23:59 read_sensor: Starting
2020-12-31 22:23:59 read_sensor: Warming Up The Camera
config_easypicamsensor.json or colors_rgb_hsv not found
Using DEFAULT_COLORS_RGB_HSV.
2020-12-31 22:24:04 read_sensor: Starting Loop
xmove ymov     latch_move_time     l_x   l_y       frame_time         rgb  (   values  )  dist    hsv  (       values       )   dist  left   whole  right (maxAng   val )
 none none                         none none 2020-12-31 22:24:06.83  Brown ( 89, 66, 41)  18.71 Orange ( 30.51, 56.53, 35.05)  10.49  23.80  18.01  12.23 ( 16.49, 99.22)
right   up 2020-12-31 22:24:06.92 right   up 2020-12-31 22:24:06.93  Black ( 17, 12,  7)  21.95 Orange ( 30.71, 59.80,  6.87)  10.29  17.63  13.70   9.76 (  7.12, 98.82)
 none   up 2020-12-31 22:24:07.02  none   up 2020-12-31 22:24:07.03  Brown ( 78, 57, 35)  31.91 Orange ( 29.45, 56.74, 30.87)  11.55  13.78  15.58  17.38 ( 16.49, 99.22)
 left   up 2020-12-31 22:24:07.12  left   up 2020-12-31 22:24:07.14  Brown ( 88, 65, 39)  19.65 Orange ( 30.55, 56.93, 34.85)  10.45  22.96  20.50  18.03 ( 16.49, 99.22)
- i_see_color.py [-h] [-v]
- Uses EasyPiCamSensor.color_values_dist_method() and optionally [-v] espeakng TTS to report estimate color seen
- User selects BEST, RGB or HSV color matching method (BEST returns RBG for some colors, HSV for others)
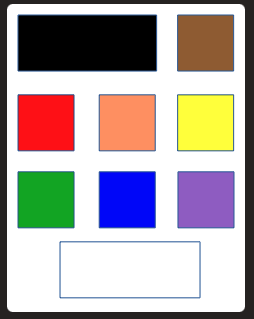
- Target_Colors.pdf provides color samples that match the default sensor color table (Print on matte photo paper for best results)
- i_see_light.py
- Comments when someone turns a room light on or off
- i_see_motion.py [-h] [-v]
- Reports first motion and datatime since last report
- Recognizes left or right, up or down motion
- Option [-v] adds TTS reports
- i_see_colors_in_motion.py [-h] [-v]
- Prints and optionally [-v] speaks last motion and color
- Saves image of motion to motion_capture-YYYY-MM-DD_HH_MM_SS.jpg
- Note: Image may not catch a fast moving object
- face_the_light.py [-h] [-v]
- Turns GoPiGo3 robot to face the brightest area in room
- Option [-v] narrates with Text-To-Speech
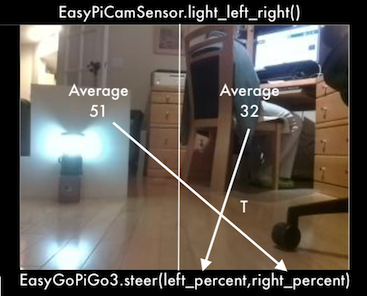
- braitenberg2B.py [-h] [-v] [-g N.n] [-s]
- implements Braitenberg Vehicle 2B “loves light”
- Uses left and right light intensity as stimulus for the opposite side wheel
- Implementation adds obstacle inhibition of forward motion for vehicle protection
- Option [-v] narrates with Text-To-Speech
- Option [-g N.n] introduces stimulus amplification with given gain. [Default 1.0]
- Option [-s] pops window on desktop every few seconds showing robot view
(This option only works from command shell on robot’s desktop)
Video: GoPiGo3 “Carl” w/EasyPiCamSensor Braitenberg Vehicle 2B
- simple_braitenberg2A.py
- implements Braitenberg Vehicle 2A “loves the dark”
- Uses left and right light intensity as stimulus for the same side wheel
- Implementation adds obstacle inhibition of forward motion for vehicle protection
- (Does not use TTS)
- teach_me_colors.py
- Allows adding or re-learning one or more colors
- Outputs to config_easypicamsensor.json.new
- (Copy to config_easypicamsensor.json for use)
- delete_a_color.py
- Allows testing and easily deleting a poor performing color
- Outputs to config_easypicamsensor.json.new file
- (Copy to config_easypicamsensor.json for use)
Credits
- Color sensing code based on work of Nicole Parrot
https://github.com/CleoQc/GoPiGoColorDetection - Motion / Gesture Detection based on the work of Dave Jones at https://github.com/waveform80/picamera_demos
DISCLAIMER
First, Thank you for trying my EasyPiCamSensor.
There are certainly more elegant ways of doing this.
This is the best I could do with my limited understanding of Python and the Pi Camera.
This code comes with no warranty of correct function.
If you think it should do something it doesn’t,
or shouldn’t do something it does,
you should know this was a learning experience for me,
It is not a product. I am not interested in maintaining it for you!
No connection to DexterIndustries or ModRobotics. Do Not Ask Them For Support!
If you know how to make it better, create a pull request.
Perhaps I will learn how to merge other people’s code.
- I should probably have investigated http://www.brucelindbloom.com/index.html?ColorDifferenceCalcHelp.html
for a better color distance calculation.


