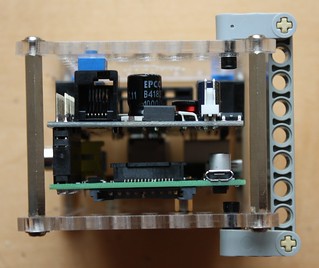
I noticed that while the holes in the acrylic cover are correctly sized to lego dimensions, the height of the complete case isn’t.
I built a robot with the brickpi case on its side (seemed like a good idea at the time), and when I came to put a bar across the two halves, it didn’t line up. By my reckoning, the posts need to be reduced by about 3mm to make it all line up in all dimensions.
Has anyone else noticed this and tried to resolve it? If I cut down the posts to the right length, will the screws still go all the way in?
Hi,
I just received my brick pi and I am very excited! It is really very nice… much more powerful then the NXT etc. But I had some disappointment with the case:
as noticed, the height is not standard
the brick pi is only held by the GPIOs and is loose: with time it may damage them
the height of the plates is not standard (8.0mm), which makes the friction pins a bit loose
the size of the lego holes is not very precise (a tiny bit to small, so it is very hard to push the friction pins in, and nearly impossible to push the basic lego brick studs in)
what am I supposed to do with the battery?!
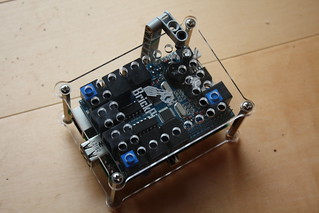
For first problem, I measured the height of the box (please confirm it, I just did it with a ruler, a caliper would be better!):
a plate is 3.75mm tall
the rods are 50.0 mm tall
This is a total of 57.5mm and as lego studs are 8mm, the height should be 8*7=56.0mm.
We also need to take into account that friction pins have a little stop in the middle, of height 0.8mm on each half. This stop normally goes into lego holes because they are larger at the ends, which is not the case with this case!
Result: (57.5 + 2*0.8) - 56.0 = 3.1mm needs to be cut
The thread in the rod holes went pretty deep so I asked my dad cut the rods and everything is fine (after some trial/error adjustment).
For the second problem I put three 1x1 plates on the top of sensor 5, motor 1 and motor 4 to stop the brick pi from moving upwards (downwards it is blocked by the double USB and the RJ45 ports of my raspberry pi).
Nice work! I’ve had some success on the other aspects you mention by using sugru. I will blog about these hacks properly at some point, but here are some pics I put on Twitter:
For the short term, we’re trying to work with our supplier to supply some shorter hex posts. I think this will allow a LEGO-multiple for the case. Great point. For the longer term, we’re trying our hand at 3-d printing a few prototypes right now of a more complete case. Ya’ll will be the first to see about our sucesses and failures!
Sugru seems great, I didn’t knew it before, but it looks pretty funny!
For the battery pack it is a great idea, but I wouldn’t do it to hold the BrickPi and the RaspberryPi because it is irreversible…
I discovered a new thing that bugs me: the screw that hold the RaspberryPi at the bottom (as well as all the other screws, but it’s less annoying) don’t have flat countersunk heads and prevent us from attaching bricks in some places.
So I am currently thinking about designing and building a better BrickPi case (at least from my point of view, because I don’t see any other people criticizing the original one!). I am not sure what material to use: drilled polycarbonate like the original or 3d-printing (I have to check the prices).
I will start a new topic if this project becomes concrete.

 and everything is fine (after some trial/error adjustment).