I also want to include some background monitoring tasks for things like battery voltage, Pi voltage, and perhaps other useful data on a serial LCD display I have.
Where do I get the SSH file from? Is it hidden in another directory or do I scrounge a Raspbian image for it.
Just create a new file named “ssh”
Just “touch” SSH? It’s that simple?
Yeah that’s pretty much what you have to do.
ssh
I think it is case sensitive, but not positive.
Oops! You’re right.
(Add extra characters to make the message long enough to post.)
Sorry to jump in a little late, but let’s go back to the beginning of the issue. If your batteries are lasting less than 1 hour, unless the motors are running hard, there’s something wrong. In my experience, with the motors turned off, a GPG3 should be powered adequately for at least 4 to 6 hours on a good set of batteries (tested to be around 8 hours on 8xAA 2000mAh batteries). That would be with the RPi booted and connected to the network (Ethernet and/or WiFi), but with the RPi CPU nearly idle and the GPG3 doing nothing (“programming” time).
I just measured a GPG3 with RPi 3 on my desk. Once booted and sitting idle (connected to Ethernet), the current draw at 8v is about 330ma, and at 9.6v is about 280ma, and at 12v is about 230ma (roughly 2.7W at all three voltages). It seems an average (quality) Alkaline cell (2500-2800mAh rating) should provide around 3.5 to 4 Wh, and it looks like an average (quality) NiMh cell (2000-2800mAh rating) should provide around 2.3 to 2.6 Wh. 3.5Wh (Alkaline) * 8 cells / 2.7 W = roughly 10.3 hours of idle runtime (theoretical). 2.3Wh (NiMh) * 8 cells / 2.7 W = roughly 6.8 hours of idle runtime (theoretical).
If your runtimes are significantly shorter than these numbers, here are some things I would recommend investigating:
- Are you using quality batteries that are actually performing as you expect they should? If you’re using 2000mAh rated batteries, are they actually 1900+ mAh, or are they really only 500mAh?
- You mentioned you’re using a servo. Are you certain you aren’t attempting to run it past it’s mechanical limits? If you attempt to run a servo to a position it’s not physically able to reach, it will stall and draw an enormous amount of current (and typically it will get hot).
- Like servos, if you attempt to run motors when they are stalled, they will draw a lot of current. Make sure if you are applying power to the drive motors, that you aren’t physically preventing them from running (don’t apply 50-100% power and grab the wheel so it can’t turn).
- Are there other hardware devices connected that are drawing current? Keyboard, mouse, WiFi dongle, Grove sensors, etc.?
If you can measure the current draw of the GPG3 with RPi3, that could help to determine if the robot or the batteries are at fault for your short runtimes.
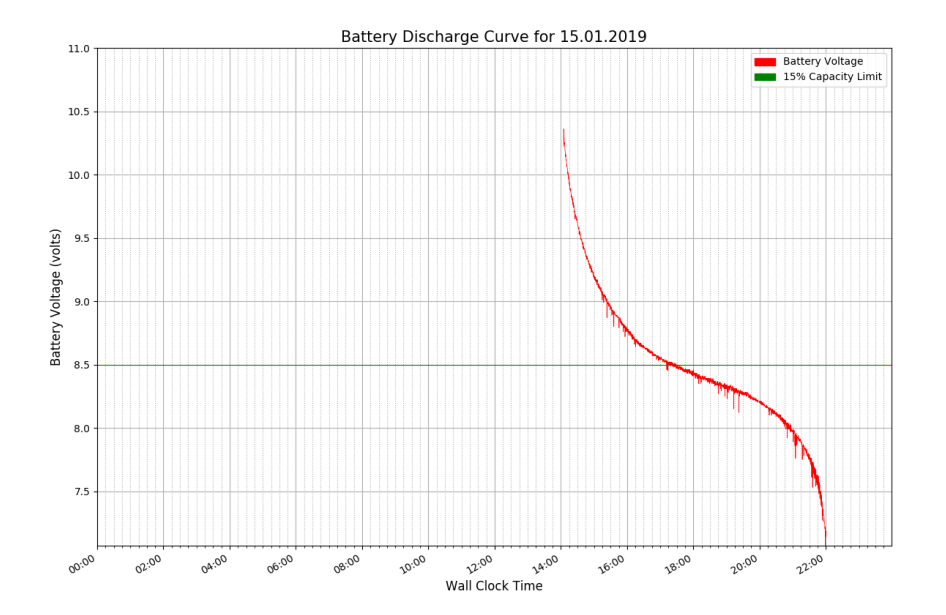
Here is a plot for my 8 NiMH 2800mAh AA cell pack of GoPiGo3 and Pi3B (not B+) running only “log EasyGoPiGo3.volt() to file every 12 seconds”, and an ssh session tailing the log file.
(Matt’s estimate: 2.6Wh * 8 / 2.7 = 7.7 hours - my test ran 8 hours to the “yellow light” and soon after “red and dead”.)
1 Like
Thank you for this very interesting information. I will try to check current draw.
Re: servos.
If I define “beyond mechanical limits” as driving them to the point of buzzing against the stops, it appears that the “mechanical limits” range from about 5 to 175 degrees. Is this normal?
I do not, under any circumstances, drive the motors stalled.
I will check the capacity of the batteries. I went out yesterday and bought eight 2500 mAh NiMH batteries that are charging even as we speak.
The alkaline batteries I purchased were the absolute best name-brand “high endurance” batteries I could find. Of course, “high capacity” is a relative term. 
Regarding servos, yes, a usable range of 5-175 is normal. In reality servos are all different, and a scaled range of 0-180 is very relative.
If you’re not familiar with servos, let me try to explain. Most servos (“RC” style) use a PWM signal to define the desired position. The signal is typically around 50-60Hz. A 1500uS (1.5ms) pulse is the “center” position, at which the servo should be relatively centered. To go to one extreme, you might send a 750uS pulse, and to go to the other you might send a 2250uS pulse. However, the pulse range is not the same for all servos (or even two nearly-identical servos), so realistically 780uS might be the limit on one side, and 2310uS might be the limit on the other side. I’ve used servos that work with a 500uS pulse, and others that physically can’t go beyond a 650uS pulse.
In attempt to simplify the pulse width issue, our software provides methods for a user to simply specify a desired position from 0-180 degrees. In reality the software is just scaling that range of 0-180 to a somewhat arbitrary range that through testing has proven to be suitable for most applications. In this case, the range of 575-2425 was chosen. It’s a range of 1850, centered at 1500, defined here.
As a result of all of this, using the range of 0-180 could result in a servo that only rotates from 10-175 degrees. Another possibility is that a range of 15-170 results in a servo that actually rotates from -3 to 185 degrees (a “180 degree” servo might actually have a slightly wider range of motion). In the first example, the full potential of the servo was not being realized, as it would never receive a signal to make it go to 0 or 180 degrees. In the second example, the servo would easily reach it’s mechanical limits and stall out if you told it to go to “0 degrees” or “180 degrees” (drawing a lot of current and probably getting warm).
The best option is to calibrate the range of motion for each individual servo you are using. Use set_servo to set the servo pulse width in uS. Find the mechanical limits of your servo by slowly adjusting the pulse width until the servo reaches it’s end, and then do the same at the other extreme. Since the servo probably has a range closer to 190 degrees, you can alternatively determine where you want the limits to be (physically 180 degrees apart), and determine the signals at the end points. Once you have the two limits or end points, you can create an equation that scales 0-180 to the two pulse lengths, and then you will have calibrated servo control.
1 Like
Save yourself future disappointment about turn accuracy, by mounting the pack on the GoPiGo3 top plate. There are two slots for the very nasty red strap to go through up there. Turns, with top mounted battery pack, are quite accurate and consistent.
Re: Alkaline batteries.
When I got back home today I checked every stinkin’ alkaline battery I have, and not a single one, (be they Energizer, Duracell, Polaroid, or any other known brand), had any mention whatsoever about capacity.
I am forced to assume that if they’re hiding it, there must be a good reason.
Even the Energizer NiMH "pre-charged batteries I bought are carefully arranged so that the capacity isn’t visible and it’s not marked on the package.
On the other hand, the “Chinese copy” batteries had the capacity marked on the batteries in big letters and the packaging was so obvious that Stevie Wonder could see it!
Makes you wonder. . . .
A word of caution from experience, don’t trust the capacity rating unless it’s name-brand and you know it’s not a knock-off. I’ve tested “2500mah” batteries to be merely 500mah or so (brand new, not abused).
I don’t think I’ve ever seen a mah rating listed on Alkaline batteries. Typically I just search Google to get a good idea of capacity for a specific battery.
Matt,
I hate to sound cynical, but everything is a Chinese knock-off these days.
Eveready and Duracell used to be the Gold Standard for batteries. Nowadays, their build quality has fallen off to the point where about 3 to 6 months use in a low-drain application, (an LCD wall clock), and they leak like sieves. I’ve never had the problems with batteries that I’ve had over the last two-or-so years - and these batteries were bought in the US and brought over.
- What is “Jupyter Lab”?
- Is there a more privileged user than “jupyter” that I can use to login to the 'bot (hopefully with sudoers) that I can use for heavier lifting?
Update:
This post says that there is no login - jupyter works but is very limited.
Hopefully there is another user that I can use?
Second update: (this is beginning to sound like some tax software I worked on a while back!)
I tried the brute-force technique.
- I manually added the jupyter user to the sudoers file.
- I logged in as jupyter and then sudo’d to root.
- I tried to “adduser” a user for myself with my own username and credentials - unfortunately the “passwd” command had been cleverly removed.
- Poking around, I discovered that, aside from the plethora of usual suspects (users) installed by the system, there was a “pi” user along with the jupyter user.
After hacking the thing to death, I decided that I was making no progress at all except for raising my blood-pressure, so I bailed.
Also, “just in case”, I totally re-flashed the SD card with a shiny new image of DexterOS 2.2.2, so that I would be using a non-trashed system. (I also dropped in a “ssh” file as you suggested).
I would still like to be able to login - either via keyboard and monitor or via SSH - as something other than jupyter.
Can do?
Thanks!
Jim “JR”
Hi @jimrh,
What is “Jupyter Lab”?
You can follow these links here to show you what JupyterLab is:
-
https://medium.com/@brianray_7981/jupyterlab-first-impressions-e6d70d8a175d
-
https://jupyterlab.readthedocs.io/en/stable/getting_started/overview.html
JupyterLab (formerly known as simply Jupyter) is a wildly popular platform on which you can build your own narrative in natural language and code. It centers around the idea that you have a Jupyter Notebook in which you start writing code and add descriptions/whatnot in Markdown format. It’s a very powerful tool.
Is there a more privileged user than “jupyter” that I can use to login to the 'bot (hopefully with sudoers) that I can use for heavier lifting?
Nope, there’s not. You can do pretty much everything with this user. What are you actually looking to do with it? If you really want more control, you can use Raspbian For Robots/Raspbian. That’s gonna give you full access to the system.
To make it clear, we didn’t develop it as something that should show everything to the user. For what it’s worth, the pi user should be unreachable to anyone but us. Another reason we sandboxed it is to prevent the user from getting confused by going into directories he shouldn’t be - it’s a programming environment and not a full system environment.
Thank you!
DexterOS is not meant to give the user full control over the robot. It’s a sandbox that offers a curated programming environment.
For the user who wants full control, there’s Raspbian for Robots. That one is wide open and you can do all you want with it.
Cleo
Update:
I did just that and the NiMH batteries I have installed seem to be working wonderfully. The original set I bought came with a charger that wasn’t very smart - so I tossed it. Another set of batteries and two matching smart-chargers later, I seem to be good-to-go!
Corollary update:
I believe I have found the reason for my 'bot’s random stalling which lead me to believe that the batteries were the problem. This also may be the reason for the, (apparently), shorter than normal run-times.
- I do not know, (but I strongly suspect), that the GoPiGo3 board’s firmware uses the encoders on the wheels to detect a “stall” or “jam” state for one or both wheels and - if detected - it shuts off the motor drivers to prevent damage to the motors or board due to excessive current. Unfortunately, it fails silently, without reporting anything back to the running process. Result: A suddenly un-responsive 'bot and no clue as to what stopped it.
Data points that lead me to this conclusion:
-
I could recreate the failure at-will by holding the 'bot while it’s running and using my fingers to provide a bit of a load to one of the wheels. Not to the point of stopping it, but to the point where the motors had to do more work than just spin - ergo one wheel was moving a tad more slowly that another.
-
Closer examination of the 'bot disclosed that one of the acrylic plastic hub spacers for the wheels had vanished, was not installed, and that wheel was lightly rubbing against a protruding screw and nut, providing additional friction.
Relieving the friction by moving the wheel further out on the motor shaft appears to have solved the problem.
As a consequence, I have been able to run the 'bot nearly every day for five to ten minutes (or more), along with non-mobile programming time, and am only down to about 9v on the first set of batteries. Both the 'bot and I couldn’t be happier if we’d won the lottery! (Correct that: Winning the lottery would please me just fine.)
Been there, done that, bought the tee-shirt.
I tried that and noticed that any time my 'bot made a sudden stop it would fall forward on it’s nose. (For example, there are certain parts of “hardware test” that cause a sudden stop.)
As a result, I relocated the batteries back to the rear of the 'bot to provide a better weight distribution and make it more stable if stopped suddenly.
As far as turning accuracy is concerned, I saw a picture of a 'bot somewhere with what appeared to be big, wide rubber-bands wrapped around the two driving wheels. Something like that would help, though the wheels and tires on the GoPiGo are plenty “sticky”, (provide enough friction), for just about any surface other than a freshly waxed bowling alley. The micro:bot on the other hand has hard plastic wheels that slide like Teflon on just about anything. I ended up wrapping double-sided tape around them so that I could control the 'bot’s movements.
Thanks to all of you, I am being given a “crash”, (bad pun!), course in robotics and programming for the beasties which I appreciate more than you can possibly imagine.
Thanks!
Jim “JR”
I am quite sure that a future pursuit of location and attitude modeling will either see you recalculating the weight and balance for better command accuracy, or adding the IMU for better measurement accuracy.
Carl has a slightly rear of center CofG, and “knows” that smooth acceleration and deceleration contributes to accuracy and prevent heart stopping near falls via a separate speed control task. (His wt distribution prevents a face-plant event at max fwd speed, but an uncontrolled emergency stop does cause a brief rear wheel lift.)